以前公開した記事では、PythonのWebアプリケーションフレームワーク「Django」の導入方法や、Web APIの作成方法をご紹介しました。
今回は弊社が提供するJavaScript開発ライブラリ「Wijmo(ウィジモ)」のデータグリッドコントロール「FlexGrid」をDjangoに組み込んで、CRUD処理を行うアプリケーションを作成してみたいと思います。
クライアントアプリの作成
前回の記事で作成したプロジェクトで、以下のコマンドを実行しクライアントアプリを追加します。
> python manage.py startapp clientapp次にプロジェクト側の設定ファイル(testproject/settings.py)の「INSTALLED_APPS」にclientappを追加します。
・・・
(中略)
・・・
INSTALLED_APPS = [
    'django.contrib.admin',
    'django.contrib.auth',
    'django.contrib.admin',
    'django.contrib.auth',
    'django.contrib.contenttypes',
    'django.contrib.sessions',
    'django.contrib.messages',
    'django.contrib.staticfiles',
    'apiapp',
    'rest_framework',
    #clientappを追加
    'clientapp'
]
次に、WijmoのJavaScriptファイルやCSSファイルなどの静的ファイルを配置します。静的ファイルの配置場所はプロジェクト側の設定ファイル(testproject/settings.py)の「STATIC_URL」の項目で設定することができます。デフォルト値は以下のようになっているので、このまま使用します。
・・・
(中略)
・・・
STATIC_URL = '/static/'
すべての使用可能な設定は公式のドキュメントに詳しく記載されているので、こちらをご覧ください。
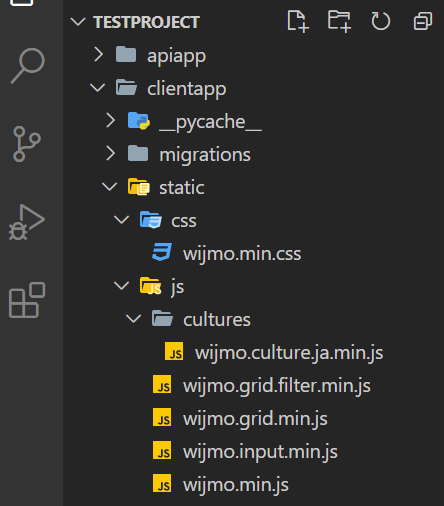
「clientapp」フォルダ内に新たに「static」フォルダを作成し、さらにその配下に「js」フォルダと「css」フォルダを作成し、Wijmoのjsファイルとcssファイルを以下のように配置します。
- static/css/wijmo.min.css
- static/js/wijmo.min.js
- static/js/wijmo.input.min.js
- static/js/wijmo.grid.min.js
- static/js/wijmo.grid.filter.min.js
- static/js/cultures/wijmo.culture.ja.min.js

次に、「clientapp」フォルダ内に新たに「templates」フォルダを作成し、さらにその中にてグリッドを表示させるhtmlファイルとして、「index.html」を作成します。ここではWijmoのhttpRequestメソッドでAPIをコールしています。
<!DOCTYPE html>
{% load static %}
<html>
<head>
    <title></title>
    <meta charset="utf-8" />
    <!-- styles -->
    <link href="{% static 'css/wijmo.min.css' %}" rel="stylesheet" >

    <script src="{% static 'js/wijmo.min.js' %}"></script>
    <script src="{% static 'js/wijmo.input.min.js' %}"></script>
    <script src="{% static 'js/wijmo.grid.min.js' %}"></script>
    <script src="{% static 'js/wijmo.grid.filter.min.js' %}"></script>
    <script src="{% static 'js/cultures/wijmo.culture.ja.min.js' %}"></script>

    <style>
        .grid {
            height: 250px;
        }
    </style>
</head>

<body>
    <div id="flexGrid"></div>
    <button id="btn">データを更新する</button>

    <script>
        const url = 'http://127.0.0.1:8000/api/griditem/';

        var cv = new wijmo.collections.CollectionView(null, {
            trackChanges: true
        });

        var flexGrid = new wijmo.grid.FlexGrid('#flexGrid', {
            itemsSource: cv,
            allowAddNew: true,
            allowDelete: true,
            autoGenerateColumns: false,
            columns: [
                { binding: 'product', header: '商品名', width: 200 },
                { binding: 'date', header: '受注日', format: 'yyyy-mm-dd', },
                { binding: 'amount', header: '受注数', width: 80 },
            ]
        });

        // read
        wijmo.httpRequest(url, {
            data: {
                '$format': 'json',
            },
            success: function (xhr) {
                cv.sourceCollection = JSON.parse(xhr.responseText)
            },
            error: function (xhr) {
                window.alert('データを読み込めませんでした')
            }
        });

        document.getElementById('btn').addEventListener('click', function () {
            //update
            for (var i = 0; i < cv.itemsEdited.length; i++) {
                wijmo.httpRequest(url + cv.itemsEdited[i].id + '/', {
                    method: 'PUT',
                    data: cv.itemsEdited[i],
                    error: function (xhr) {
                        console.log(xhr)
                    }
                });
            }

            //create
            for (var i = 0; i < cv.itemsAdded.length; i++) {
                wijmo.httpRequest(url, {
                    method: 'POST',
                    data: cv.itemsAdded[i],
                    error: function (xhr) {
                        console.log(xhr)
                    }
                });
            }

            //delete
            for (var i = 0; i < cv.itemsRemoved.length; i++) {
                wijmo.httpRequest(url + cv.itemsRemoved[i].id + '/', {
                    method: 'DELETE',
                    error: function (xhr) {
                        console.log(xhr)
                    }
                });
            }
        })
    </script>
</body>

</html>
Djangoのテンプレート上で静的なファイルを読み込むために、ファイルの上部に以下のように{% load static %}テンプレートタグを追加しています。
{% load static %}また、以下のように{% static %} テンプレートタグを使用して、JSファイルやCSSファイルのパスを指定しています。
<link href="{% static 'css/wijmo.min.css' %}" rel="stylesheet" >

<script src="{% static 'js/wijmo.min.js' %}"></script>
次にクライアントアプリ側のurlの設定を行います。
今回は「http://127.0.0.1:8000/grid/」が要求された場合に、先ほどのhtmlを表示するように「clientapp/views.py」を以下のように修正します。
from django.shortcuts import render

def index(request):
    return render(request, 'index.html')
さらに「clientapp」フォルダ配下に「urls.py」ファイルを追加し、以下のように設定します。
from django.urls import path
from . import views

urlpatterns = [
    path('', views.index, name='index'),
]
最後にプロジェクト側のURL設定ファイル(testproject/urls.py)にクライアントアプリのURLを追加します。
・・・
(中略)
・・・
urlpatterns = [
    path('admin/', admin.site.urls),
    path('api/', include(apiapp_router.urls)),
    #以下を追加
    path('grid/', include('clientapp.urls')),
]
以上で設定は完了です。これでアプリケーション実行中に「http://127.0.0.1:8000/grid」が要求された場合に「clientapp/views.py」ファイルのindexが参照され、「templates」フォルダに追加した「index.html」が読み込まれるようになります。
実行結果
以下のコマンドを実行してアプリケーションを起動します。
python manage.py runserver参照(Read)
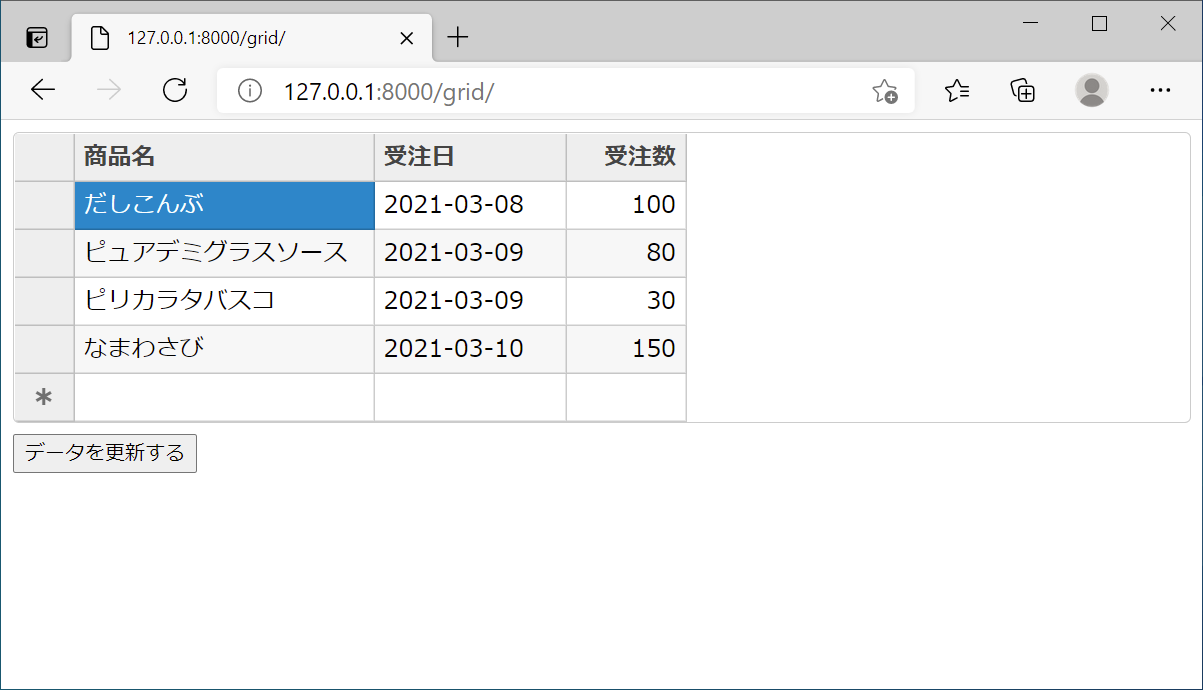
「http://127.0.0.1:8000/grid」にアクセスすると、以下のようにWijmoのFlexGrid上に前回作成したWeb APIから取得したデータが表示されます。

あとはグリッド上のデータを更新、あるいはレコードを追加・削除し、[データを更新する]ボタンをクリックすると、データベースに変更を反映することができます。
更新(Update)
登録(Create)
削除(Delete)
さいごに
以上がPythonのWebアプリケーションフレームワーク「Django」でWijmoを使用する方法でした。バックエンドの環境に関わらず、様々なWebアプリケーションで使用できるのがJavaScript開発ライブラリであるWijmoの魅力になります。
Webサイトでは製品の機能を手軽に体験できるデモアプリケーションやトライアル版も公開しておりますので、こちらもご確認ください。
また、ご導入前の製品に関するご相談、ご導入後の各種サービスに関するご質問など、お気軽にお問合せください。
