今回はAzure Container AppsのコンテナーアプリとしてデプロイしたBlazor ServerアプリからWeb APIを呼び出す方法についてお届けします。
Azure Container Appsとは?
「Azure Container Apps」は今年の「Microsoft Build 2022」でGAになった、Azureでコンテナー化されたアプリケーションをホストする新しいサービスです。
Azure Container Apps を使用すると、サーバーレス プラットフォームでマイクロサービスとコンテナー化されたアプリケーションを実行できます。 Container Appsを使用すると、クラウドインフラストラクチャや複雑なコンテナーオーケストレーターを手動で管理する必要がなくなり、コンテナーを実行するメリットが得られます。
https://docs.microsoft.com/ja-jp/azure/container-apps/overview
本記事では、ローカルの開発環境でVisual Studio 2022を使用してBlazor ServerアプリケーションとASP.NET Core Web APIアプリケーションを作成し、コンテナーアプリとしてそれぞれAzure Container Appsにデプロイして動作を確認してみます。
ASP.NET Core Web APIアプリケーションの作成
Web APIの内容
以下の公式ドキュメントで紹介されている「アルバム API」を参考にASP.NET Core Web APIアプリケーションを作成します。
このアルバム APIは以下のリポジトリで公開されています。
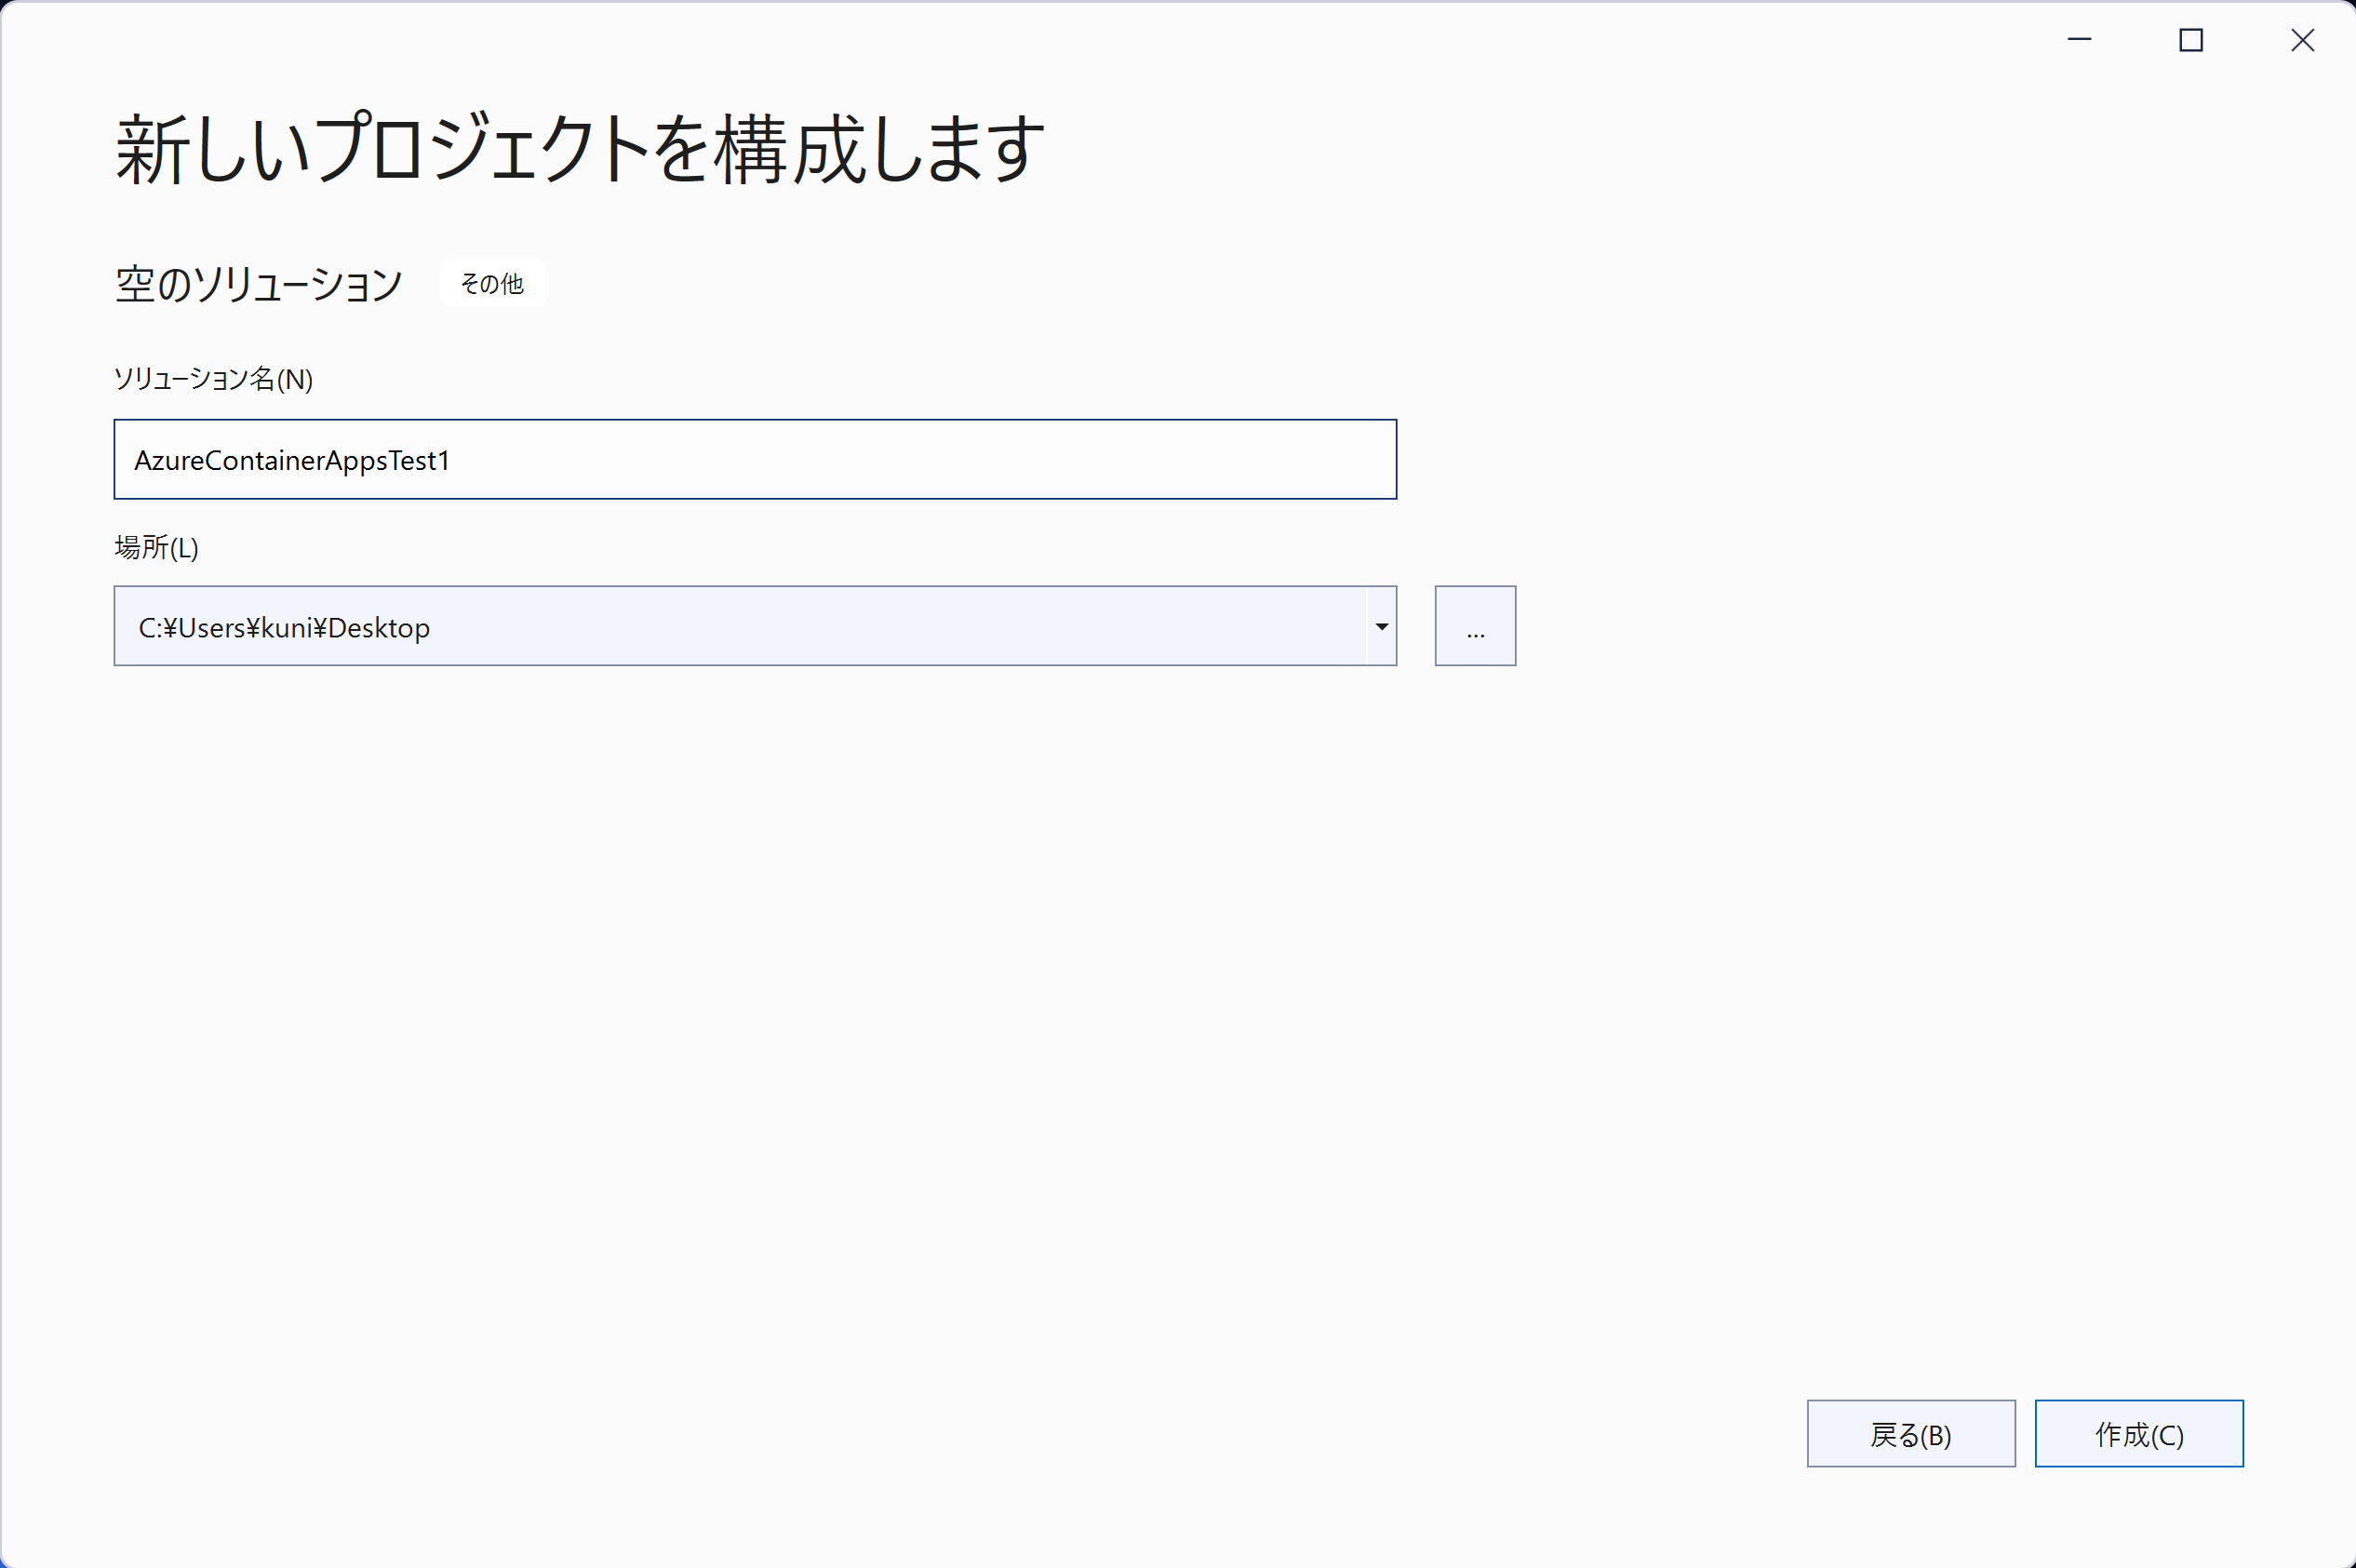
ソリューション「AzureContainerAppsTest1」の作成
はじめにVisual Studio 2022でBlazor ServerとASP.NET Core Web APIのプロジェクトを追加するためのソリューション「AzureContainerAppsTest1」を準備しておきます。
ASP.NET Core Web APIアプリケーションの追加
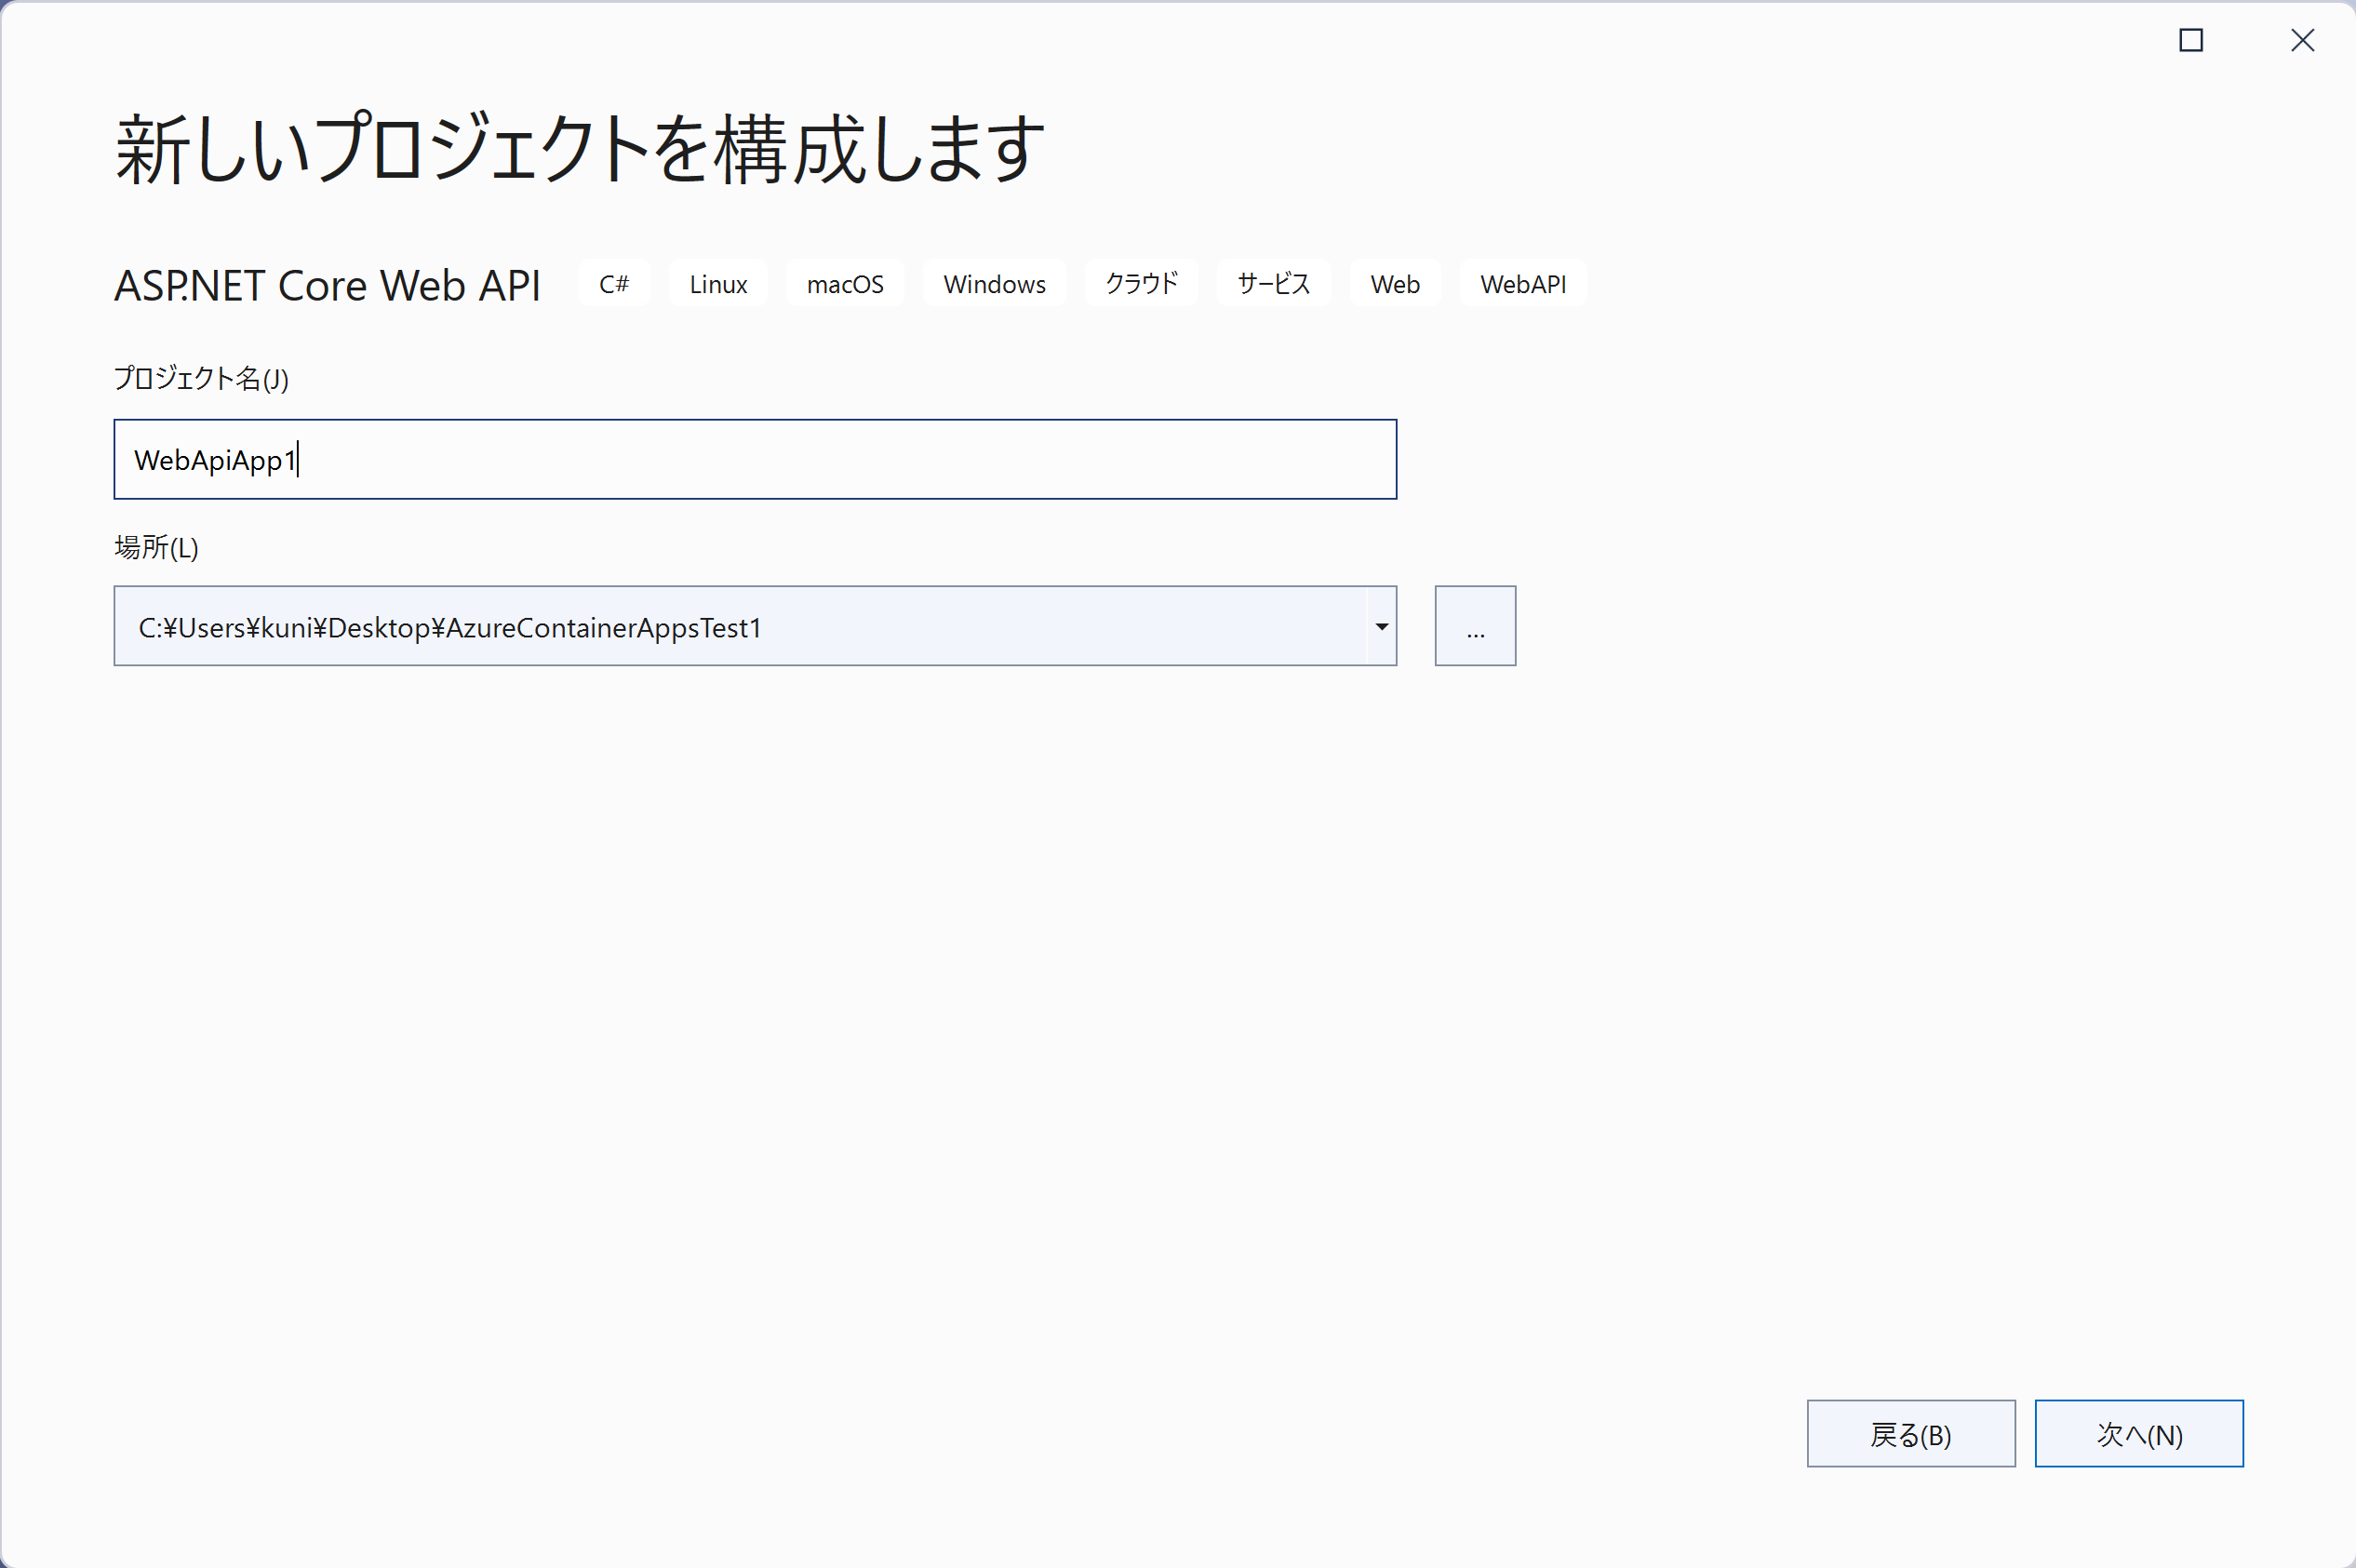
作成したソリューション「AzureContainerAppsTest1」にASP.NET Core Web APIアプリケーションを追加します。プロジェクトテンプレートから「ASP.NET Core Web API」を選択します。プロジェクト名には「WebApiApp1」を設定します。
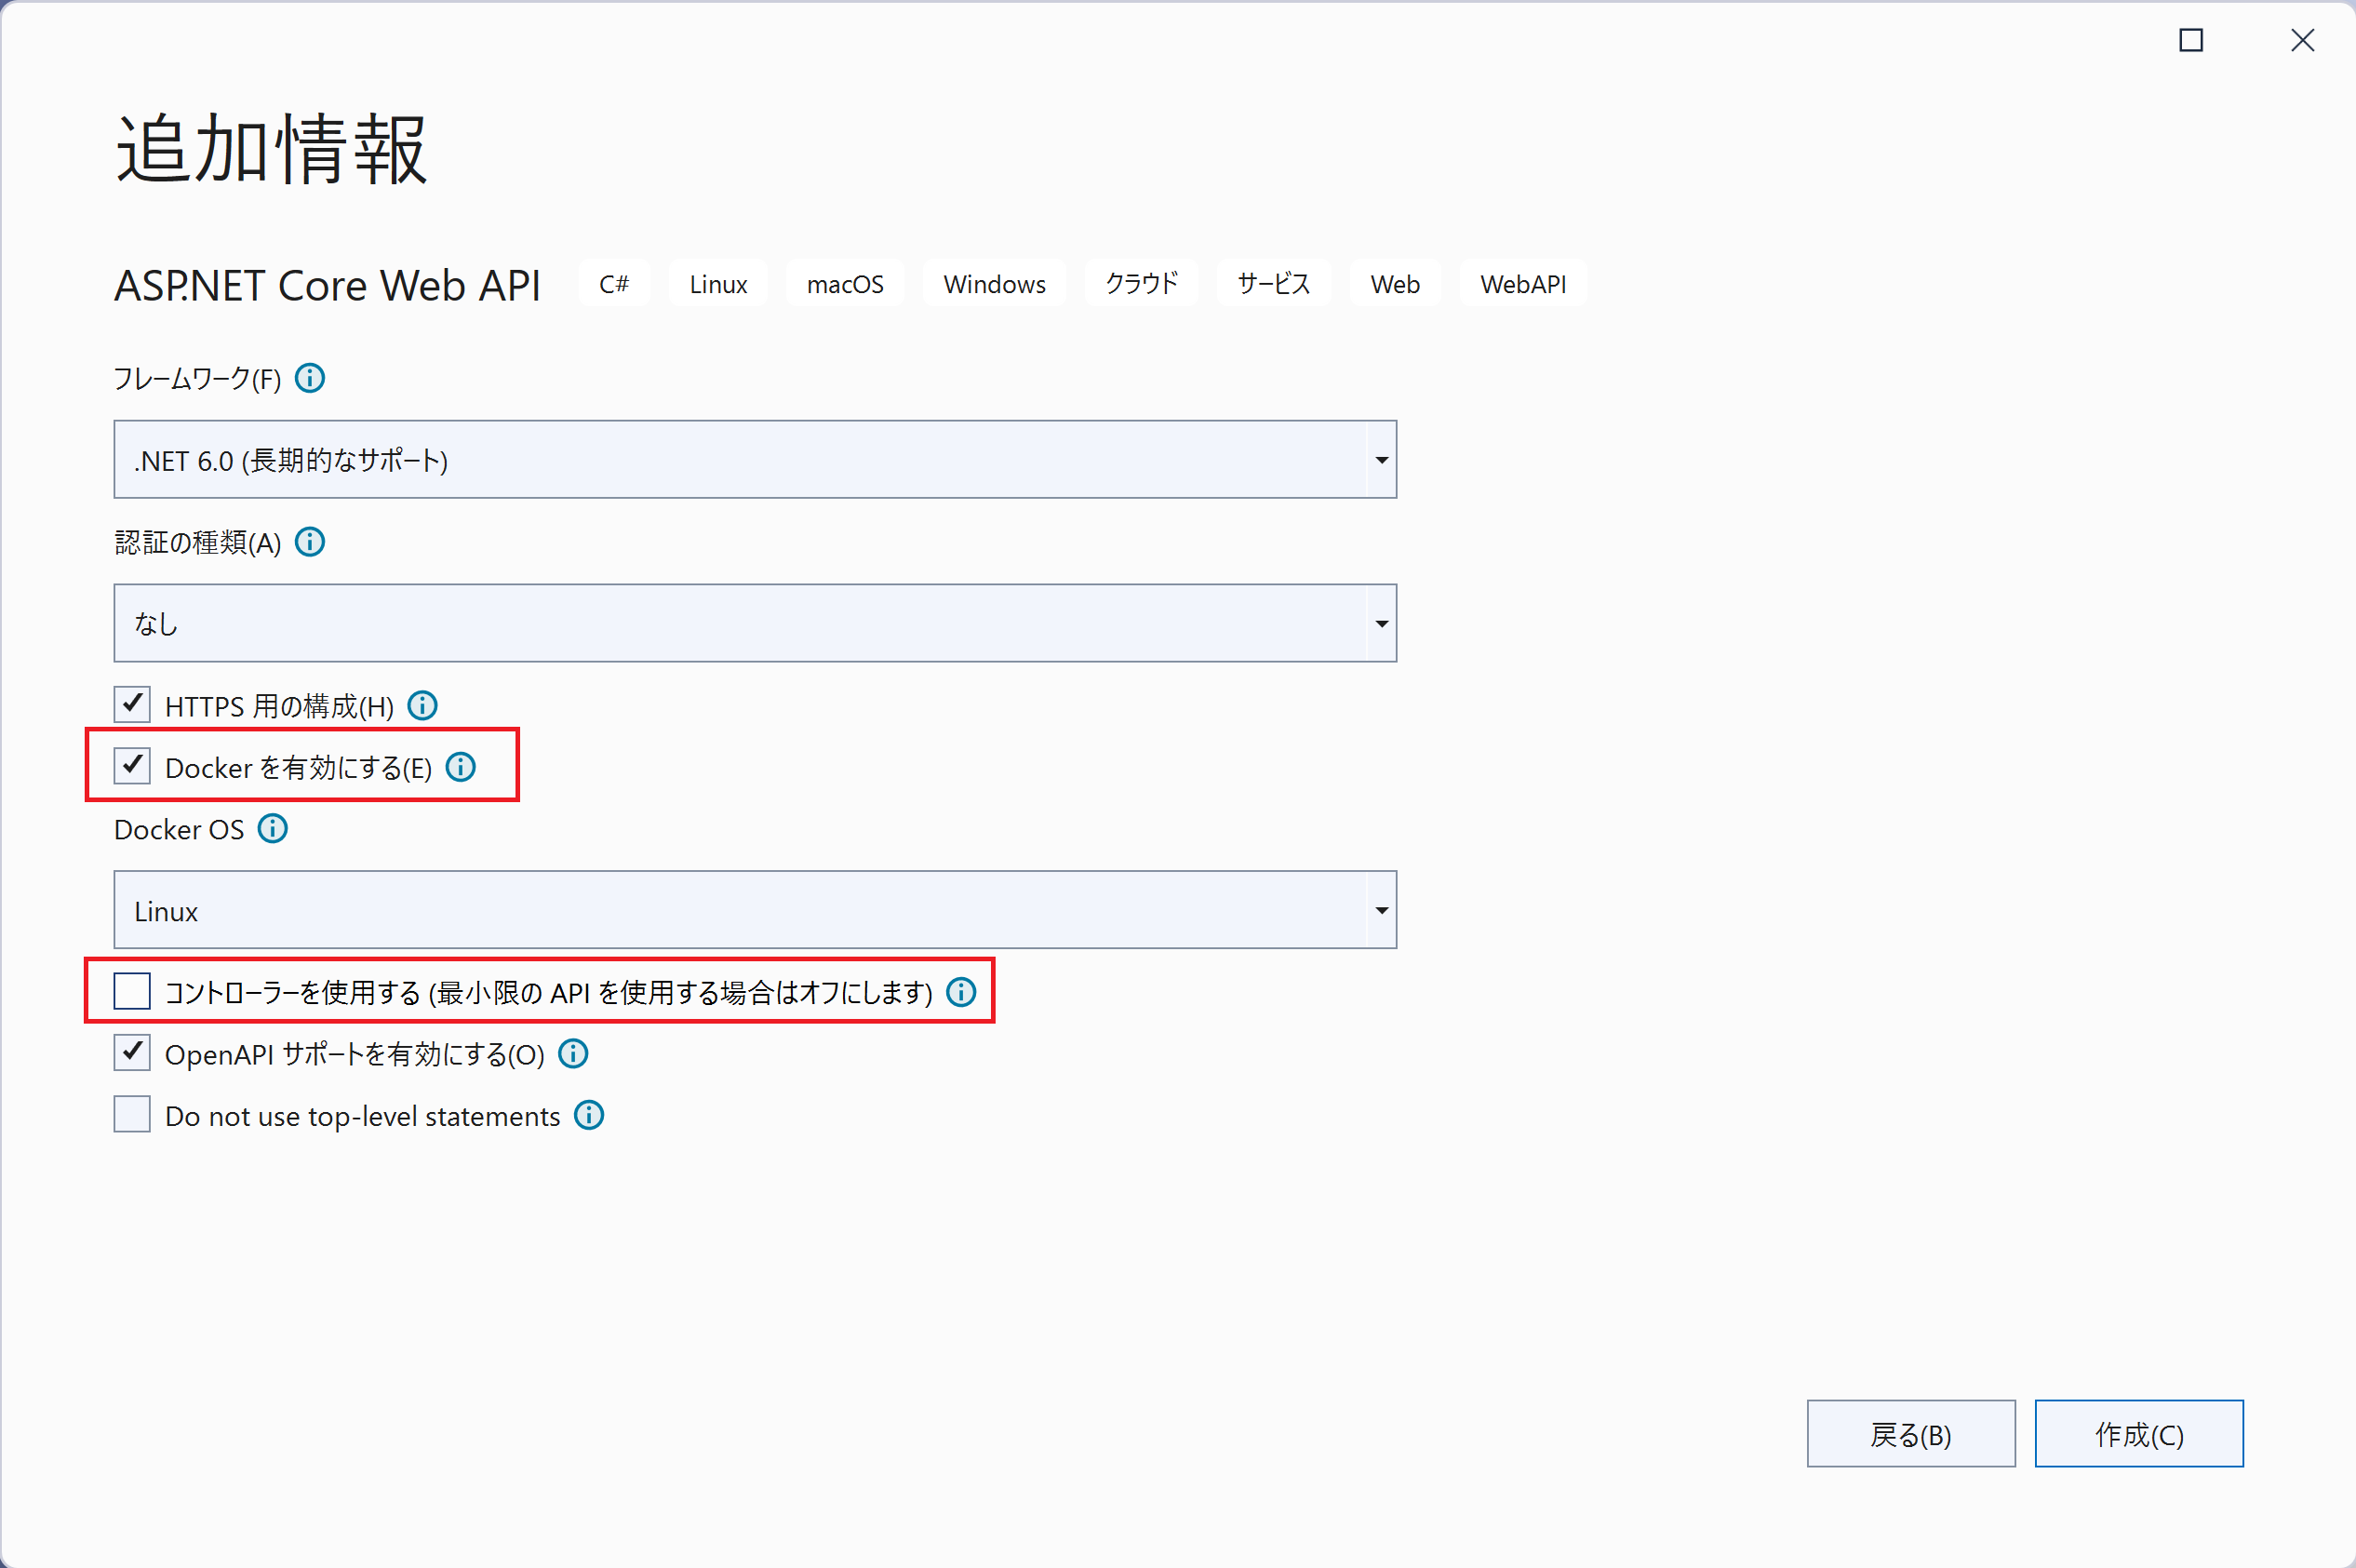
「Docker を有効にする」のチェックをONにして「コントローラーを使用する (最小限の API を使用する場合にはオフにします)」のチェックをOFFにして[作成]をクリックします。
以下のようにProgram.csのコードを更新します。
var builder = WebApplication.CreateBuilder(args);

// Add services to the container.
// Learn more about configuring Swagger/OpenAPI at https://aka.ms/aspnetcore/swashbuckle
builder.Services.AddEndpointsApiExplorer();
builder.Services.AddSwaggerGen();

builder.Services.AddCors(options =>
{
    options.AddDefaultPolicy(builder =>
    {
        builder.AllowAnyOrigin();
        builder.AllowAnyHeader();
        builder.AllowAnyMethod();
    });
});

var app = builder.Build();

// Configure the HTTP request pipeline.
if (app.Environment.IsDevelopment())
{
    app.UseSwagger();
    app.UseSwaggerUI();
}

app.UseCors();

app.MapGet("/", async context =>
{
    await context.Response.WriteAsync("Hit the /albums endpoint to retrieve a list of albums!");
});

app.MapGet("/albums", () =>
{
    return Album.GetAll();
})
.WithName("GetAlbums");

app.Run();

record Album(int Id, string Title, string Artist, double Price, string Image_url)
{
    public static List<Album> GetAll()
    {
        var albums = new List<Album>(){
            new Album(1, "You, Me and an App Id", "Daprize", 10.99, "https://aka.ms/albums-daprlogo"),
            new Album(2, "Seven Revision Army", "The Blue-Green Stripes", 13.99, "https://aka.ms/albums-containerappslogo"),
            new Album(3, "Scale It Up", "KEDA Club", 13.99, "https://aka.ms/albums-kedalogo"),
            new Album(4, "Lost in Translation", "MegaDNS", 12.99,"https://aka.ms/albums-envoylogo"),
            new Album(5, "Lock Down Your Love", "V is for VNET", 12.99, "https://aka.ms/albums-vnetlogo"),
            new Album(6, "Sweet Container O' Mine", "Guns N Probeses", 14.99, "https://aka.ms/albums-containerappslogo")
         };

        return albums;
    }
}
このWeb APIはBlazor Serverアプリから呼び出されるので、8~16、27行目でクロスオリジン要求(CORS)を有効にしています。
Azure Container Appsへデプロイ
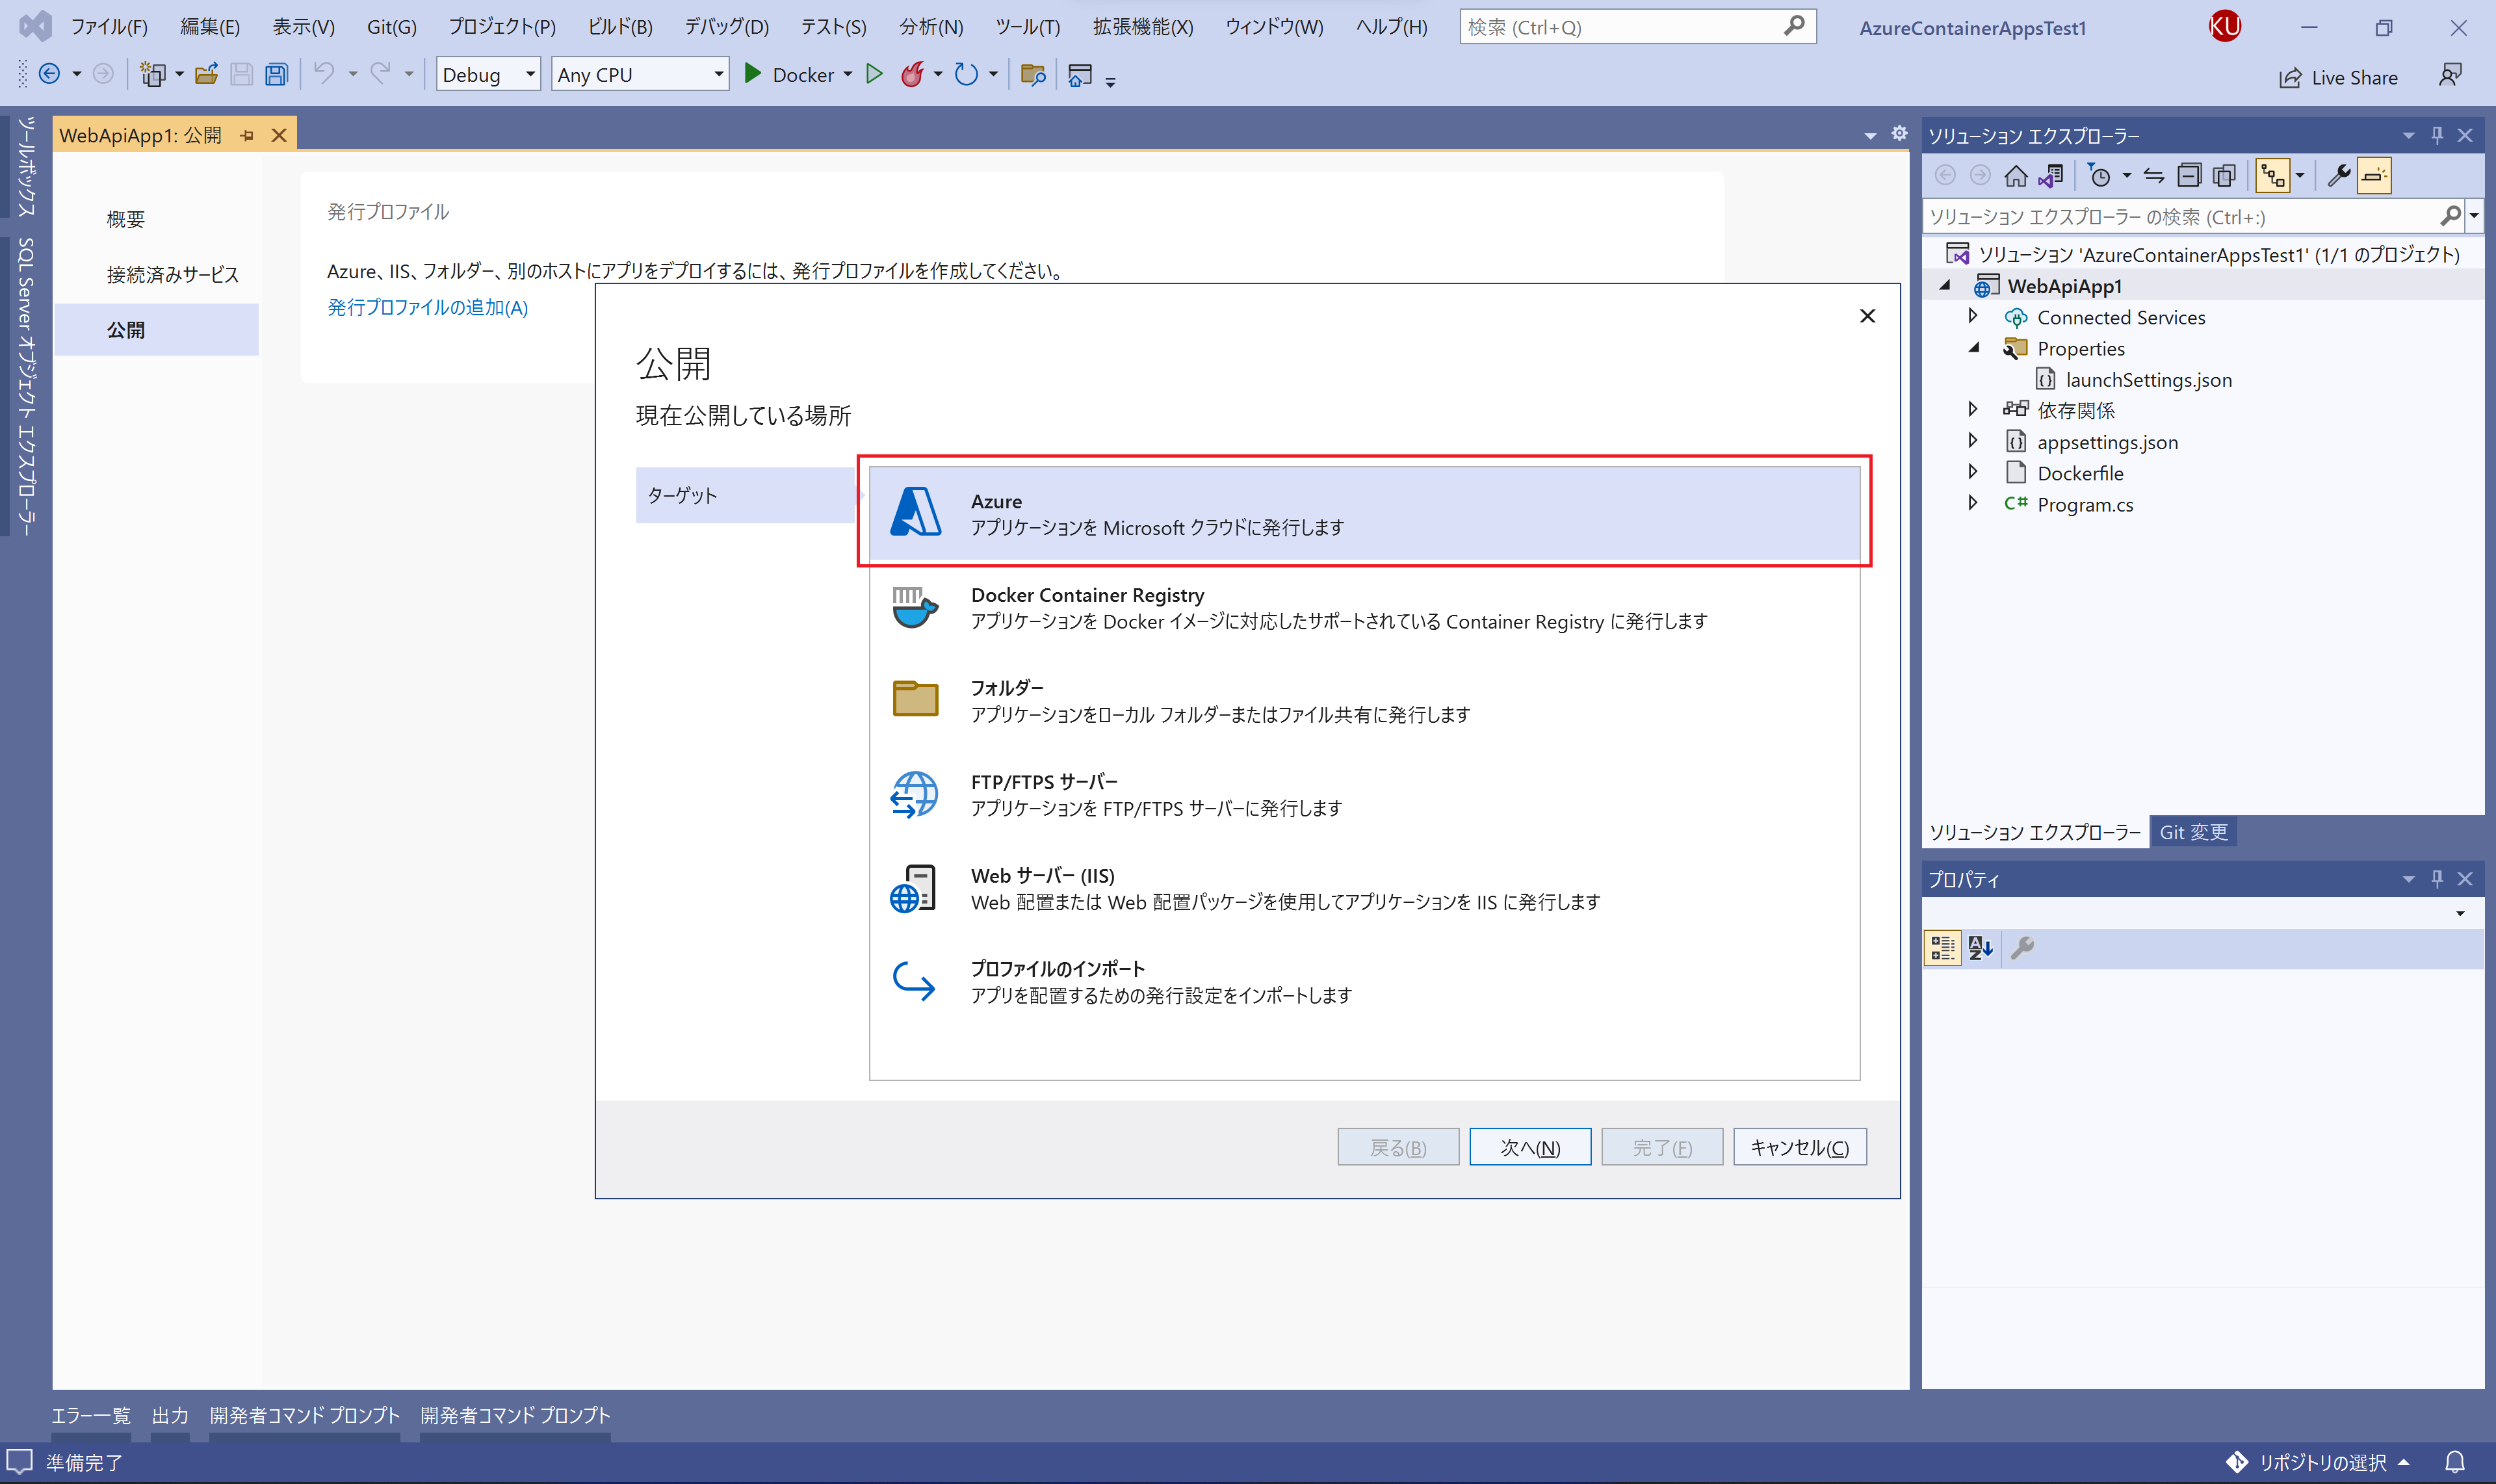
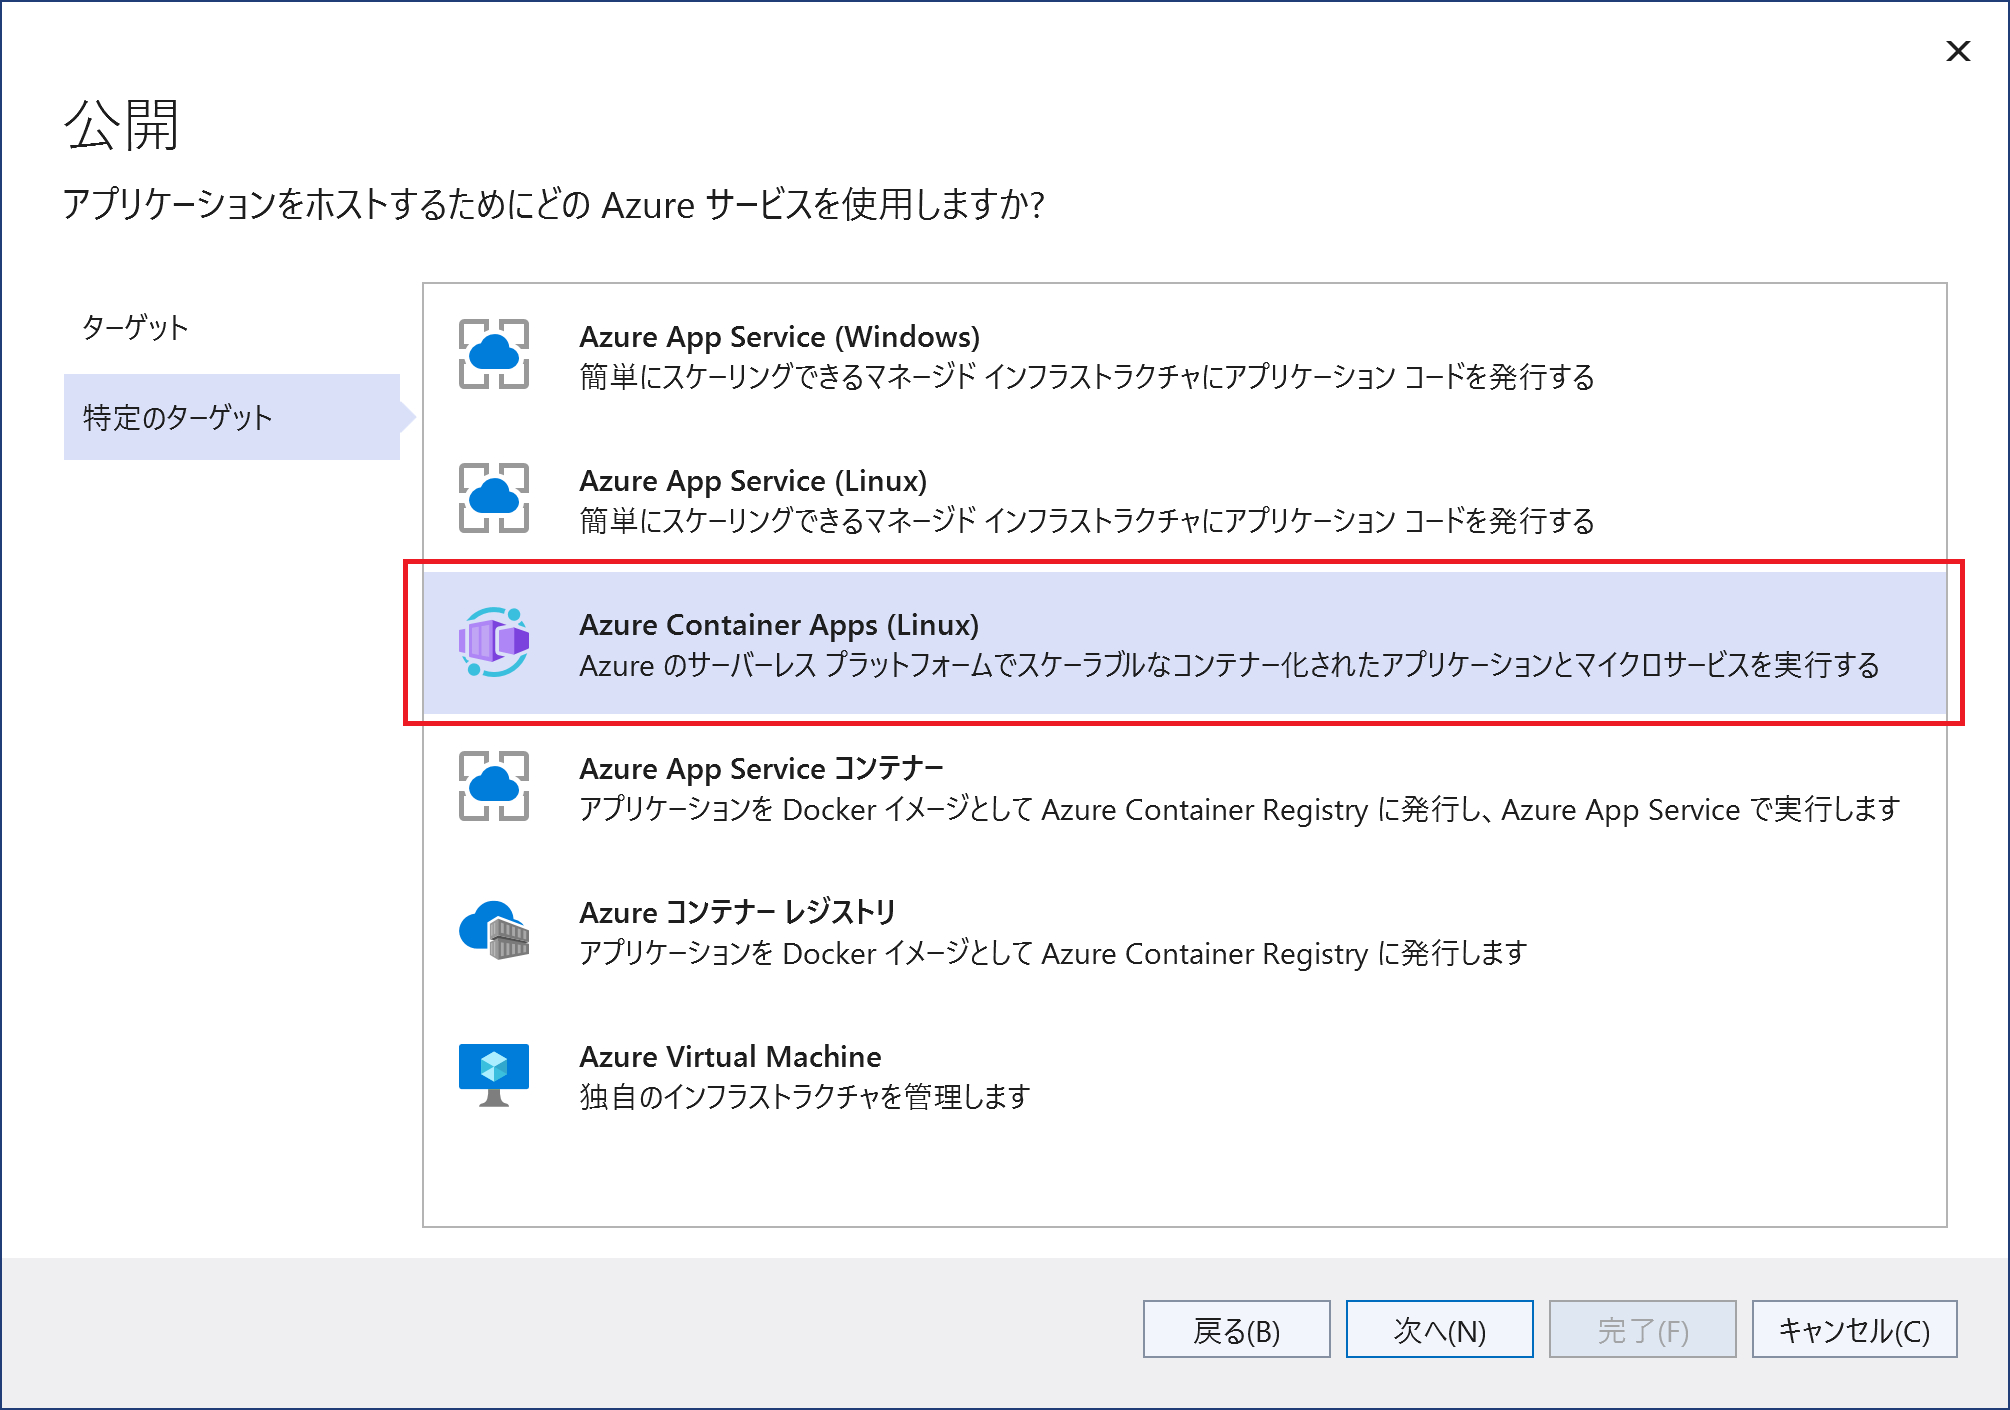
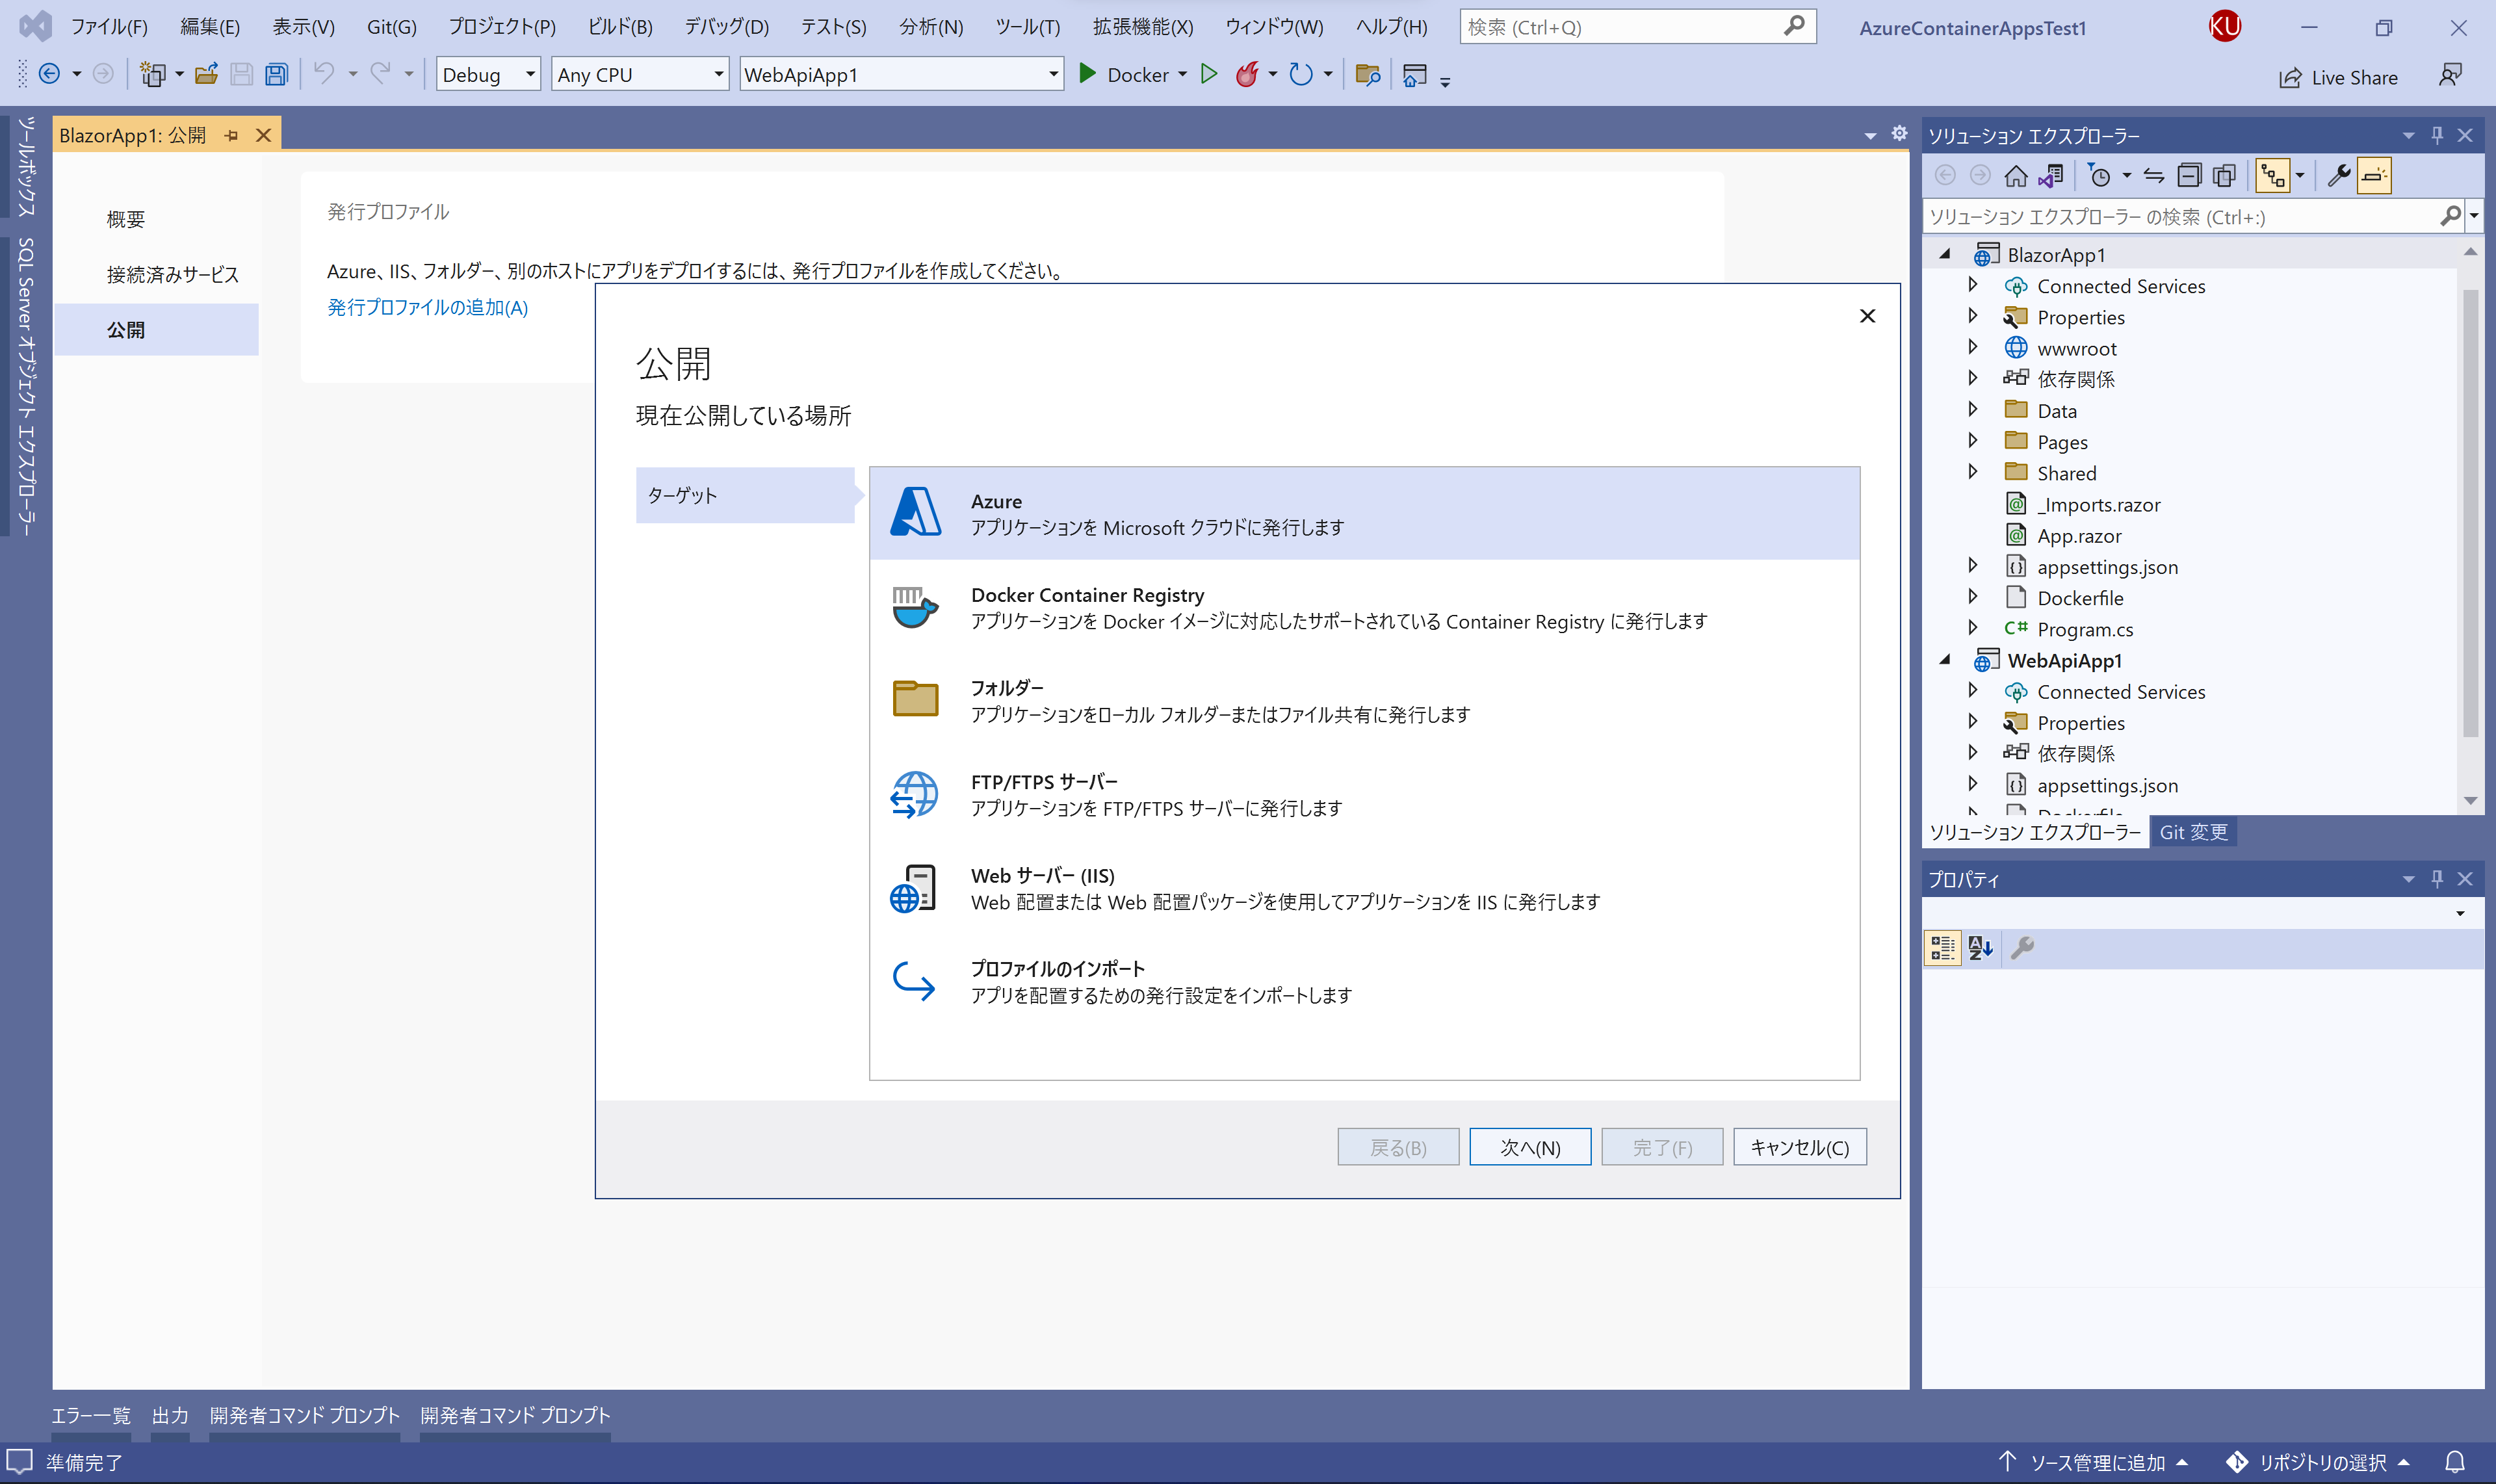
作成したASP.NET Core Web APIアプリケーションをAzure Container Appsへデプロイします。プロジェクトを右クリックしてコンテキストメニューから[公開]をクリックし、ターゲットとして「Azure」を選択します。
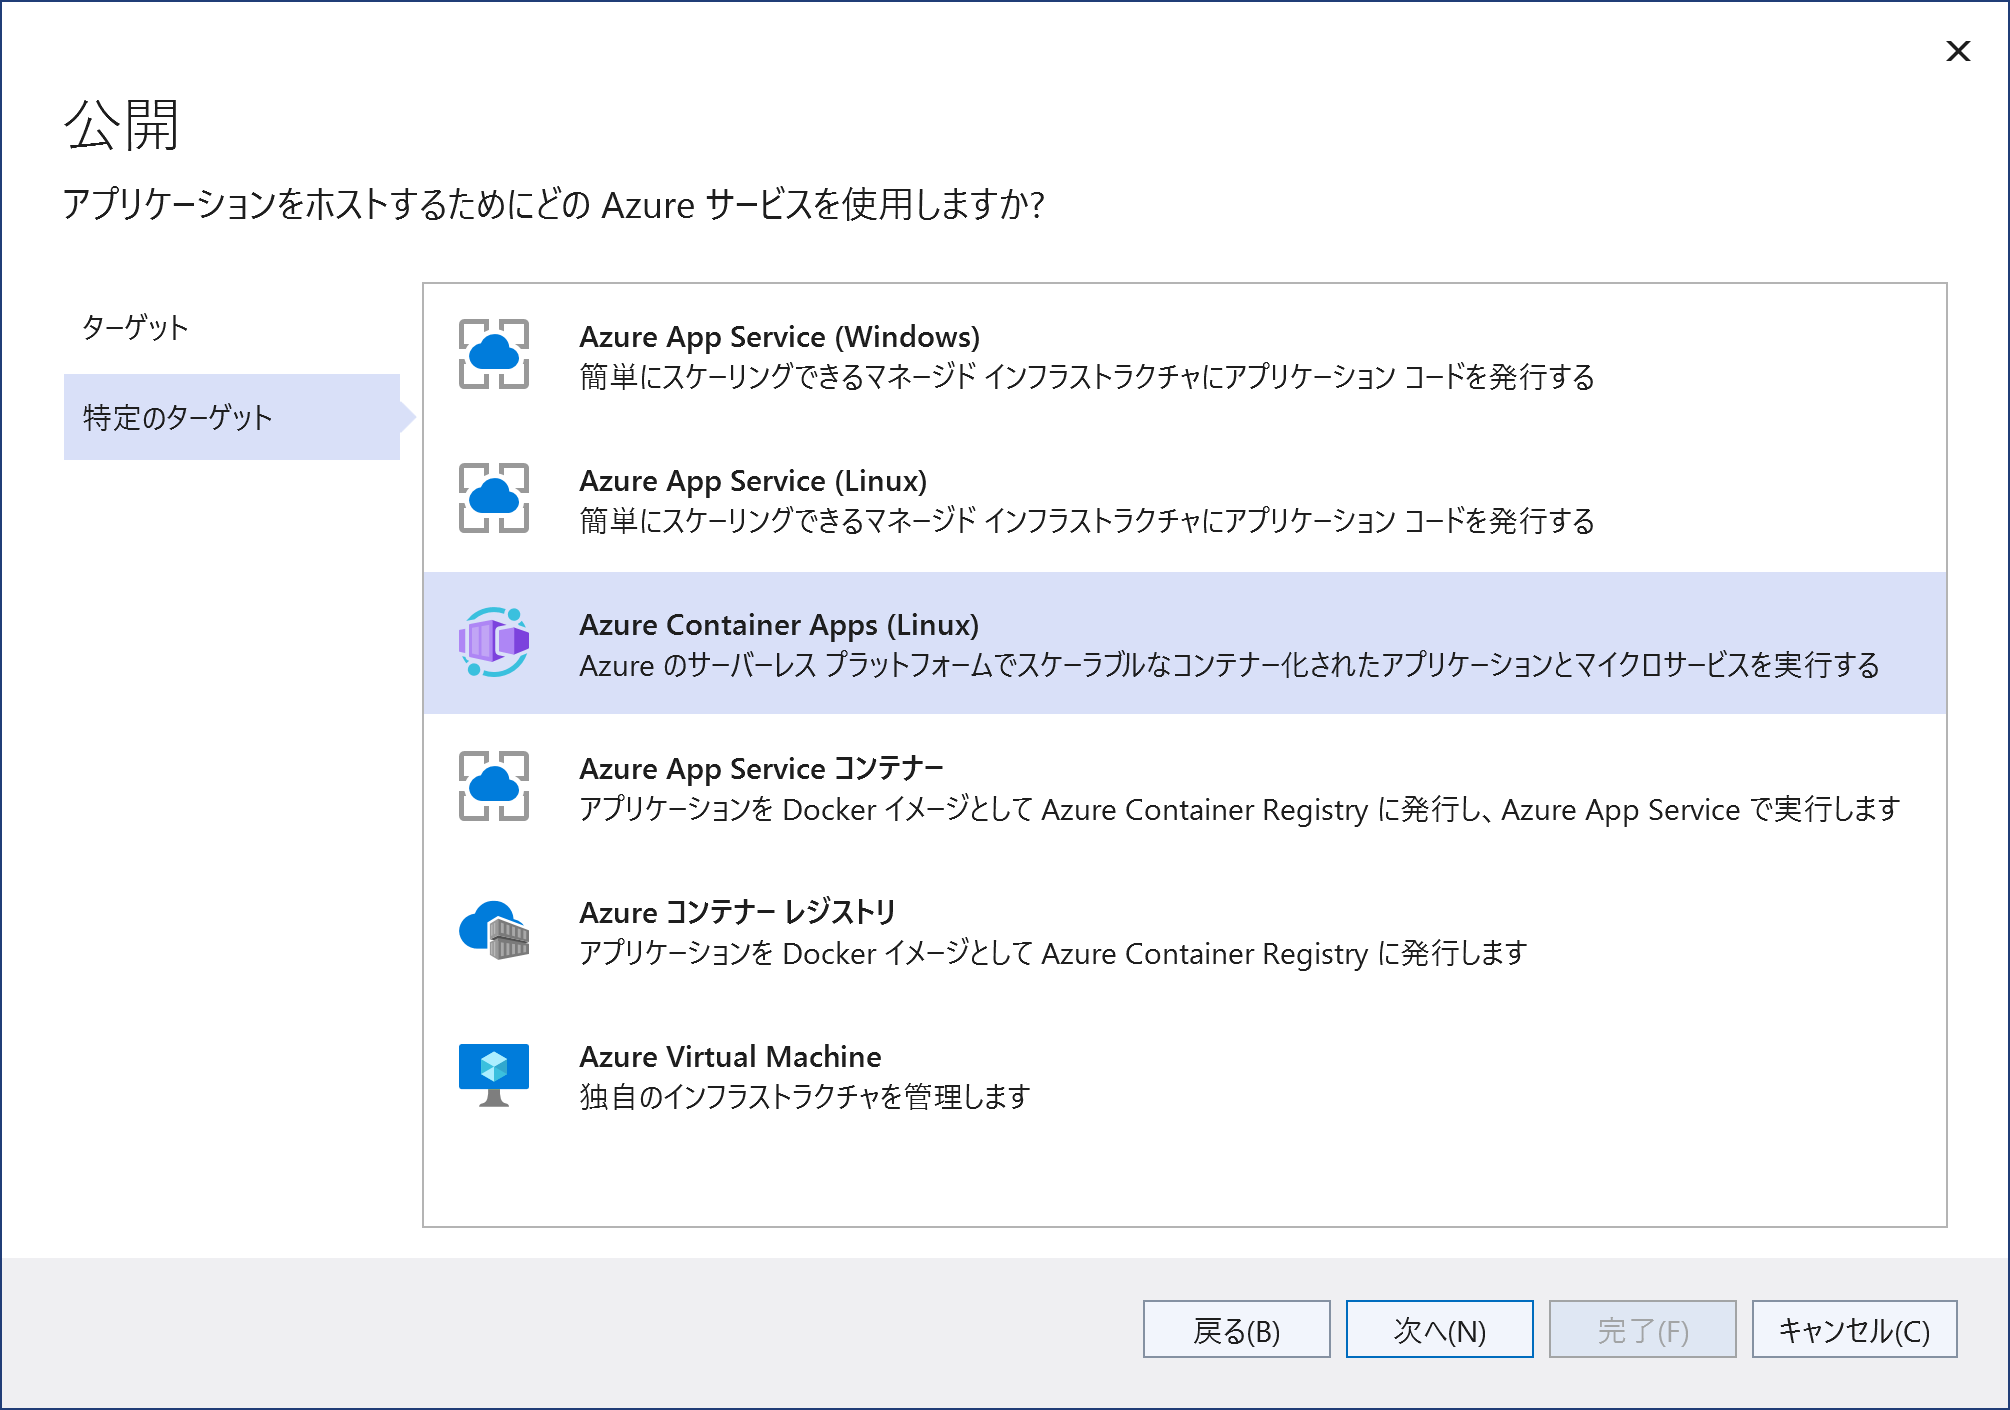
さらにそこから特定のターゲットとして「Azure Container Apps (Linux)」を選択して[次へ]をクリックします。
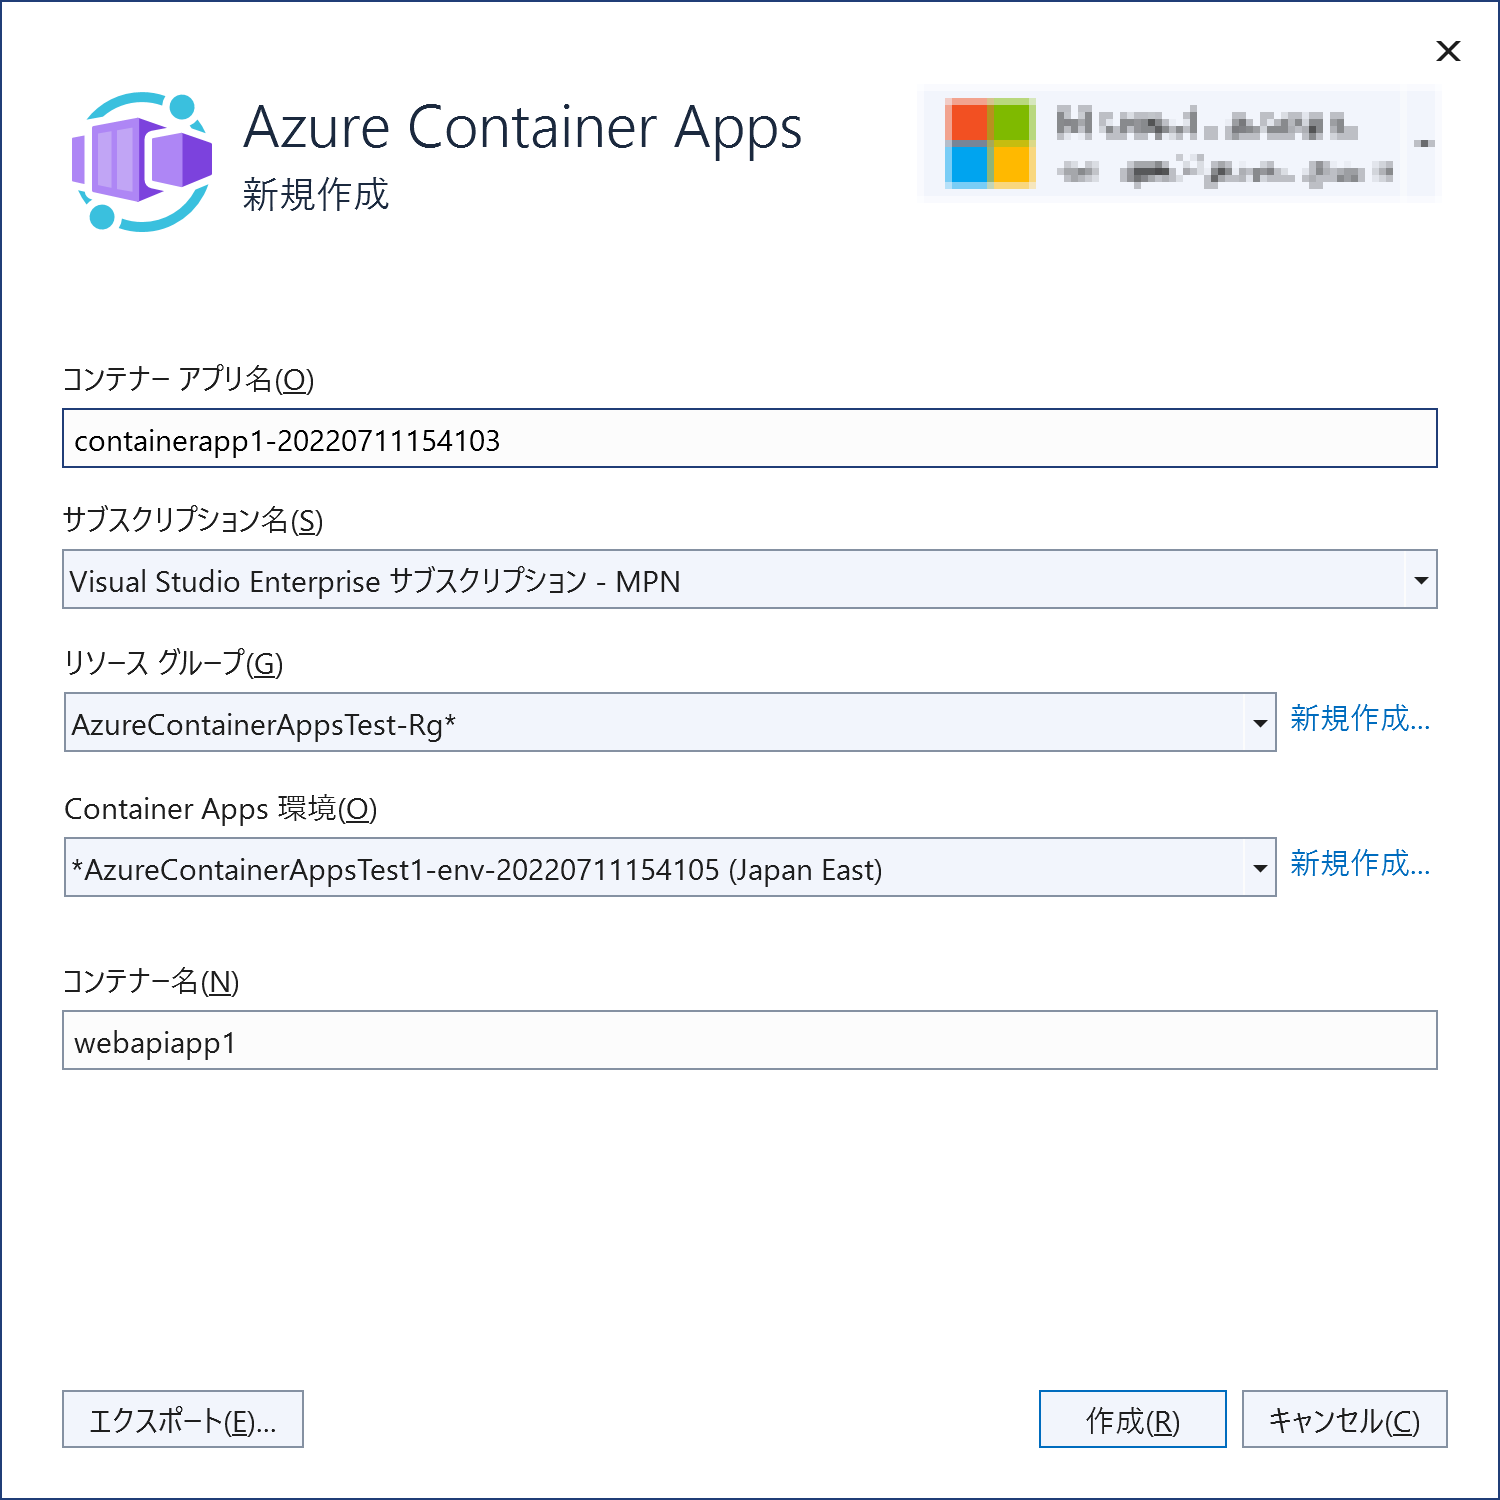
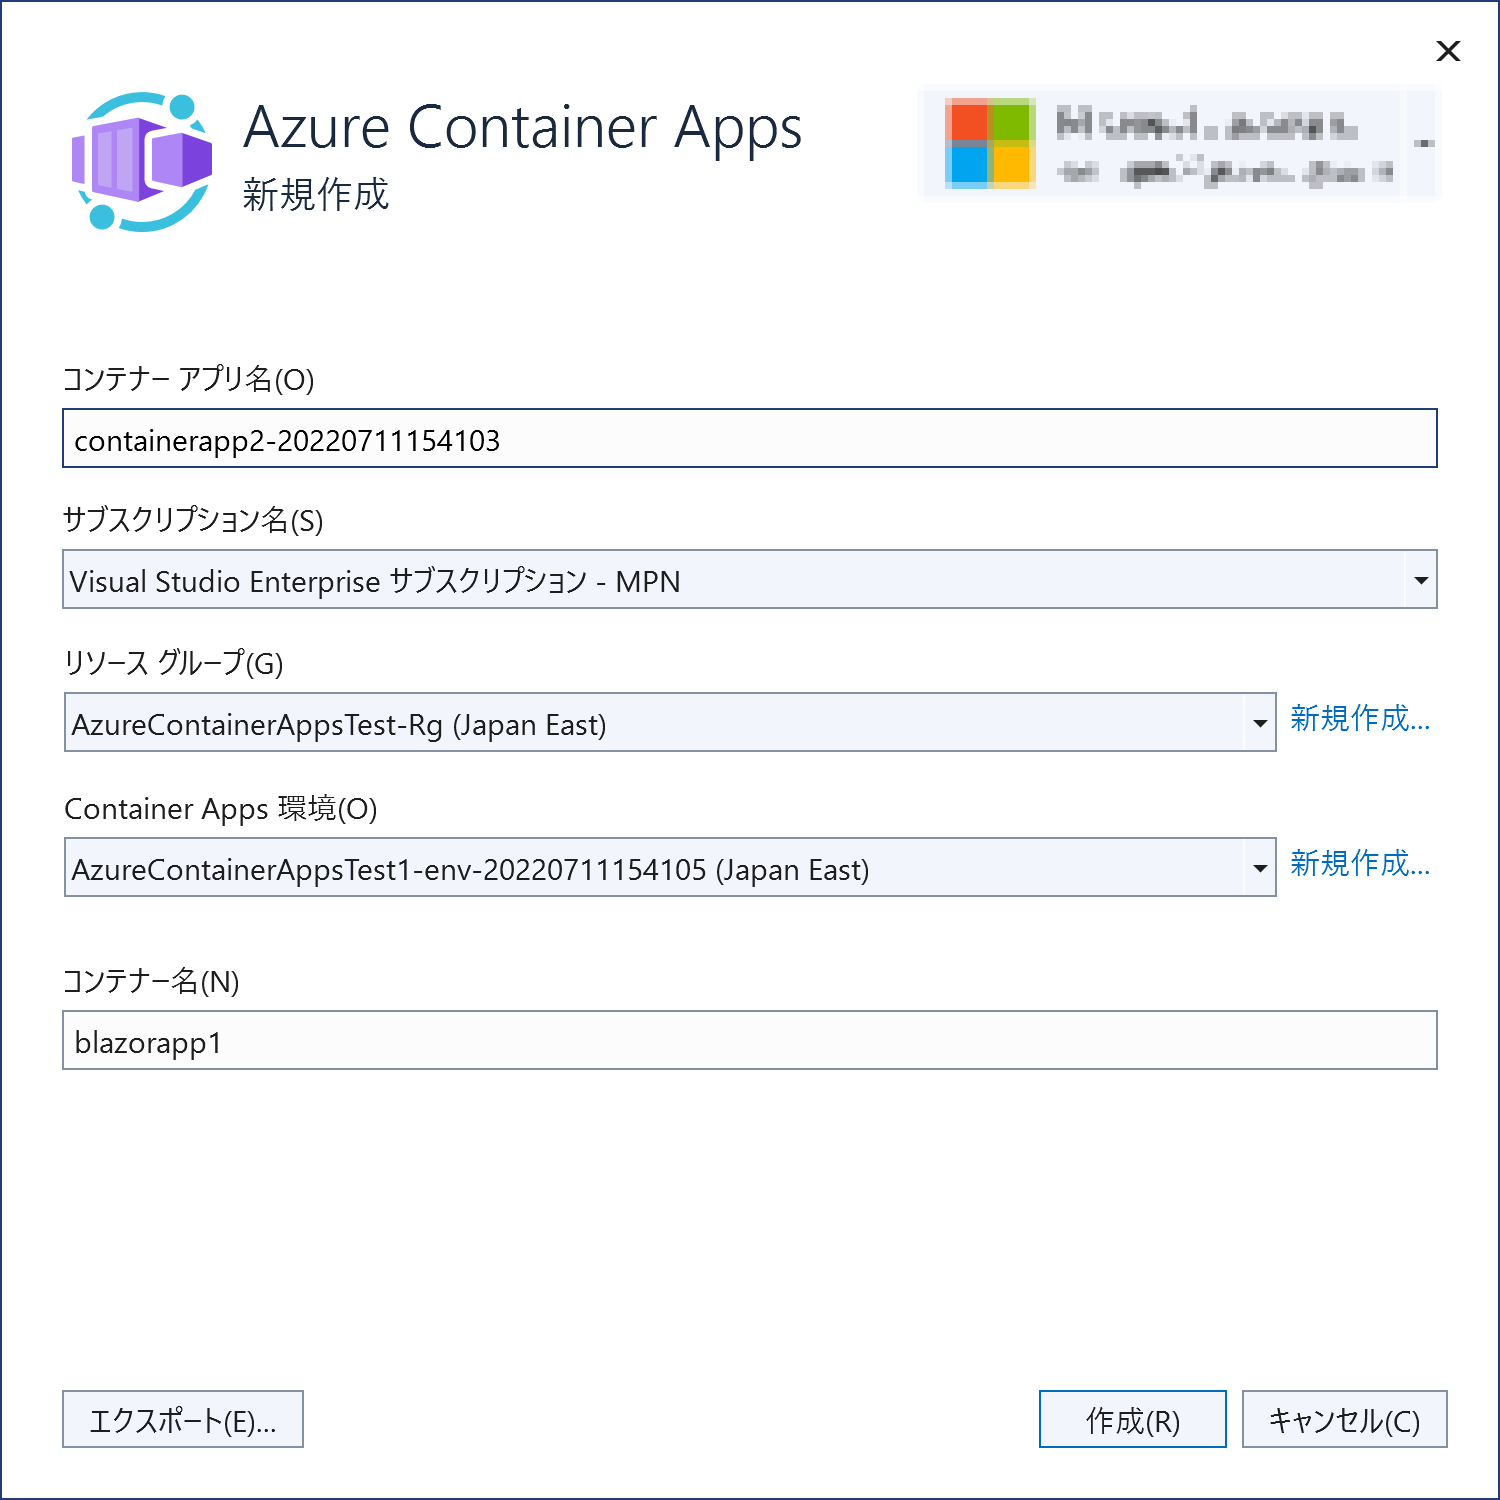
コンテナーアプリの設定をしていきます。「コンテナー アプリ名」、「リソースグループ」、「Container Apps 環境」、「コンテナー名」をそれぞれ設定した後に[作成]をクリックします。
作成が完了すると以下の画面に切り替わるので[次へ]をクリックします。

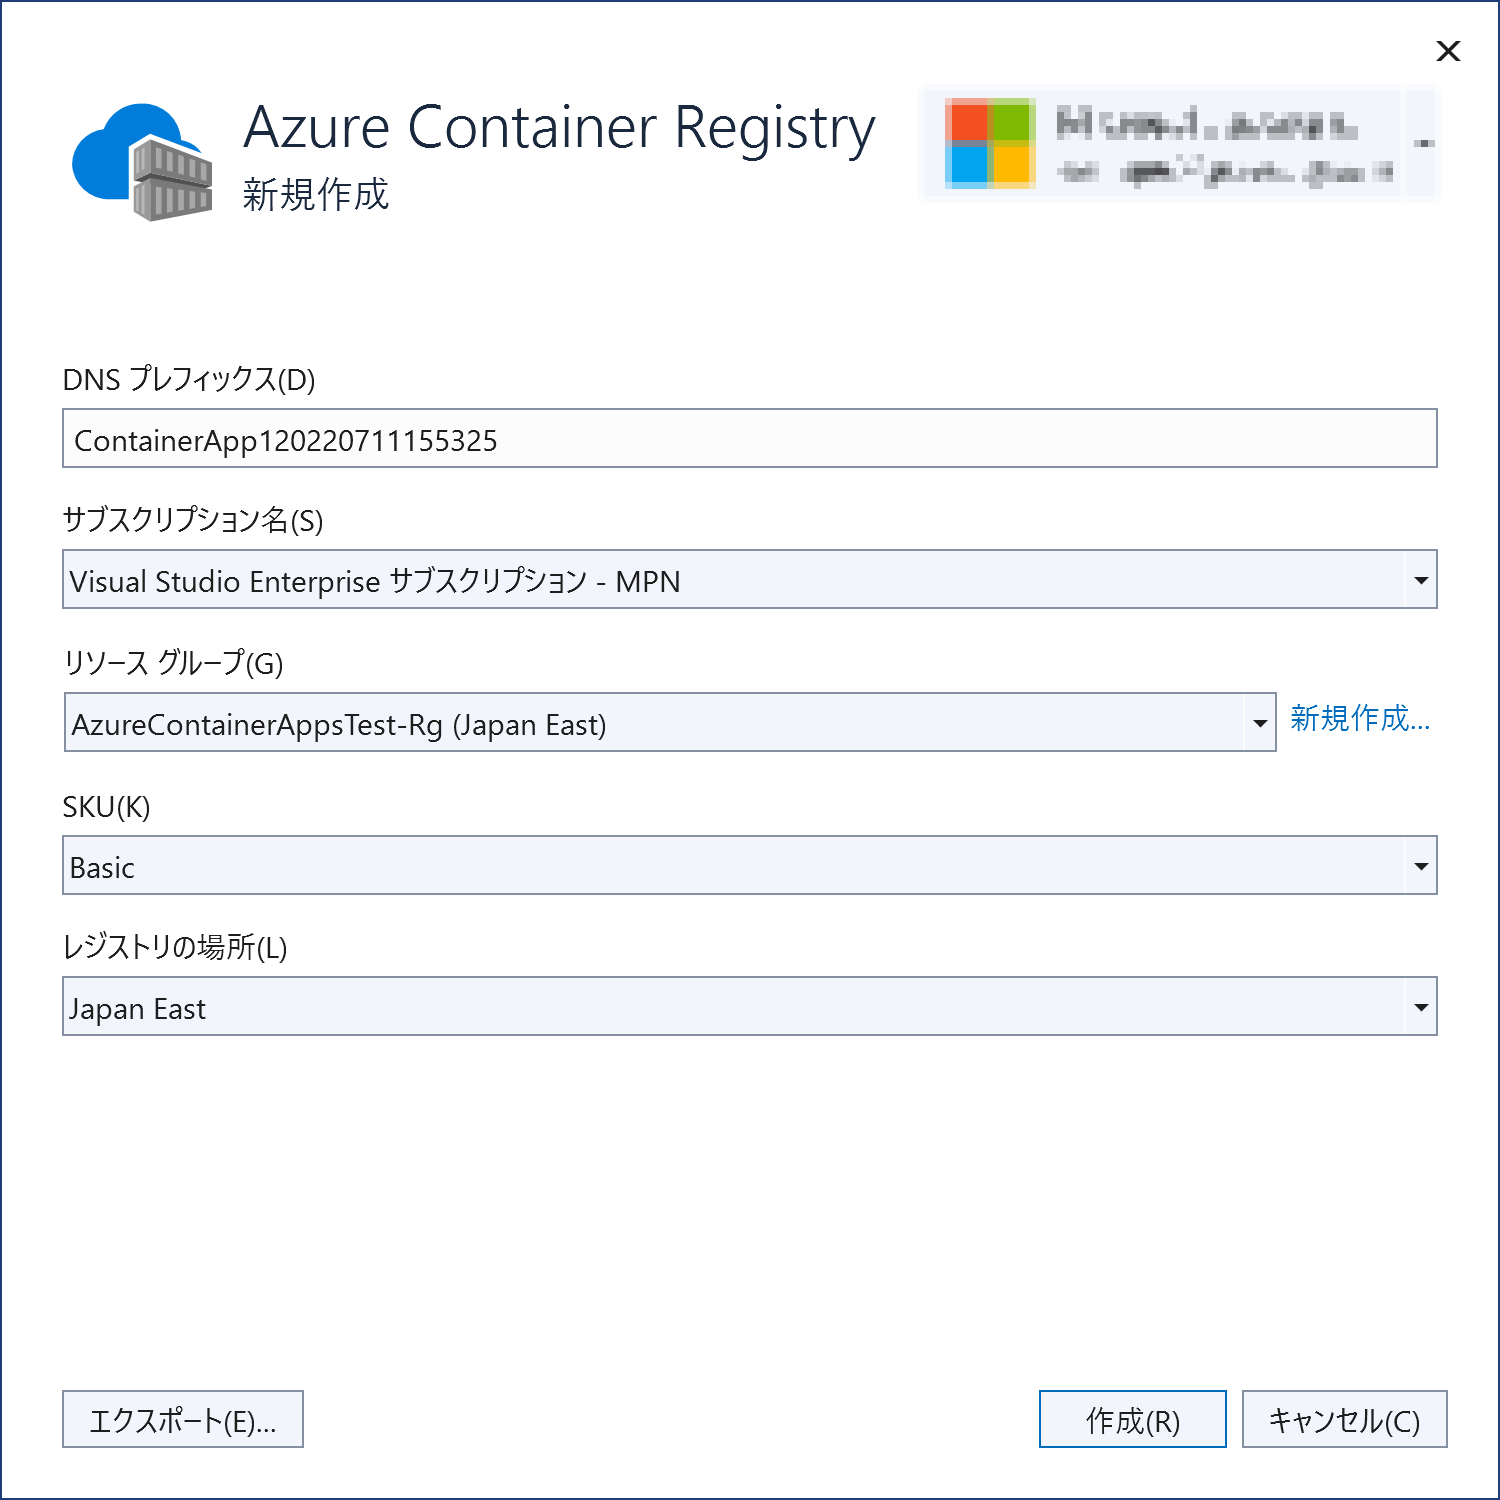
コンテナーレジストリの設定を行います。今回は以下の設定で新規にレジストリを作成します。各種情報を設定して[作成]をクリックします。
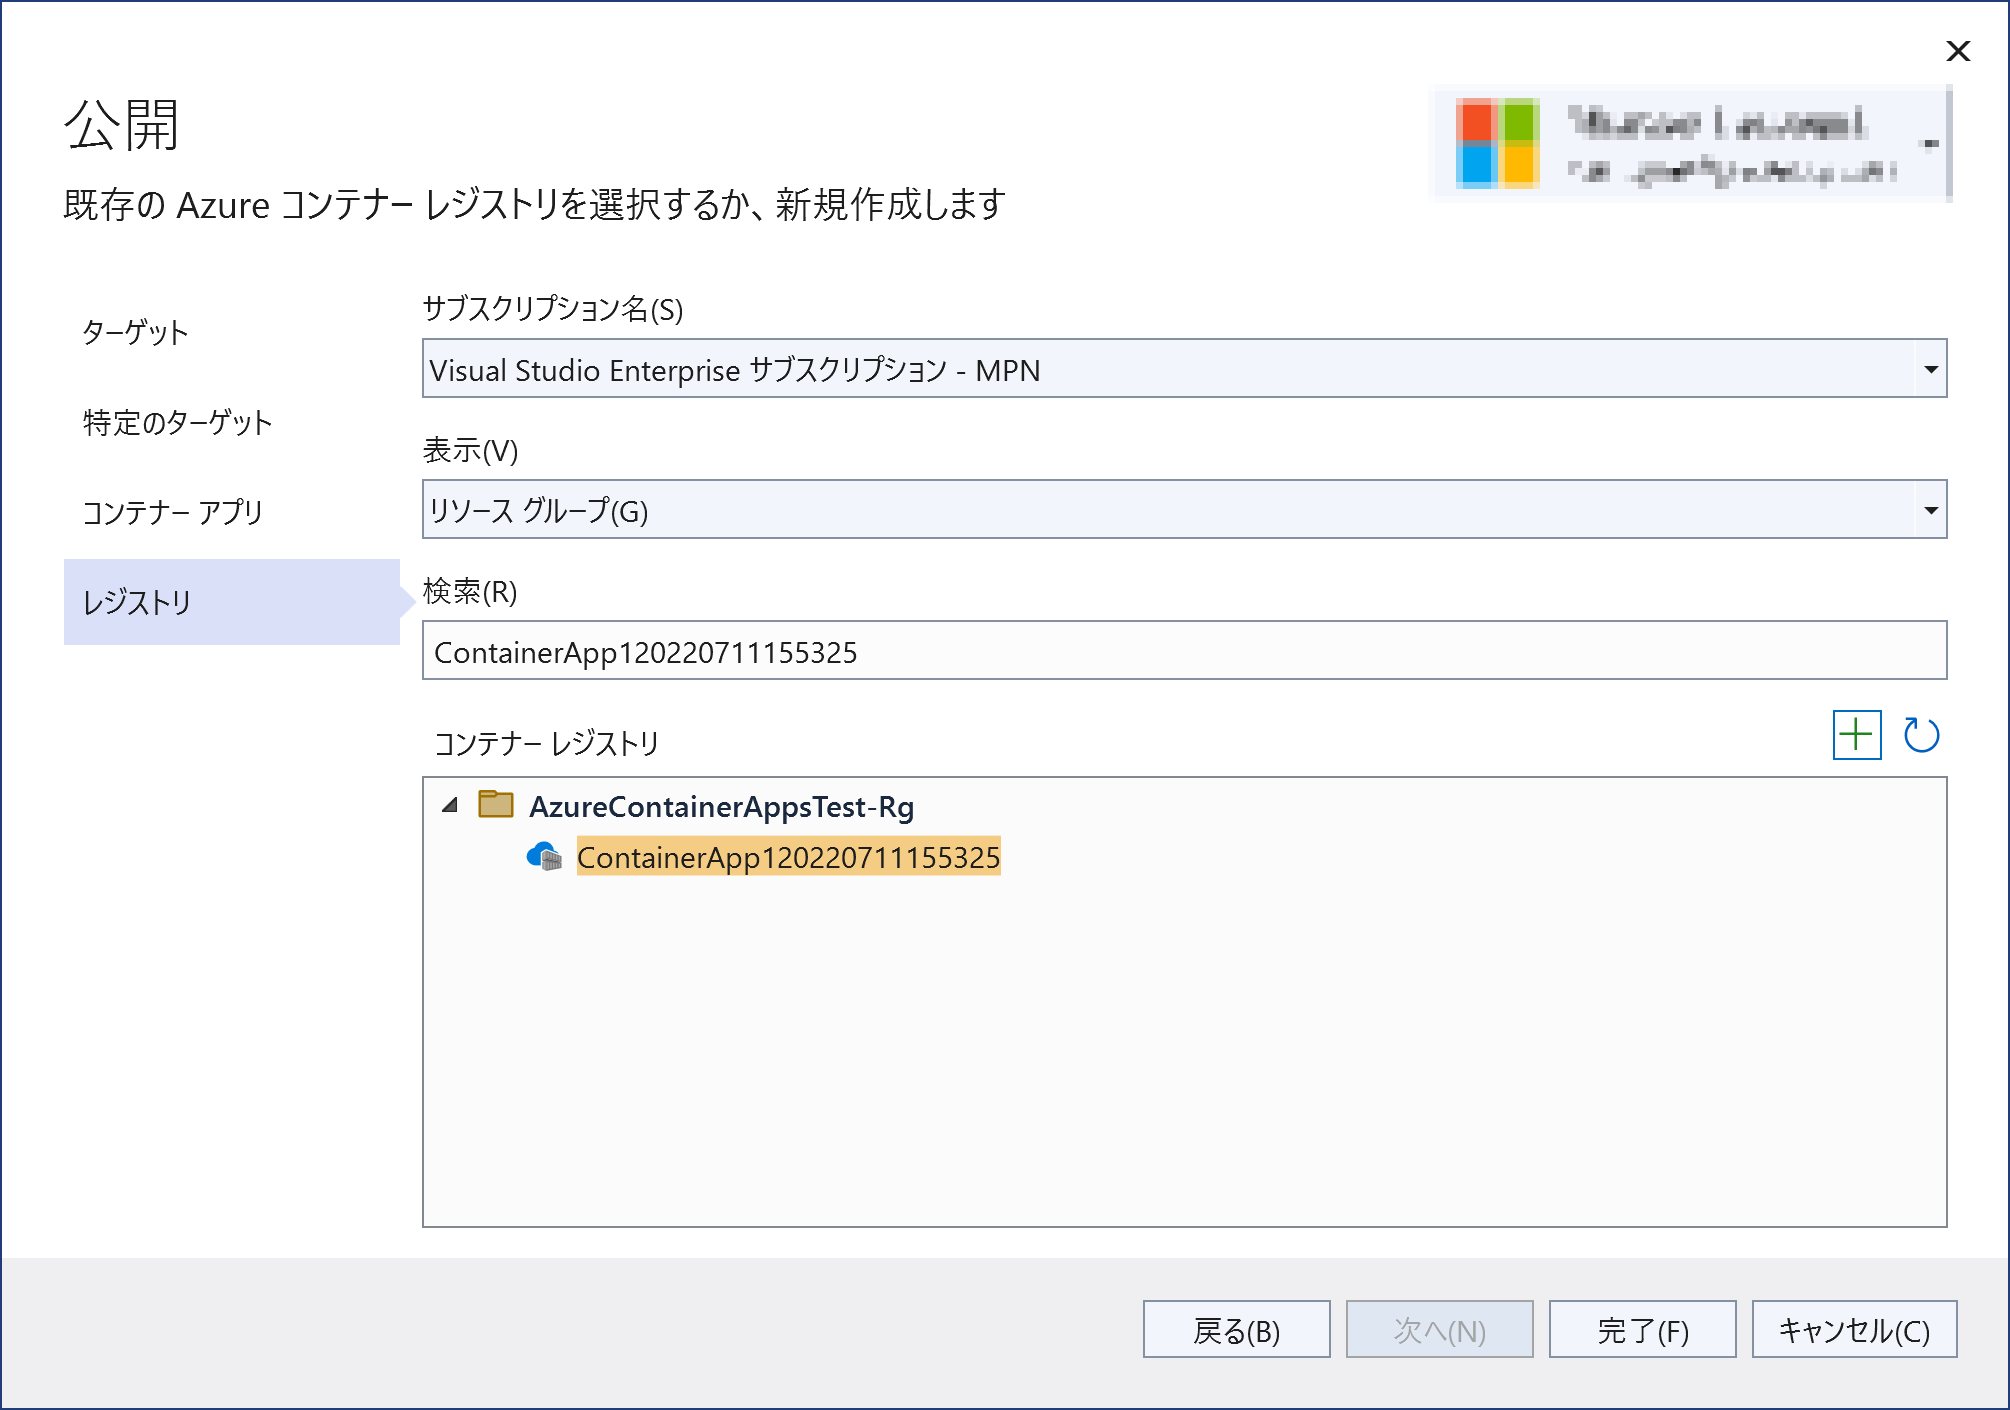
作成が完了すると以下の画面に切り替わるので[完了]をクリックします。
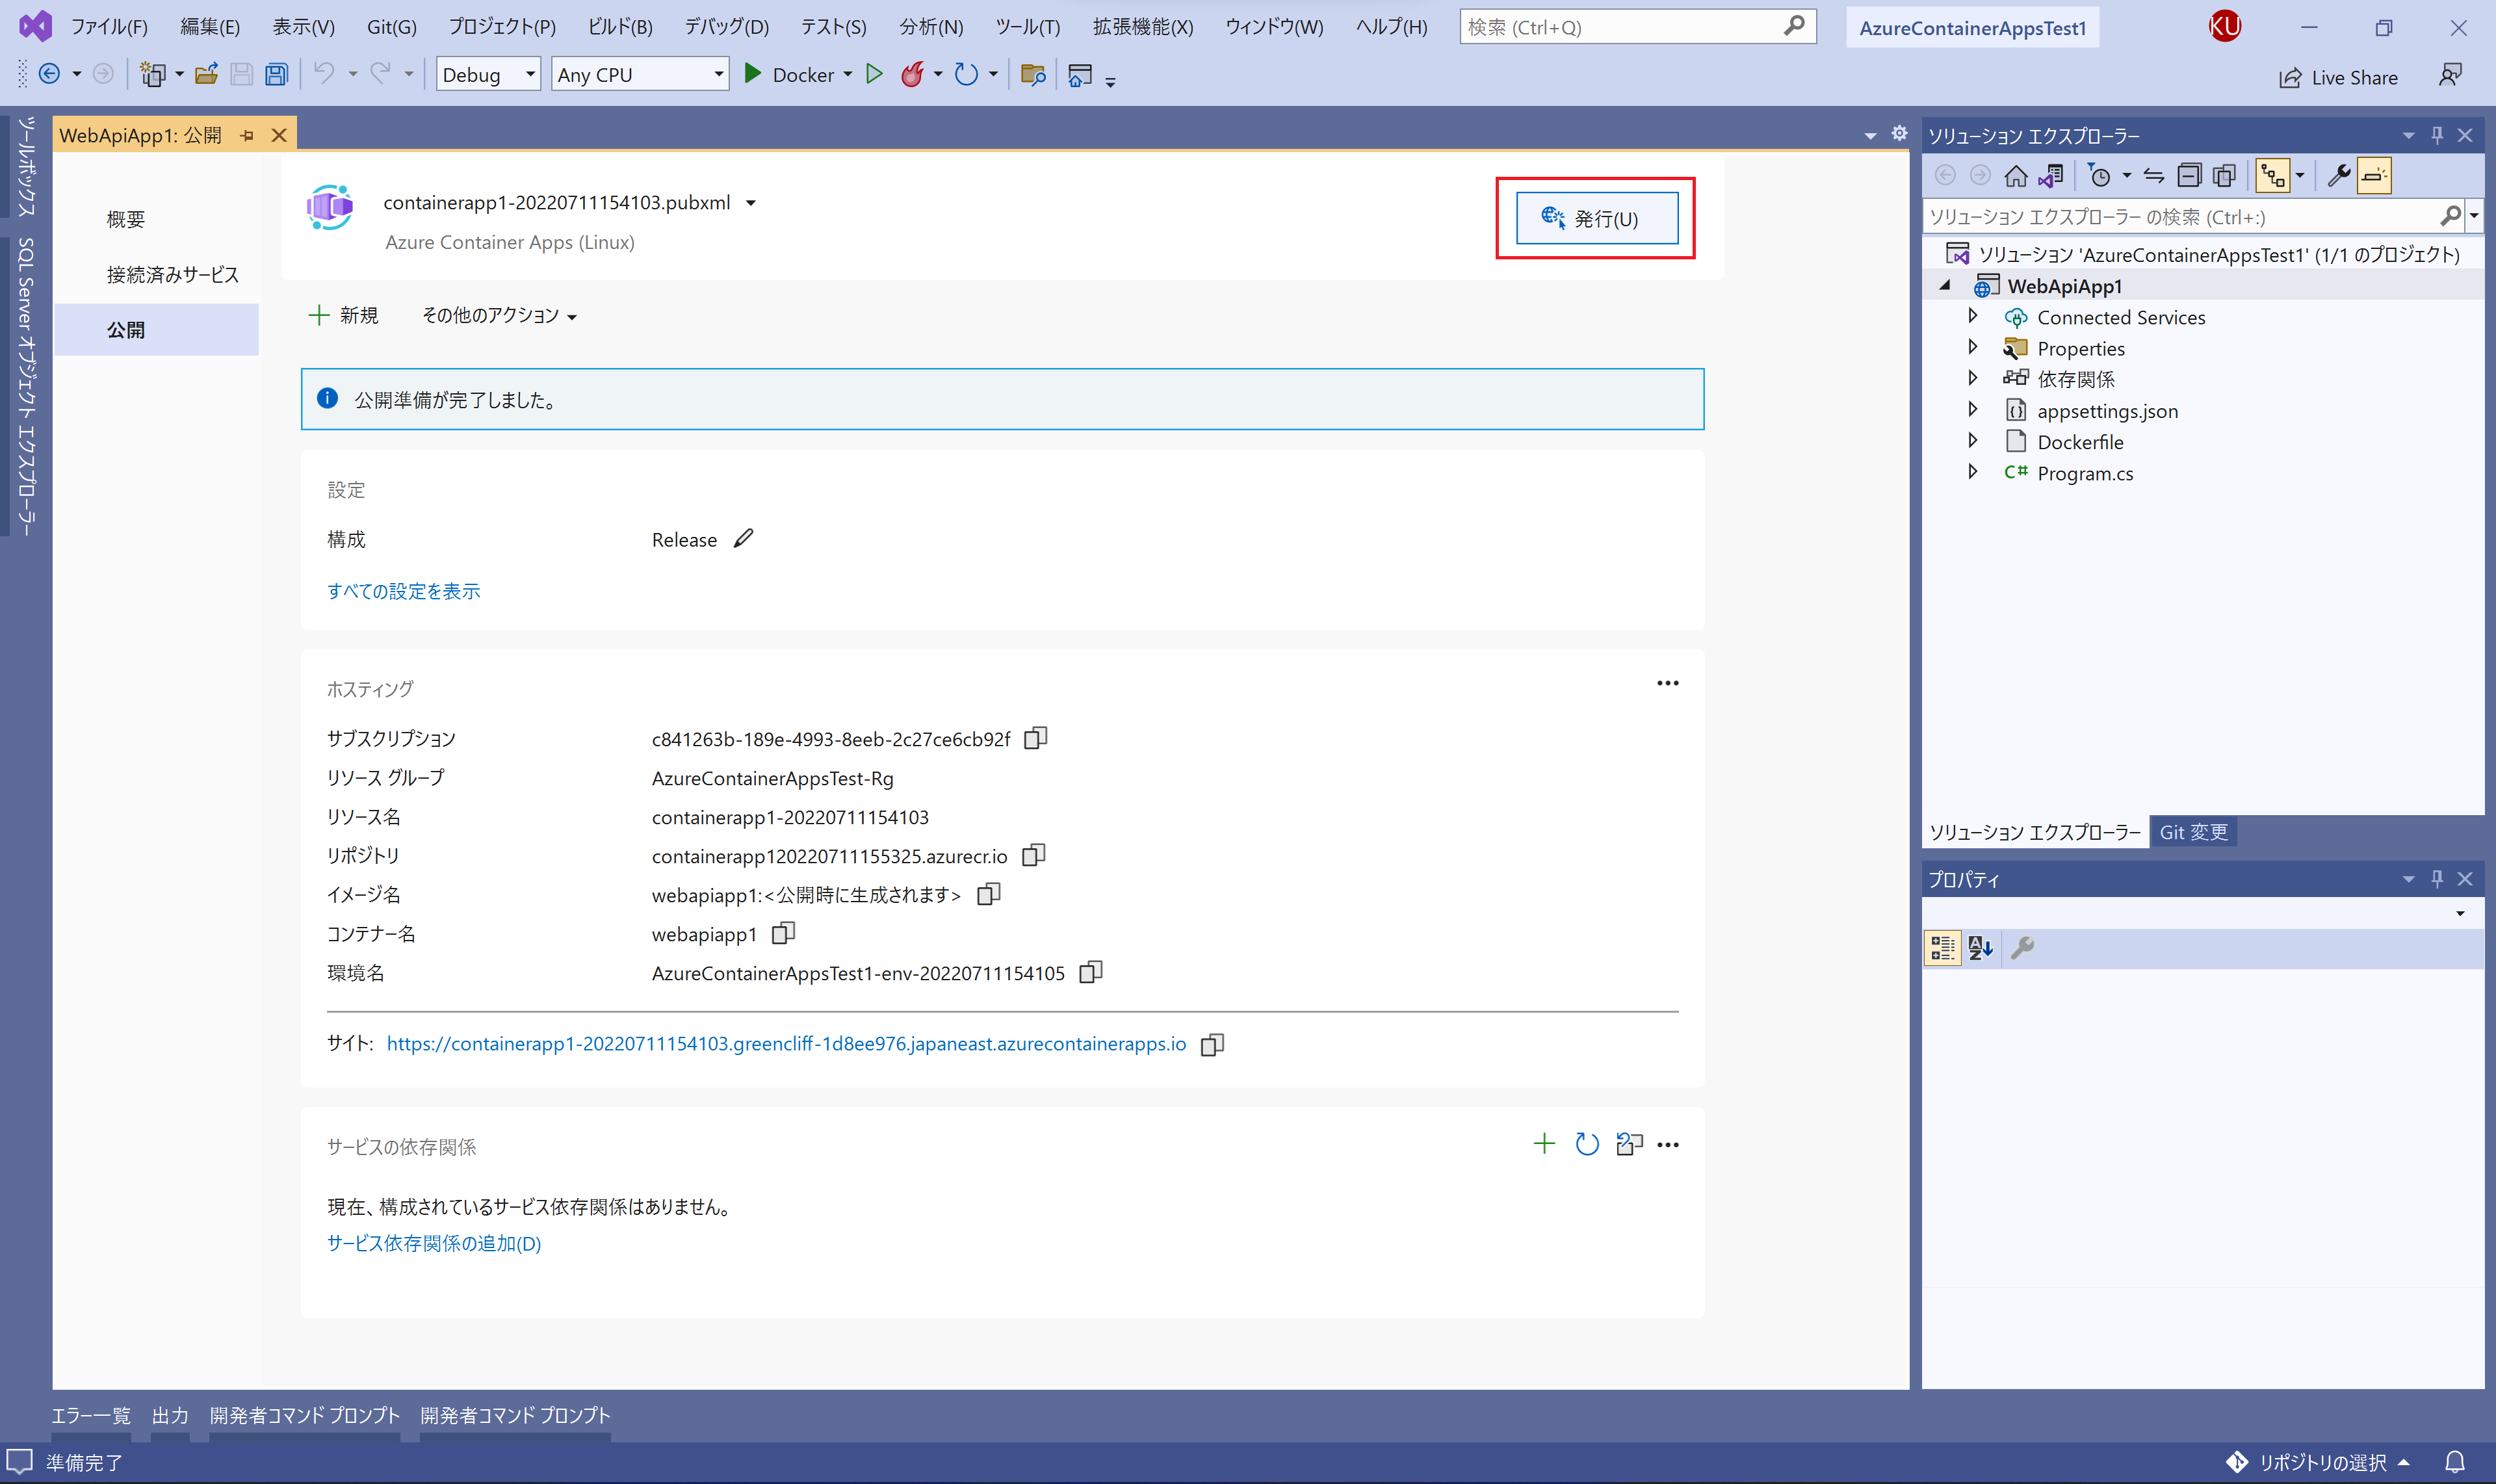
これでデプロイの準備は完了です。以下の画面で[発行]をクリックしてデプロイを実施します。
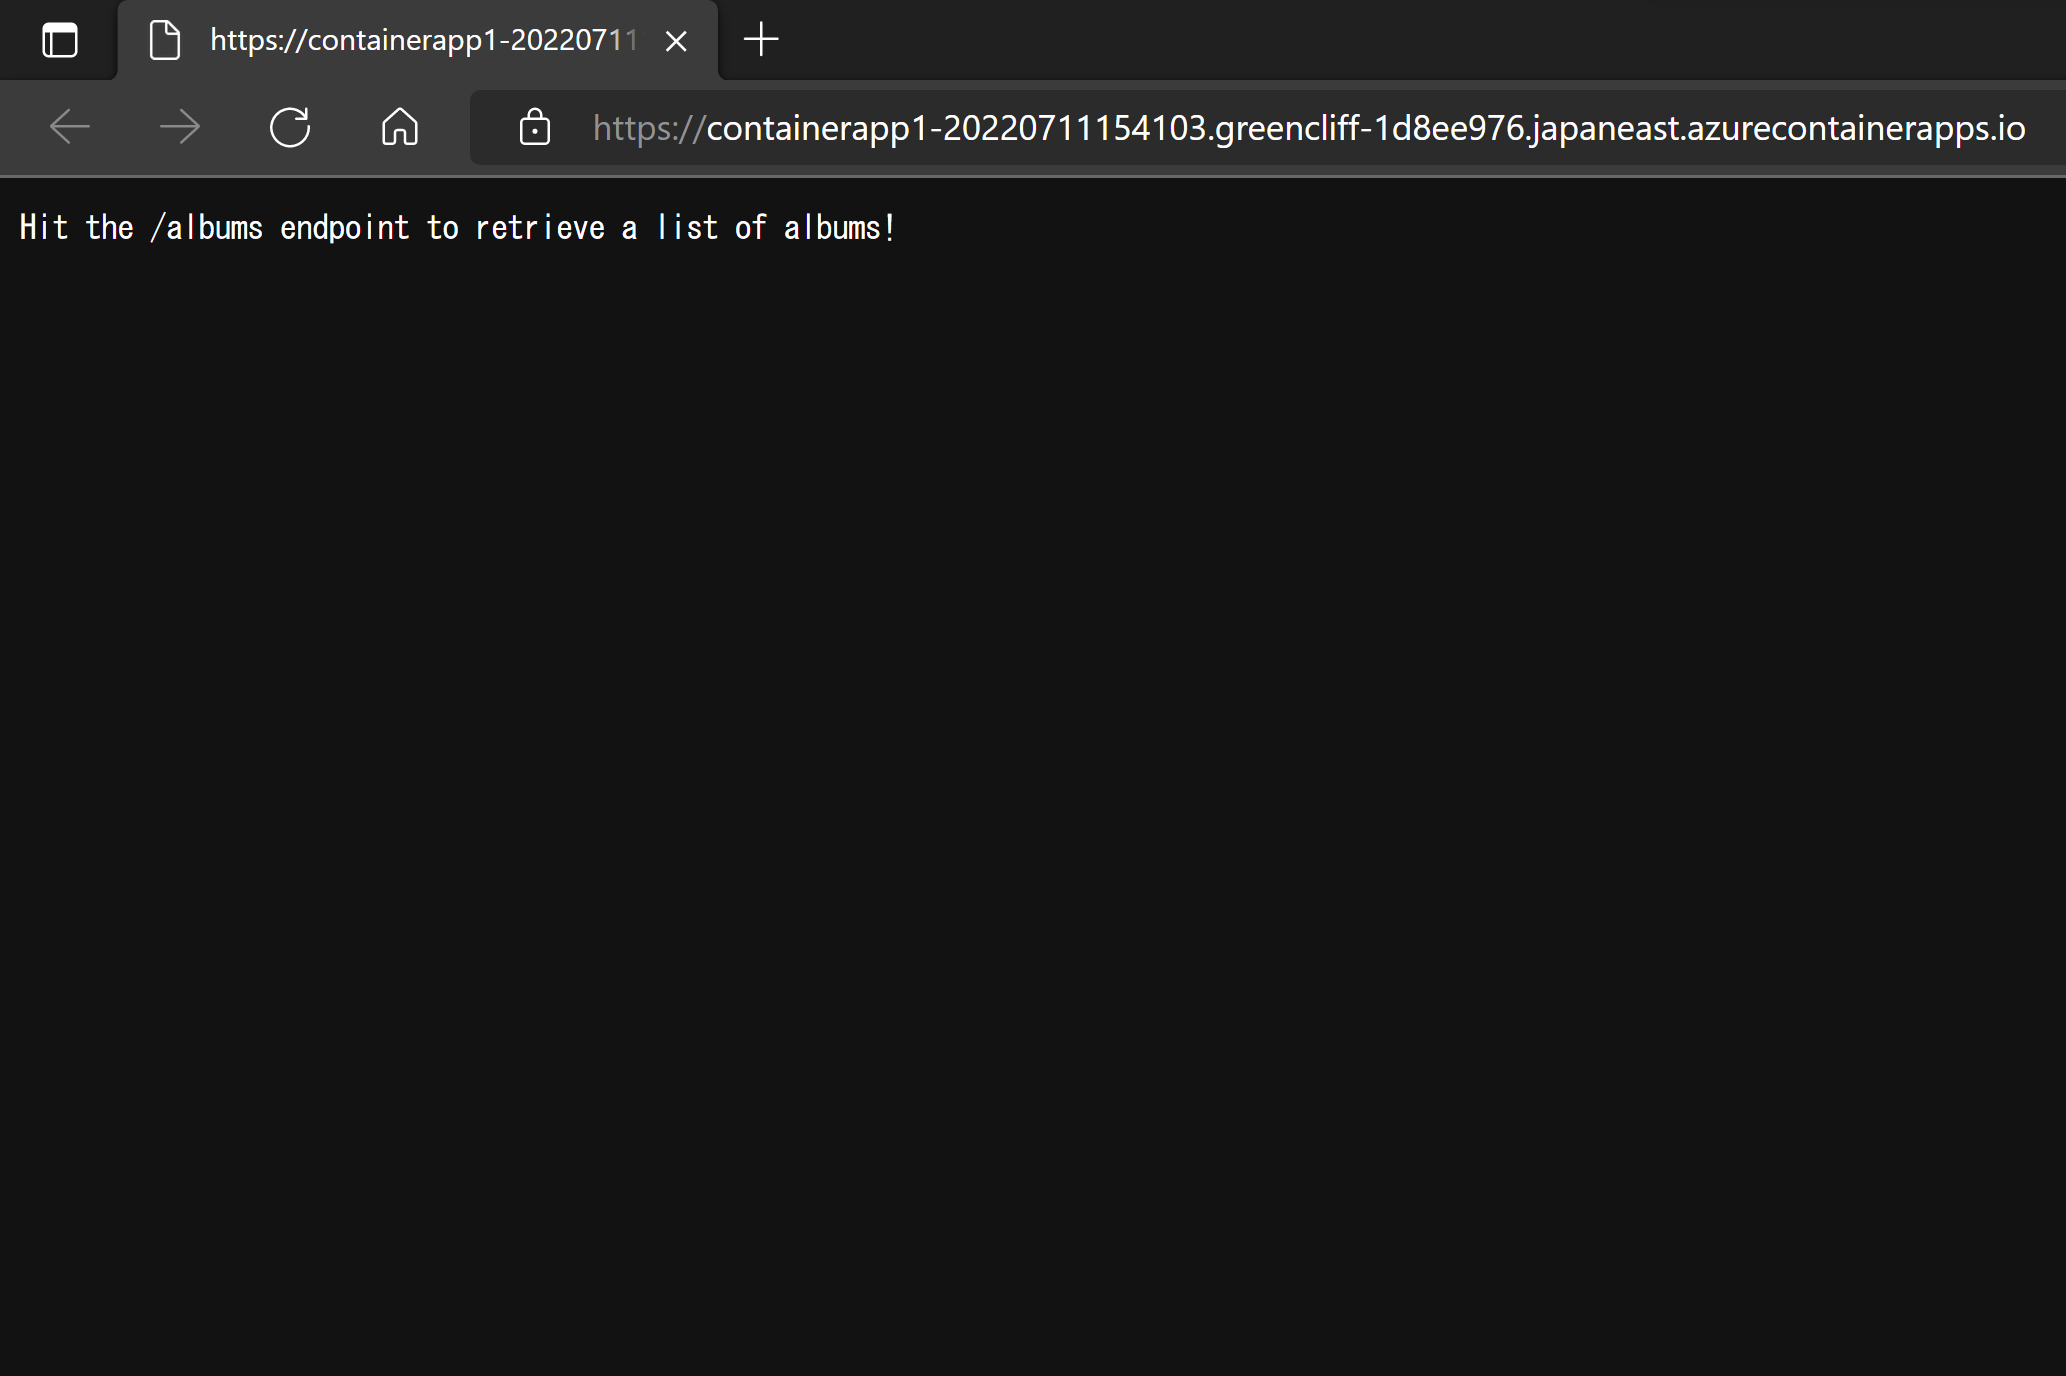
デプロイが完了すると、Web APIのURLでブラウザが起動します。Web APIのデフォルトのエンドポイント「/」でProgram.csで設定していた「Hit the /albums endpoint to retrieve a list of albums!」が返されています。
Blazor Serverアプリケーションの作成
公式ドキュメントの内容
以下の公式ドキュメントでは、Web API「アルバム API」を呼び出すアプリケーション「アルバム UI」が紹介されています。
このアルバム UIは以下のリポジトリで公開されていてそのまま使いたいところですが、Pugというテンプレートエンジンが使われており、あまり汎用的ではありません。
そこで今回はBlazor Serverアプリケーションを作成してAzure Container Appsへデプロイし、このアプリからWeb APIを呼び出すようにします。
Blazor Serverアプリケーションの追加
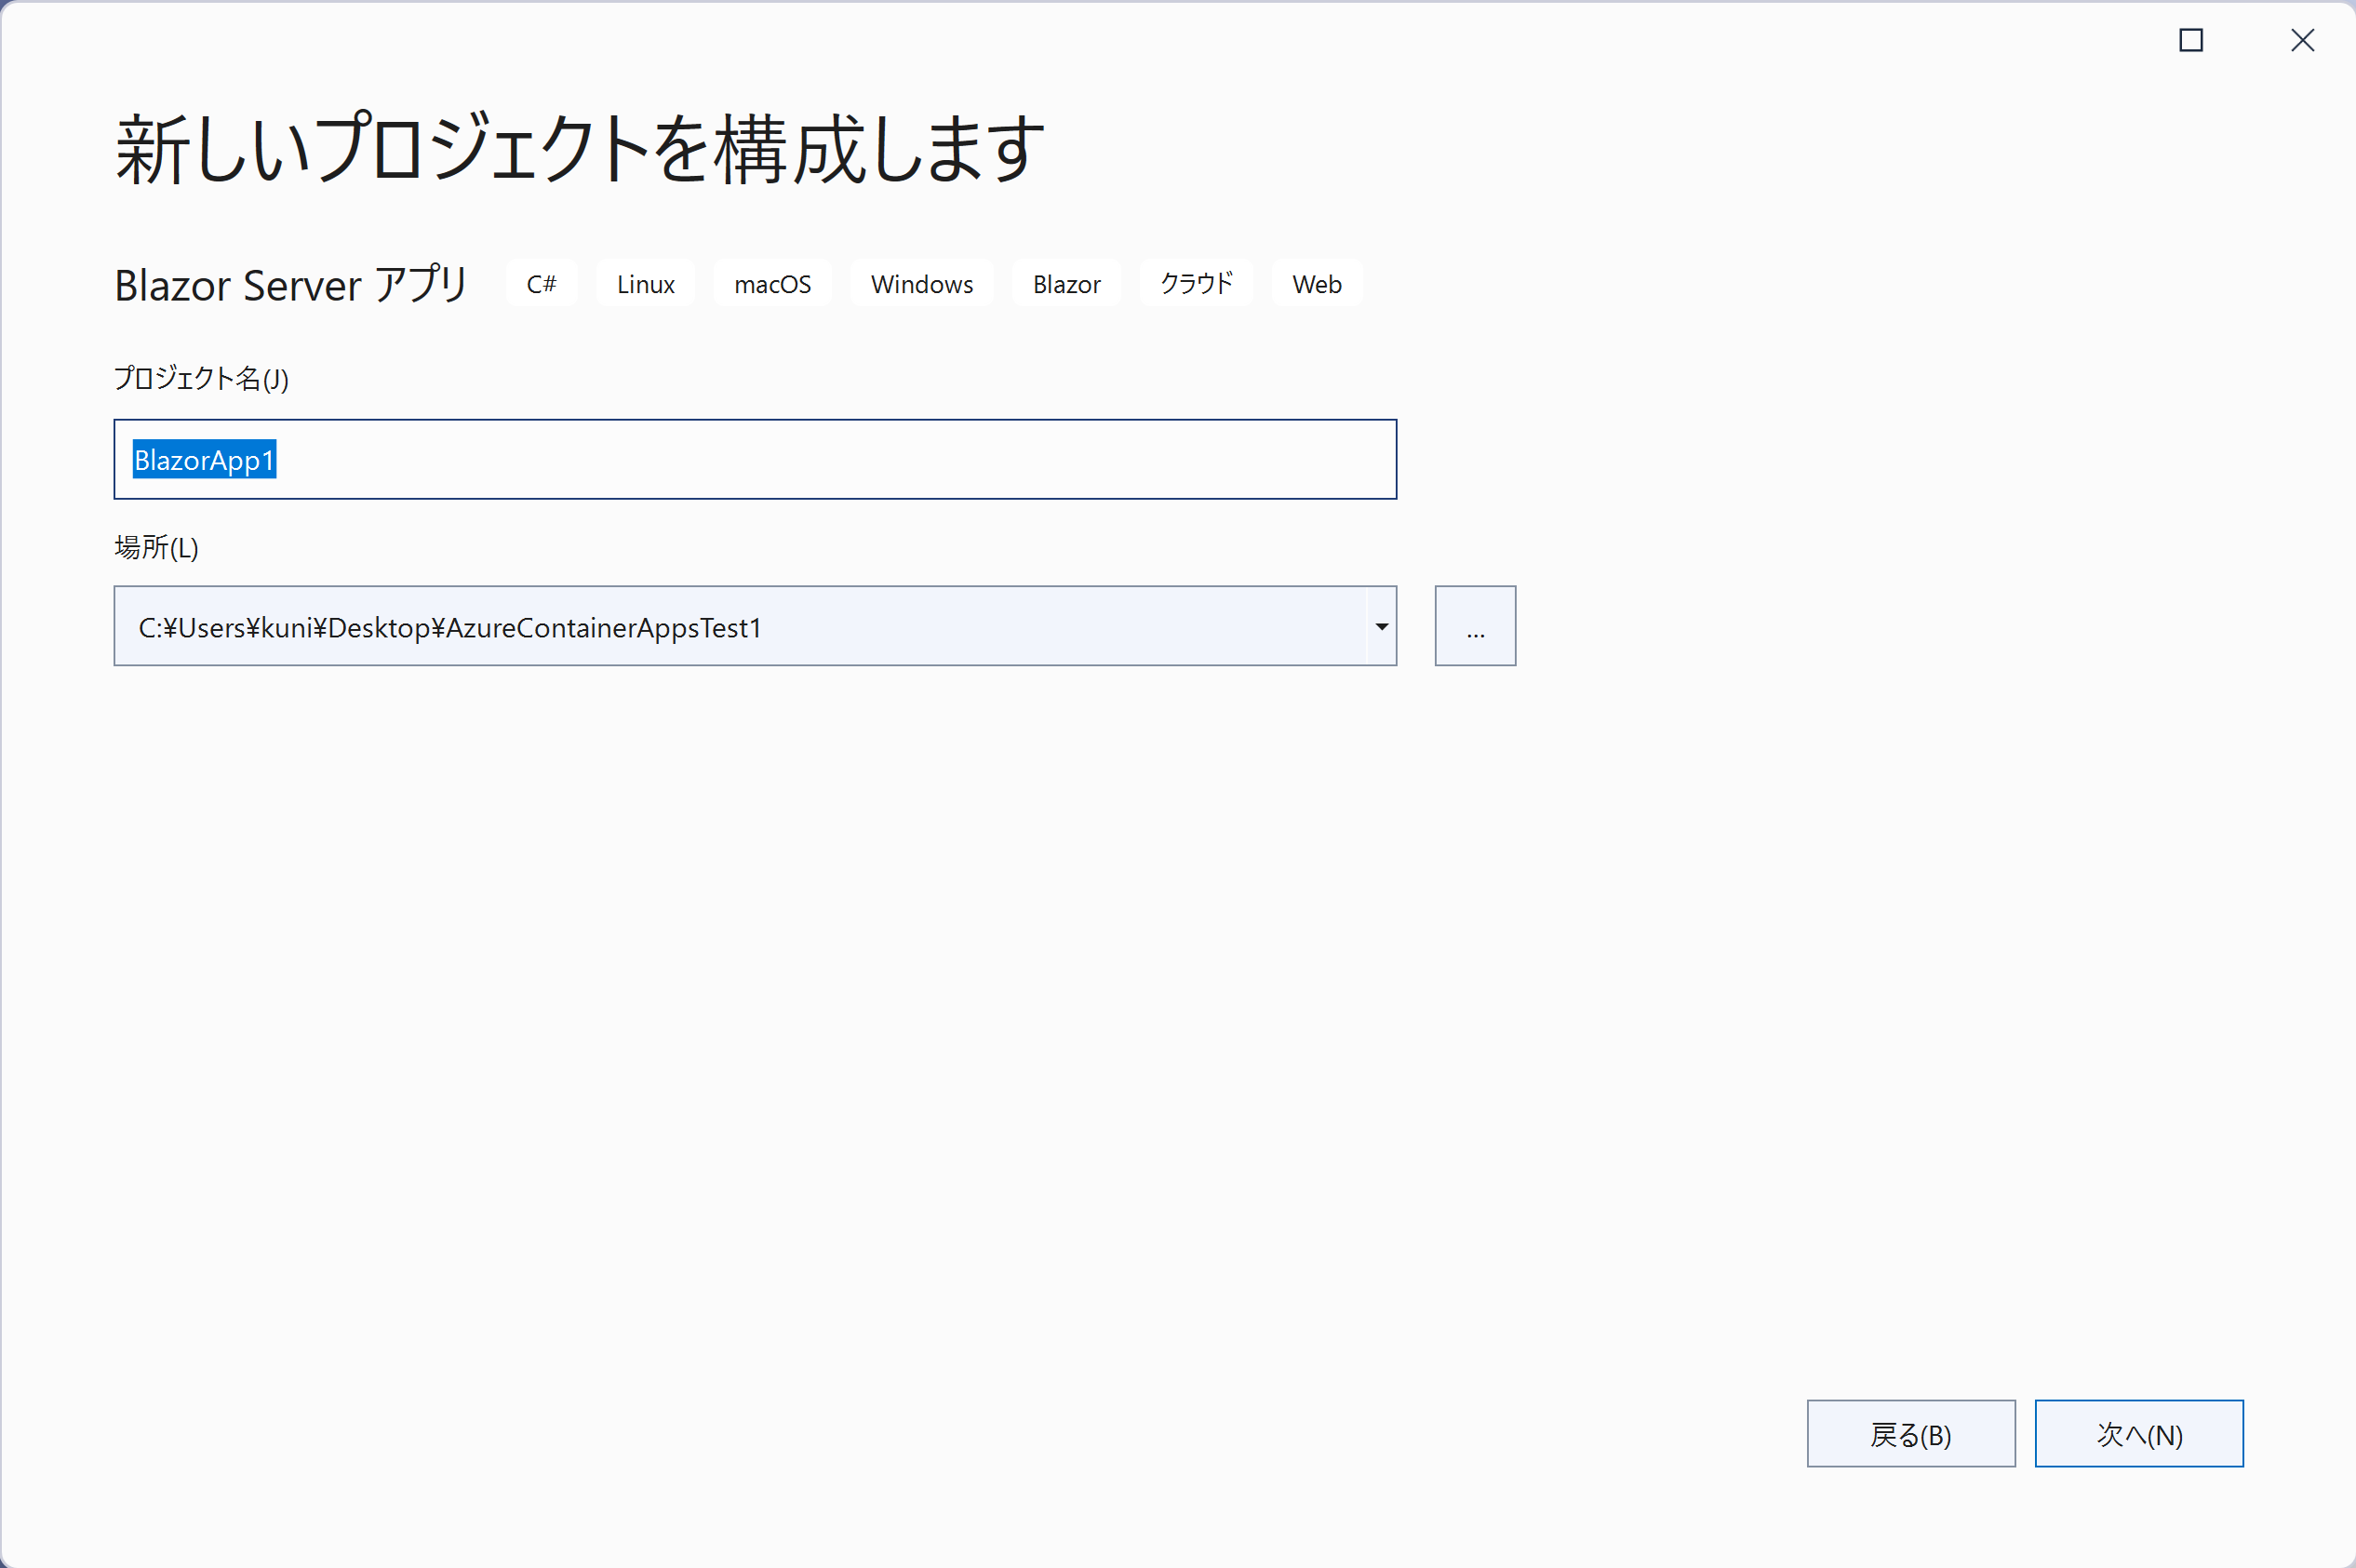
作成したソリューション「AzureContainerAppsTest1」にBlazor Serverアプリケーションを追加します。プロジェクトテンプレートから「Blazor Server」を選択します。プロジェクト名には「BlazorApp1」を設定します。
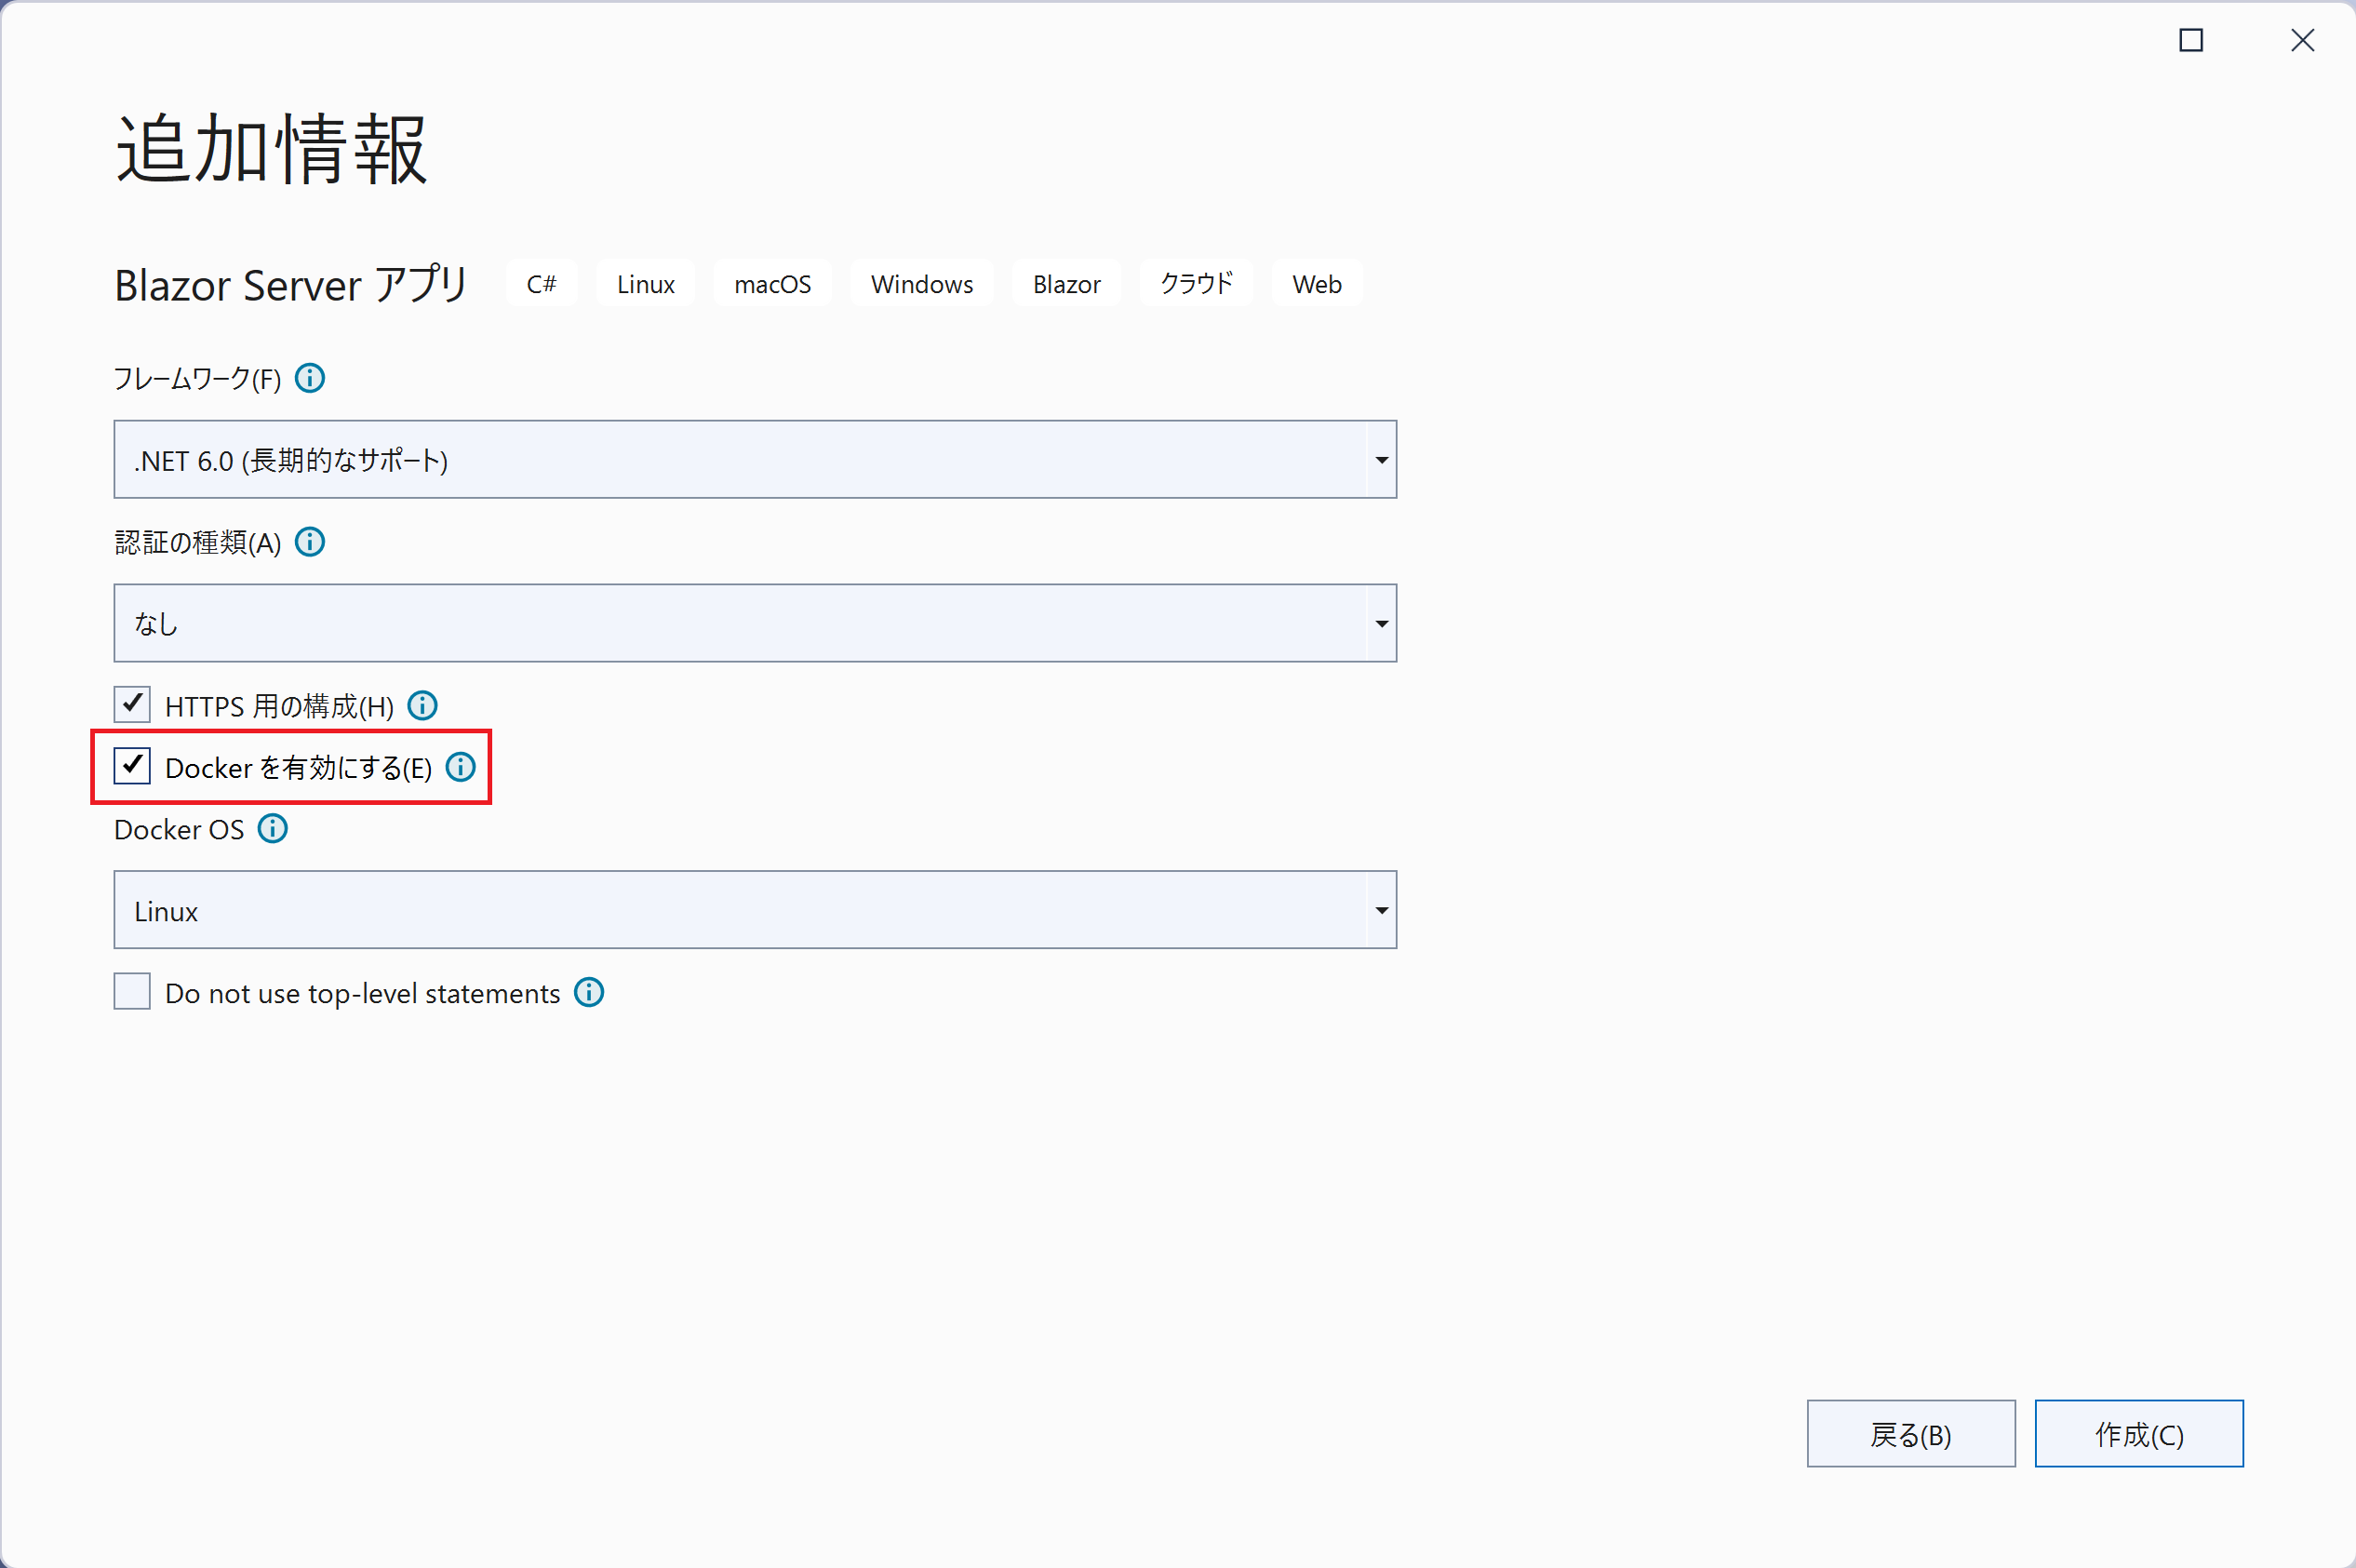
「Docker を有効にする」のチェックをONにして[作成]をクリックします。
Albumクラスの追加
DataフォルダにAlbum.csを追加して以下のようにAlbumクラスを追加します。
using System.Text.Json.Serialization;

namespace BlazorServerApp1.Data
{
    public class Album
    {
        [JsonPropertyName("id")]
        public int Id { get; set; }

        [JsonPropertyName("title")]
        public string? Title { get; set; }

        [JsonPropertyName("artist")]
        public string? Artist { get; set; }

        [JsonPropertyName("price")]
        public double Price { get; set; }

        [JsonPropertyName("image_url")]
        public string? Image_url { get; set; }
    }
}
HttpClientサービスを追加
Program.csを以下のように更新してHttpClientサービスを追加します。
using BlazorApp1.Data;
using Microsoft.AspNetCore.Components;
using Microsoft.AspNetCore.Components.Web;

var builder = WebApplication.CreateBuilder(args);

// Add services to the container.
builder.Services.AddRazorPages();
builder.Services.AddServerSideBlazor();
builder.Services.AddSingleton<WeatherForecastService>();

builder.Services.AddHttpClient();

var app = builder.Build();

// Configure the HTTP request pipeline.
if (!app.Environment.IsDevelopment())
{
    app.UseExceptionHandler("/Error");
    // The default HSTS value is 30 days. You may want to change this for production scenarios, see https://aka.ms/aspnetcore-hsts.
    app.UseHsts();
}

app.UseHttpsRedirection();

app.UseStaticFiles();

app.UseRouting();

app.MapBlazorHub();
app.MapFallbackToPage("/_Host");

app.Run();
Web APIを呼び出すページを追加
PagesフォルダにWeb APIを呼び出すページとしてCallWebAPI.razorを追加して内容を以下のように更新します。
@page "/call-web-api"
@using BlazorApp1.Data
@using System.Text.Json
@inject IHttpClientFactory ClientFactory

<PageTitle>Call Web API</PageTitle>

<h1>Albums</h1>

@if (albums == null)
{
    <p><em>Loading...</em></p>
}
else
{
    <table class="table">
        <thead>
            <tr>
                <th>番号</th>
                <th>タイトル</th>
                <th>アーティスト</th>
                <th>価格</th>
                <th>URL</th>
            </tr>
        </thead>
        <tbody>
            @foreach (var album in albums)
            {
                <tr>
                    <td>@album.Id</td>
                    <td>@album.Title</td>
                    <td>@album.Artist</td>
                    <td>@album.Price</td>
                    <td>@album.Image_url</td>
                </tr>
            }
        </tbody>
    </table>
}

@code {
    private IEnumerable<Album>? albums = Array.Empty<Album>();

    protected override async Task OnInitializedAsync() => await GetAlbums();

    private async Task GetAlbums()
    {
        var request = new HttpRequestMessage(HttpMethod.Get,
            "https://containerapp1-20220711154103.greencliff-1d8ee976.japaneast.azurecontainerapps.io/albums");

        var client = ClientFactory.CreateClient();

        var response = await client.SendAsync(request);

        if (response.IsSuccessStatusCode)
        {
            using var responseStream = await response.Content.ReadAsStreamAsync();
            albums = await JsonSerializer.DeserializeAsync<IEnumerable<Album>>(responseStream);
        }
    }
}
48、49行目でWeb APIのURLを設定しています。URLはWeb APIのエンドポイント「先ほどデプロイしたWeb APIのURL + /albums」を設定します。
CallWebAPI.razorで設定したページ「/call-web-api」を参照するために、SharedフォルダにあるNavMenu.razorを以下のように更新します。
<div class="top-row ps-3 navbar navbar-dark">
    <div class="container-fluid">
        <a class="navbar-brand" href="">BlazorApp1</a>
        <button title="Navigation menu" class="navbar-toggler" @onclick="ToggleNavMenu">
            <span class="navbar-toggler-icon"></span>
        </button>
    </div>
</div>

<div class="@NavMenuCssClass" @onclick="ToggleNavMenu">
    <nav class="flex-column">
        <div class="nav-item px-3">
            <NavLink class="nav-link" href="" Match="NavLinkMatch.All">
                <span class="oi oi-home" aria-hidden="true"></span> Home
            </NavLink>
        </div>
        <div class="nav-item px-3">
            <NavLink class="nav-link" href="counter">
                <span class="oi oi-plus" aria-hidden="true"></span> Counter
            </NavLink>
        </div>
        <div class="nav-item px-3">
            <NavLink class="nav-link" href="fetchdata">
                <span class="oi oi-list-rich" aria-hidden="true"></span> Fetch data
            </NavLink>
        </div>
        <div class="nav-item px-3">
            <NavLink class="nav-link" href="call-web-api">
                <span class="oi oi-code" aria-hidden="true"></span> Call Web API
            </NavLink>
        </div>
    </nav>
</div>

@code {
    private bool collapseNavMenu = true;

    private string? NavMenuCssClass => collapseNavMenu ? "collapse" : null;

    private void ToggleNavMenu()
    {
        collapseNavMenu = !collapseNavMenu;
    }
}
27~31行目で/call-web-apiを参照するメニューの要素を追加しています。これでBlazor Serverアプリの作成は完了です。
Azure Container Appsへデプロイ
作成したBlazor ServerアプリケーションをAzure Container Appsへデプロイします。プロジェクトを右クリックしてコンテキストメニューから[公開]をクリックし、ターゲットとして「Azure」を選択します。
さらにそこから特定のターゲットとして「Azure Container Apps (Linux)」を選択して[次へ]をクリックします。
コンテナーアプリの設定をしていきます。「コンテナー アプリ名」、「リソースグループ」、「Container Apps 環境」、「コンテナー名」をそれぞれ設定した後に[作成]をクリックします。
作成が完了すると以下の画面に切り替わるので[次へ]をクリックします。
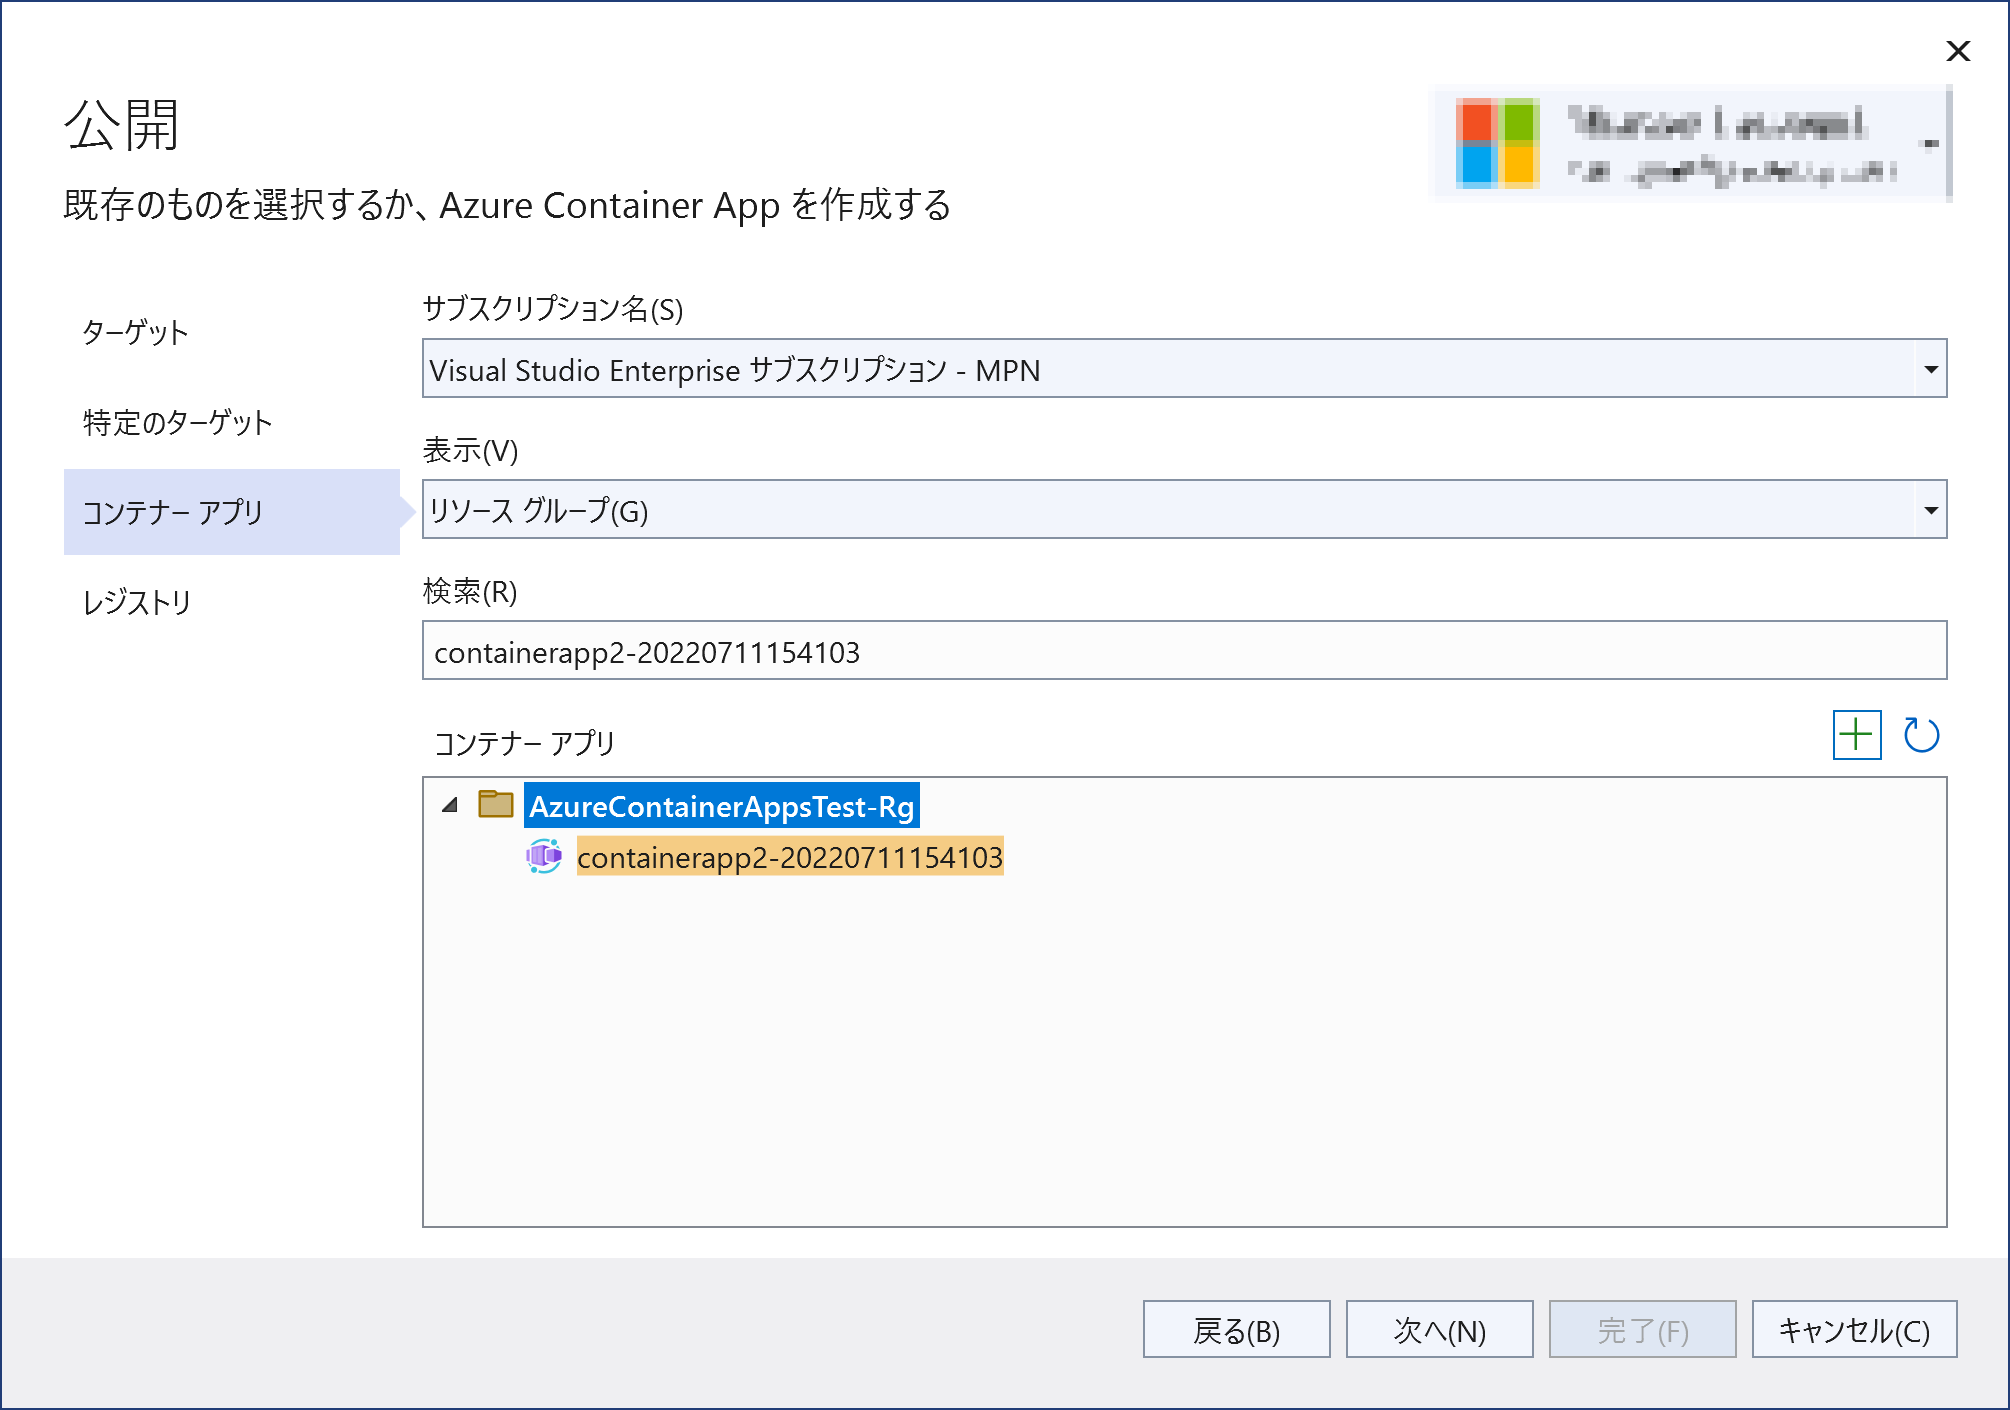
コンテナーレジストリはWeb APIをデプロイする際に作成したレジストリを設定します。
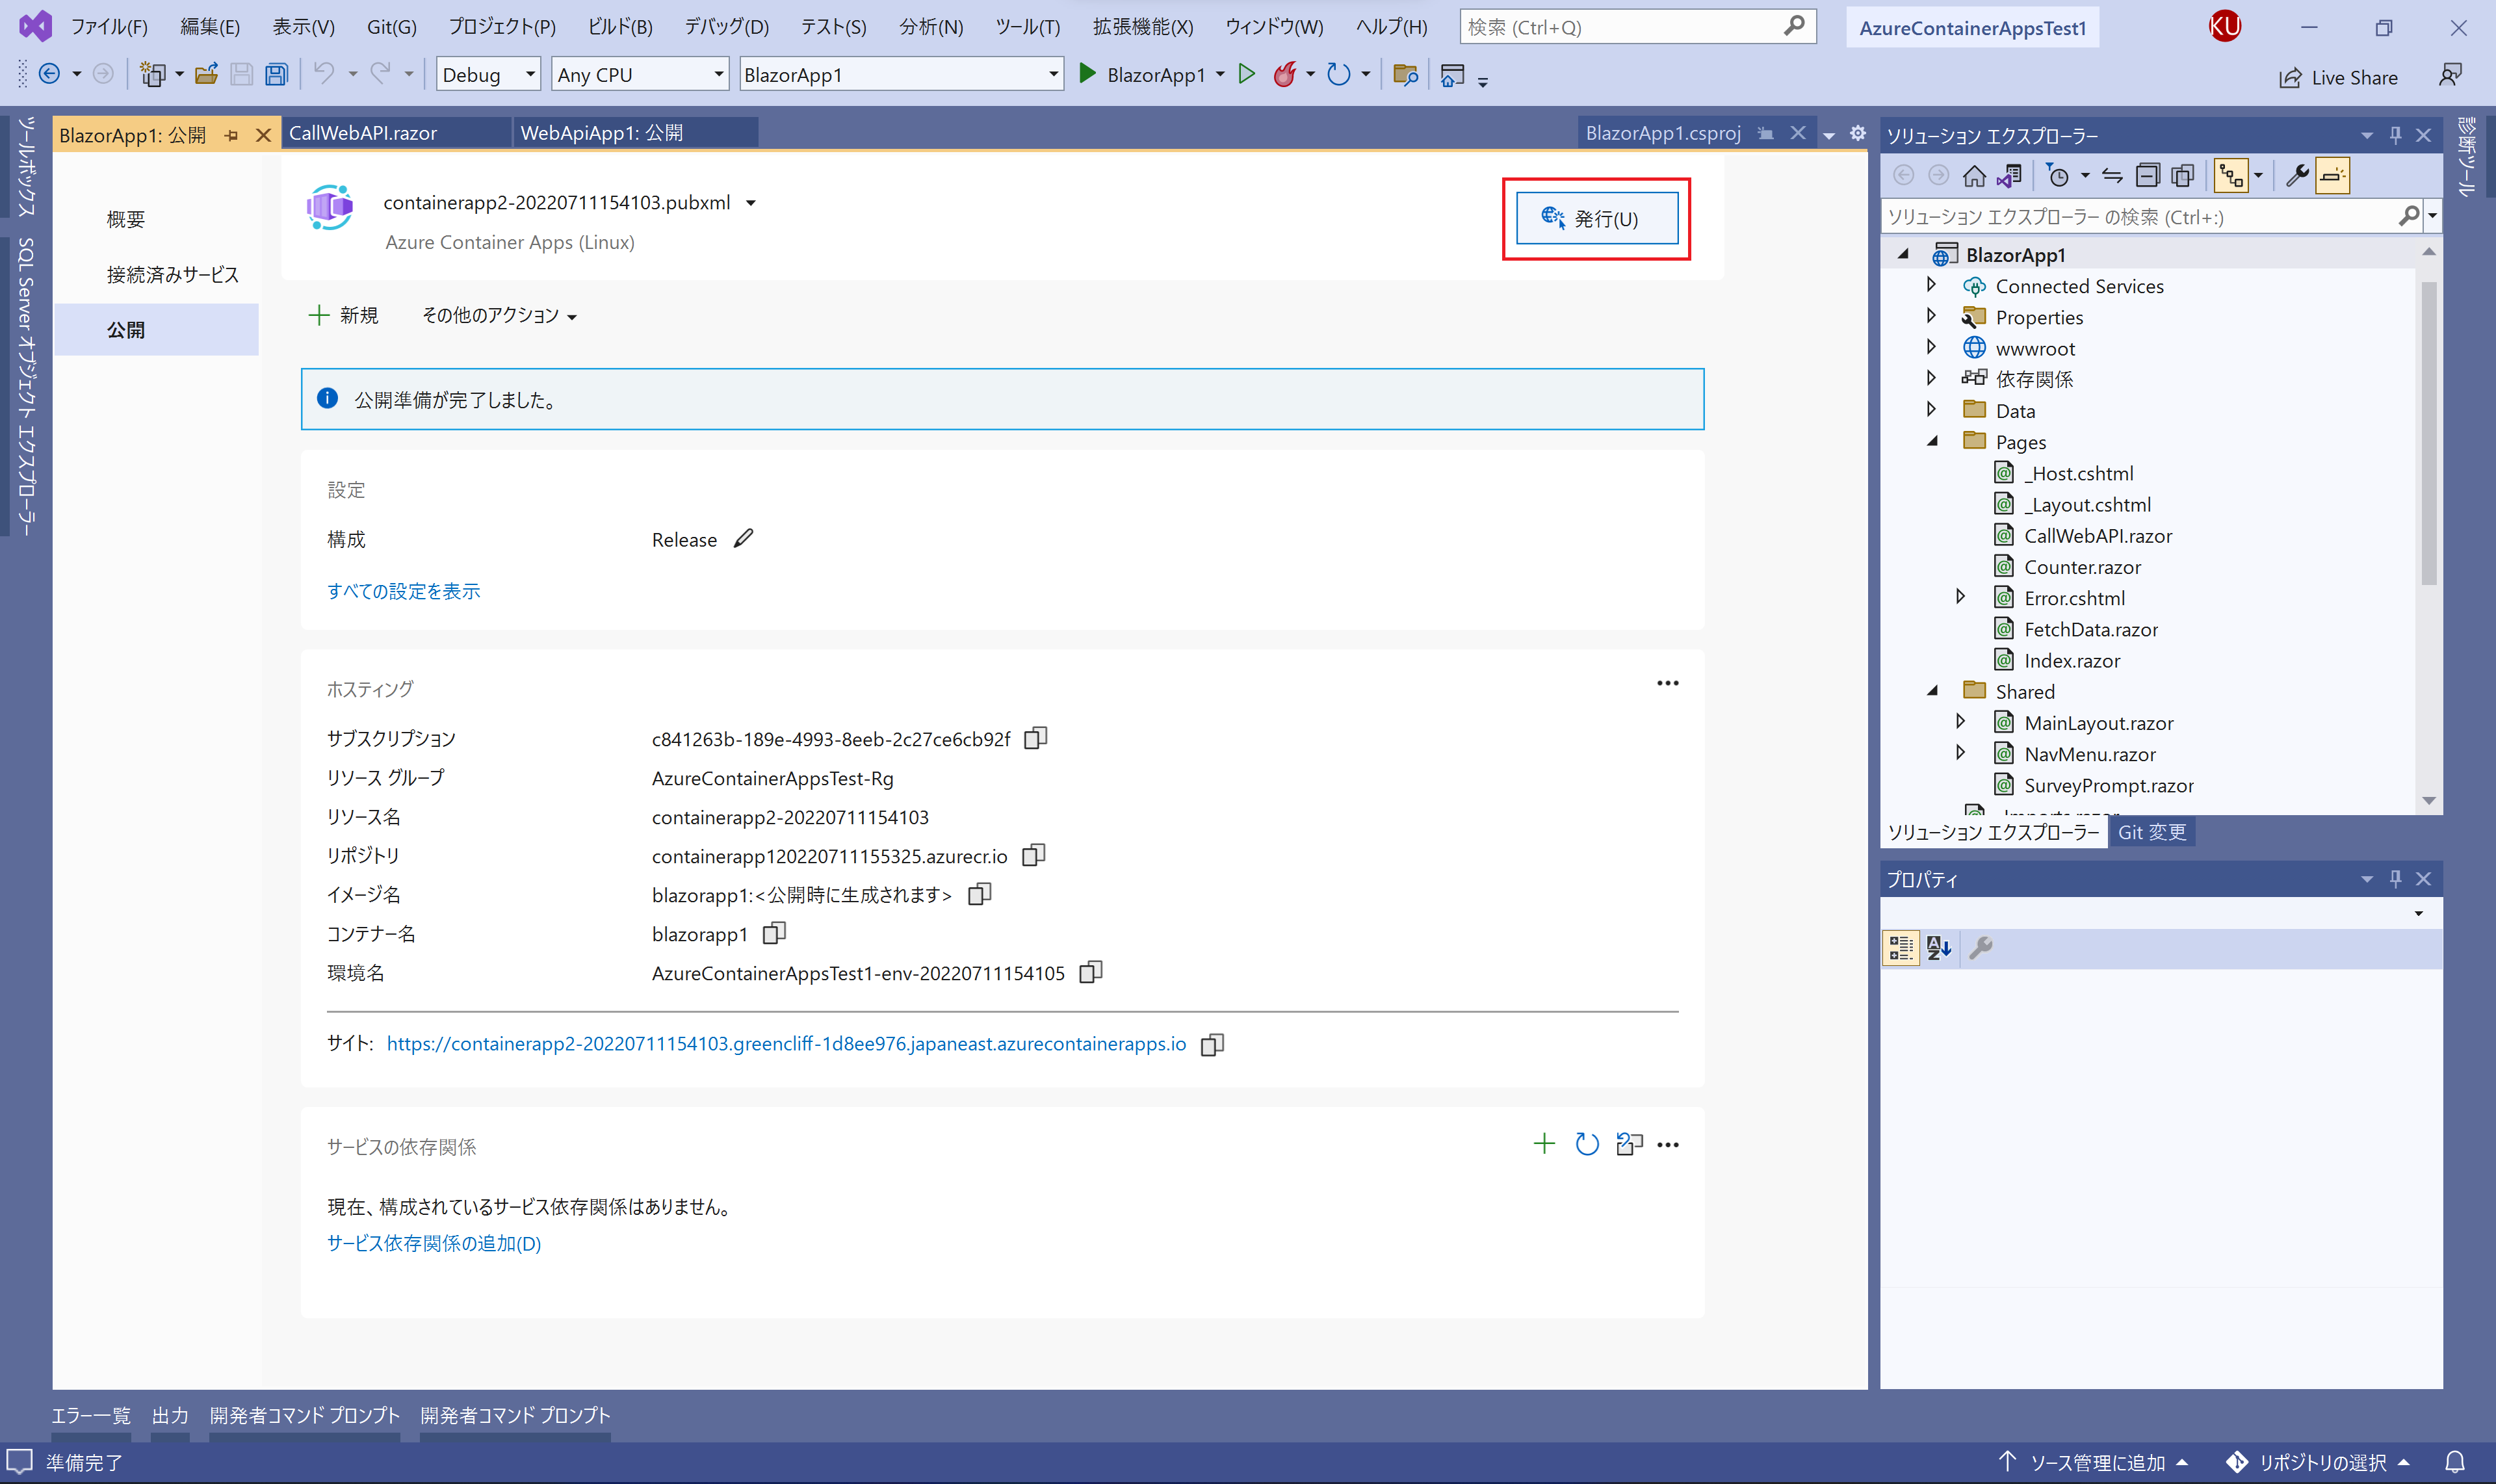
これでデプロイの準備は完了です。以下の画面で[発行]をクリックしてデプロイを実施します。
動作を確認してみる
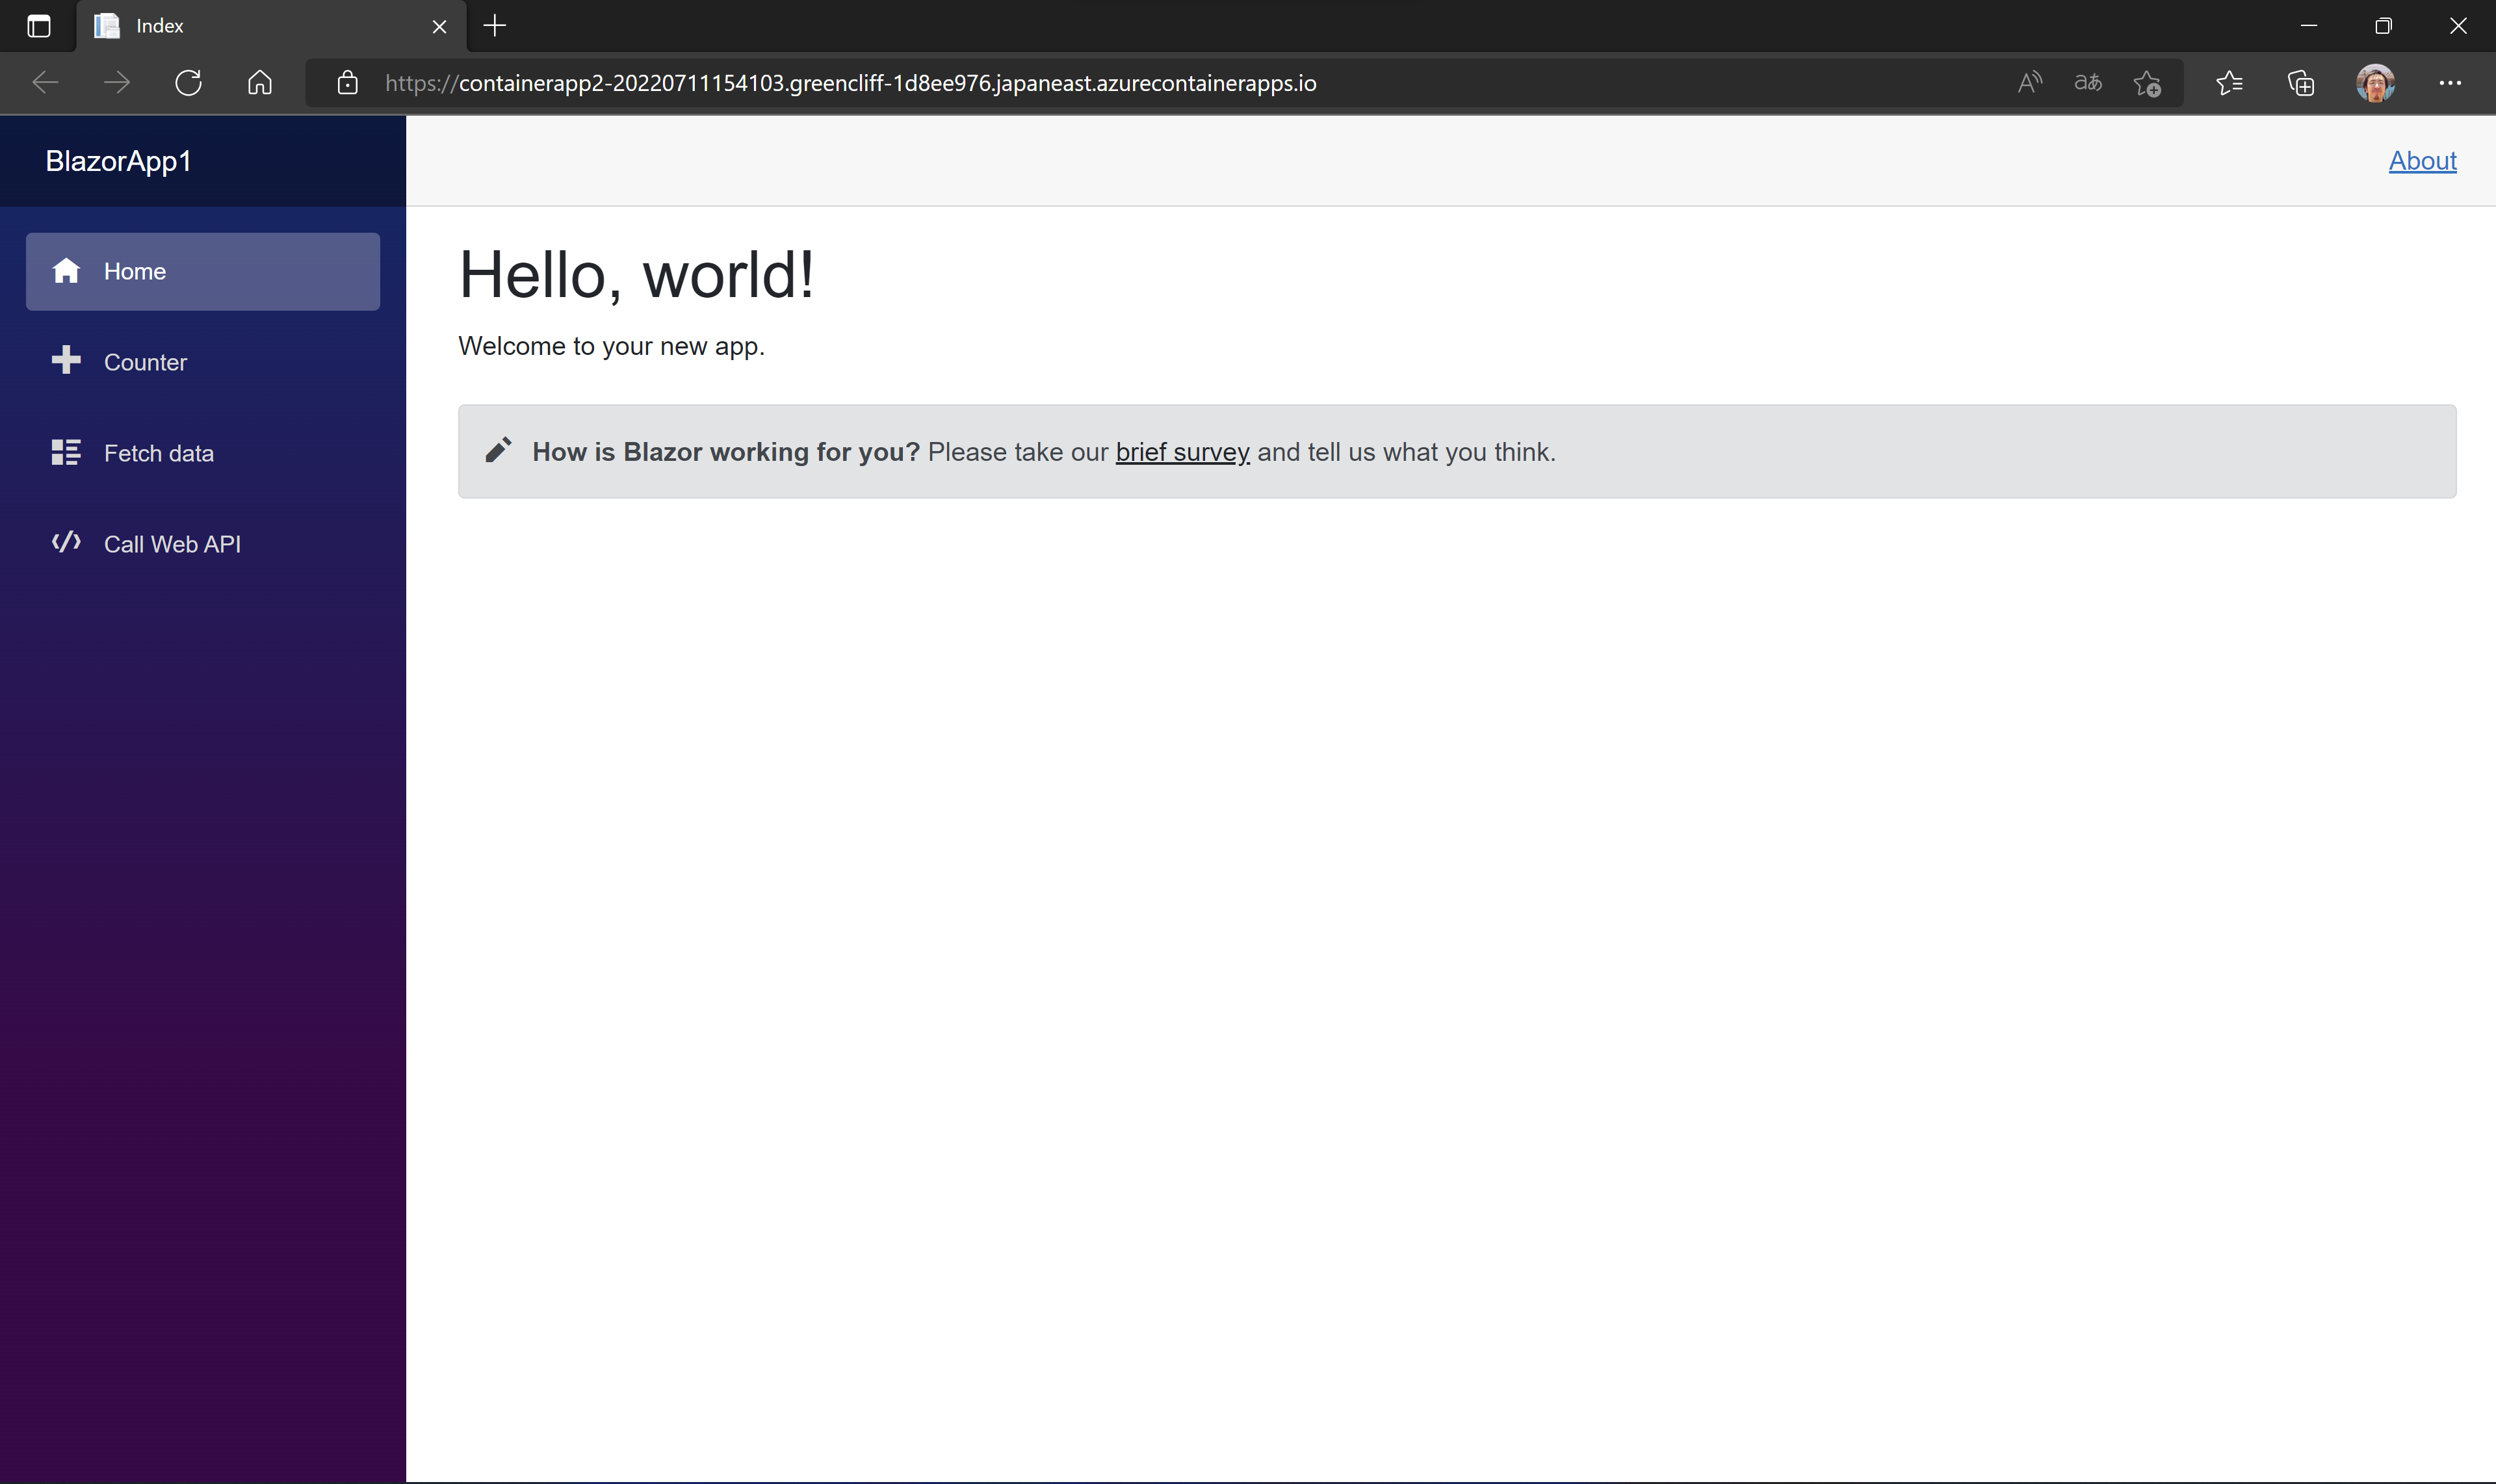
デプロイが完了すると、Blazor ServerアプリのURLでブラウザが起動します。
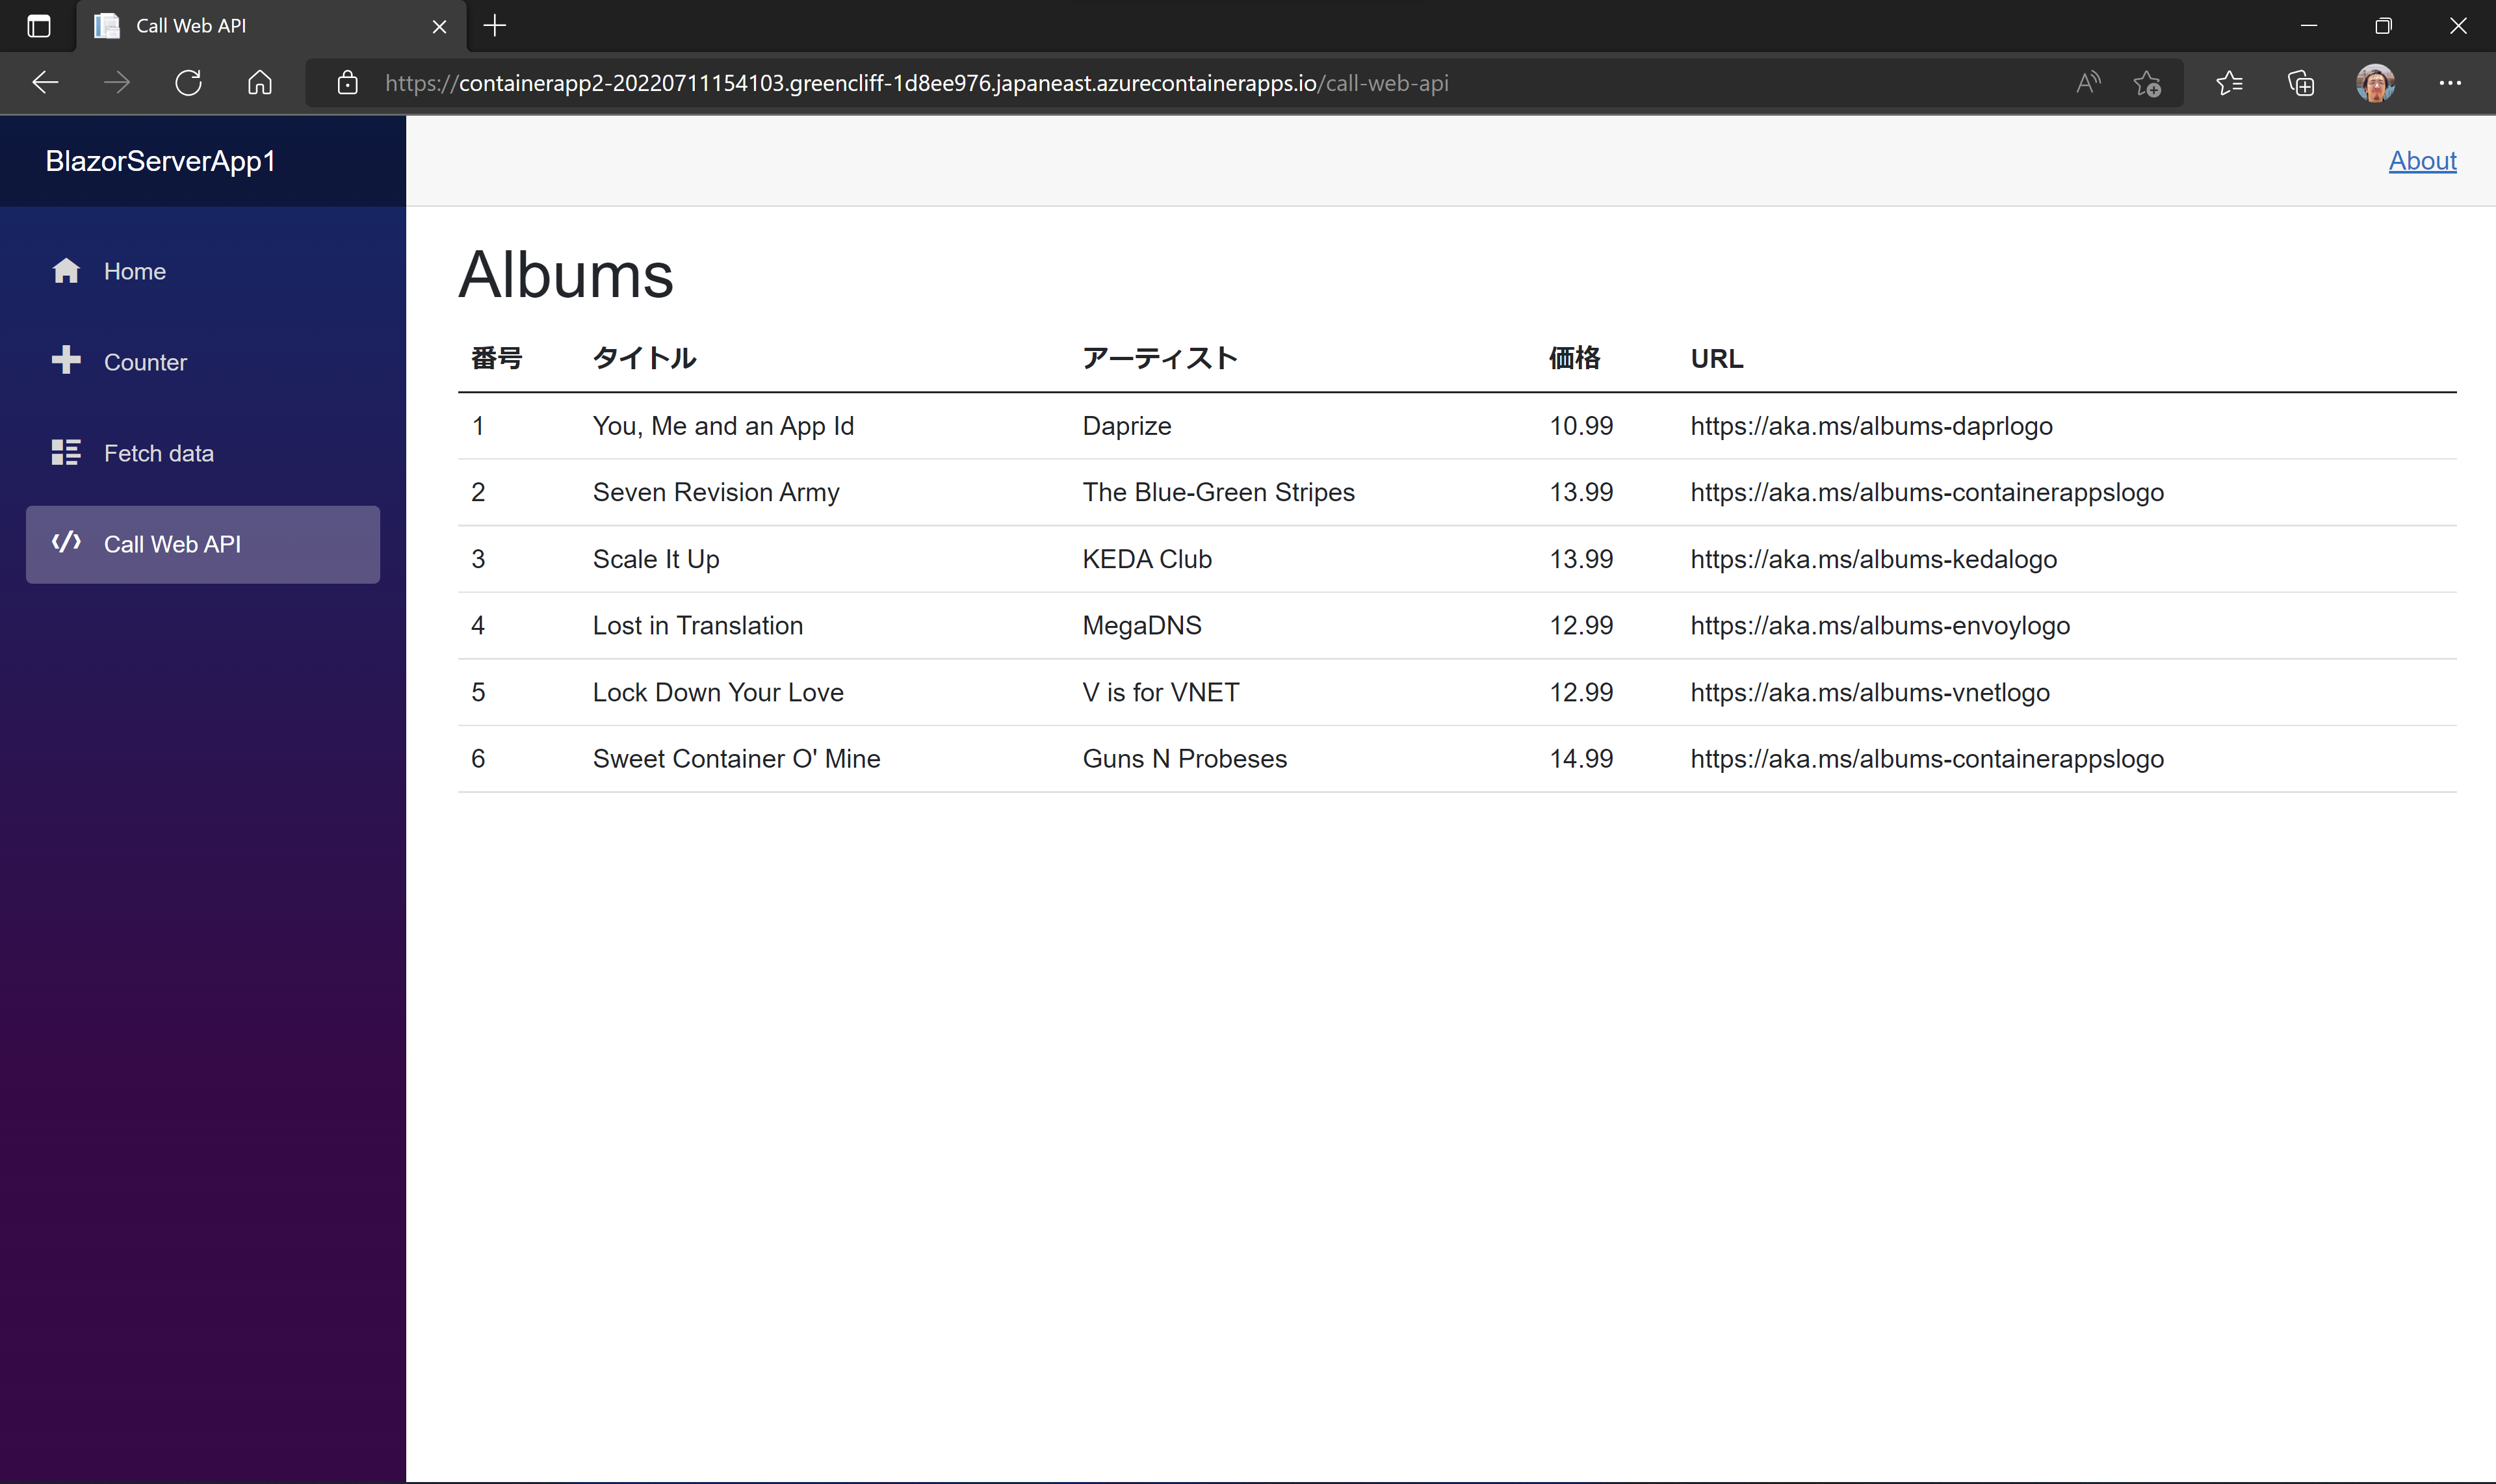
左側のメニューから「Call Web API」を選択してBlazor ServerアプリからWeb APIを呼び出します。以下のようにWeb APIから取得したデータが表示されていることが確認できます。
さいごに
今回はAzure Container AppsへBlazor ServerアプリとASP.NET Core Web APIアプリをそれぞれコンテナーアプリとしてデプロイして、Blazor ServerアプリからWeb APIを呼び出してデータを表示作成してみました。
Visual Studioを使うと、作成したアプリケーションをAzure Container Appsへデプロイする手順を従来のAzure App Serviceにデプロイするのとほぼ同じように、非常にシンプルに行うことができると思います。
上記コードを実装しているサンプルはコチラです。