「Gemini」はGoogleが開発したマルチモーダル(異なる種類のデータを同時に処理できる)大規模言語モデルです。テキスト、コード、オーディオ、画像、動画など、様々な種類の情報を理解し、生成することができます。
Geminiは開発者がGeminiの機能を自社のアプリケーションやサービスに組み込むためのインターフェースとして「Gemini API」を提供しており、APIを通じてテキスト生成をはじめとしたGeminiの各種機能を使用することができます。
今回は便利で快適な入力フォーム開発に特化したJavaScriptライブラリ「InputManJS(インプットマンJS)」のリッチテキストエディタコントロールとGemini APIを連携させて、リッチテキストエディタコントロールにAIを活用した入力支援機能を追加する方法をご紹介します。
目次
Gemini APIとは
Gemini APIは、開発者がGeminiの高度な機能を自社のアプリケーションやサービスに組み込むためのインターフェースです。
APIを通じてGeminiの以下の機能を活用できます。
- 埋め込み生成:テキストや画像をベクトル形式の埋め込みに変換し、類似性検索やクラスタリングなどのタスクに利用できます。
- テキスト生成:ストーリー、記事、メール、スクリプトなど、様々なテキストコンテンツを生成できます。
- 画像理解と生成:画像の内容を理解したり、説明文に基づいた画像を生成したりできます。
- マルチモーダル推論:テキストと画像を組み合わせた質問に答えたり、画像を基にテキストを生成したりできます。
Gemini APIの料金体系
Gemini APIの利用には無料枠と有料枠があり、料金は利用するモデル、入力トークン数、出力トークン数などによって変動します。利用可能なモデルや料金も日々変更されるので、最新の料金体系については、Google AI for Developersの公式ドキュメントで確認してください。
Gemini APIの導入方法
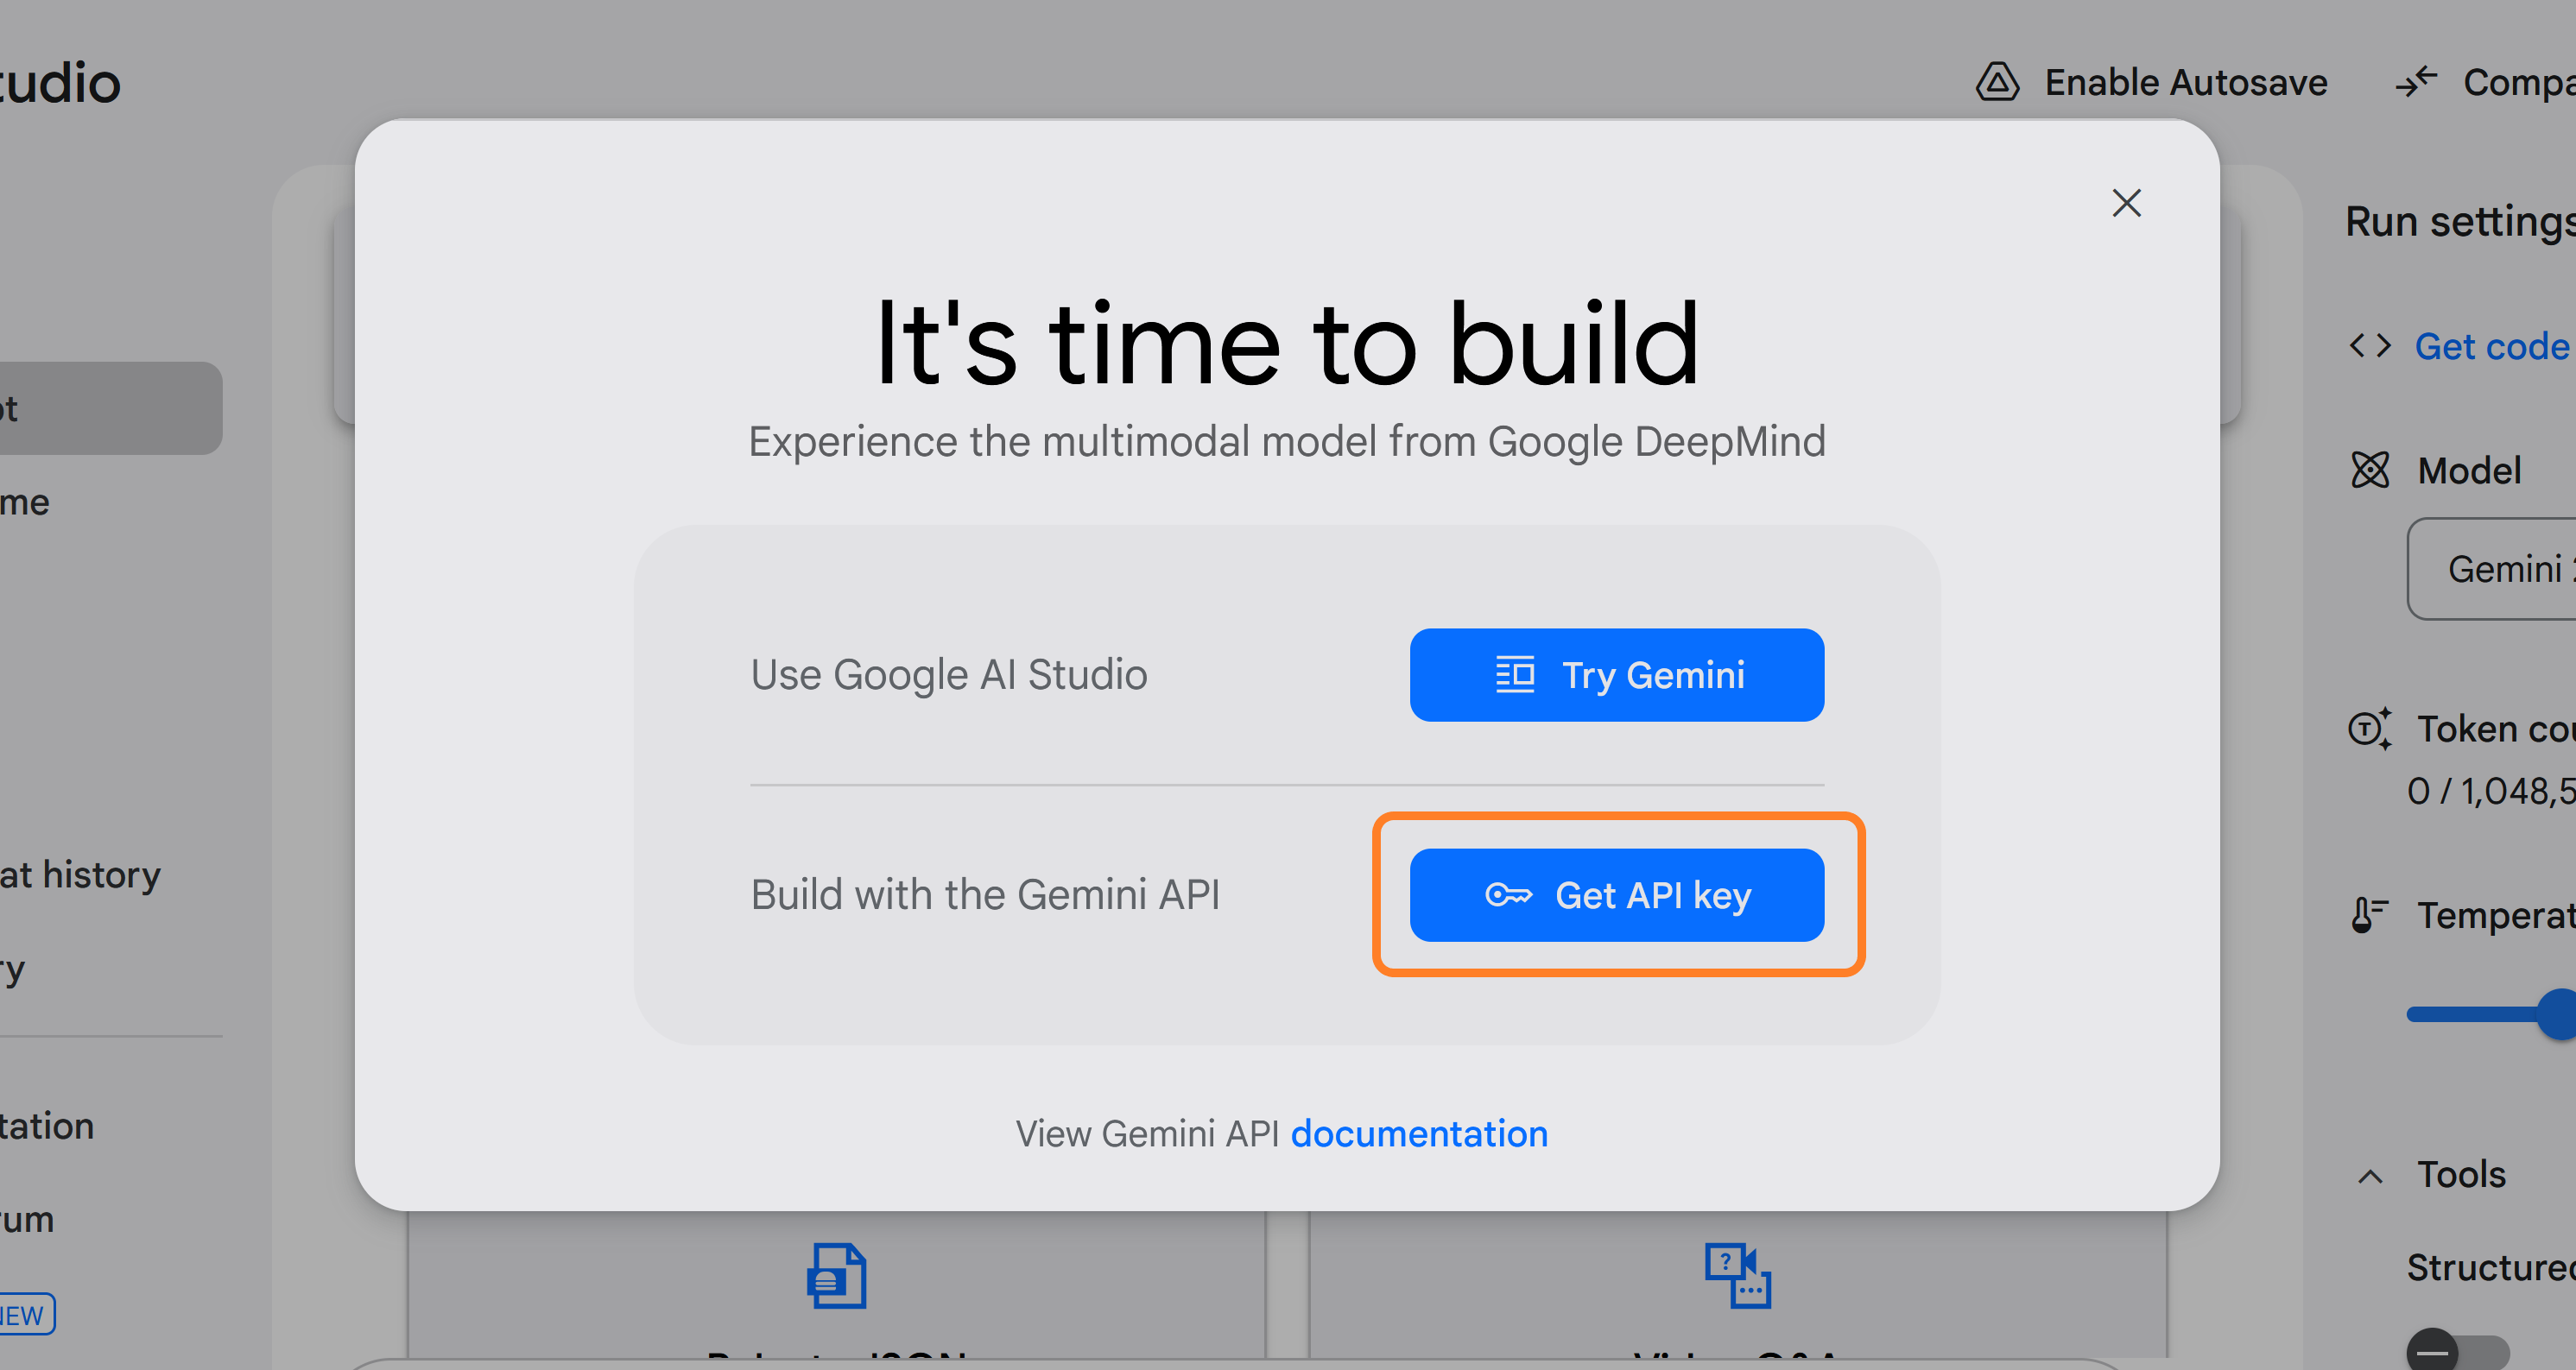
Gemini APIを使用するには、Googleが提供する生成AIを試験的に活用できる開発プラットフォーム「Google AI Studio」からAPIキーを取得します。

GoogleアカウントにログインしてGoogle AI Studioにアクセスすると、以下のようなダイアログが表示されるので、[Get API Key]を押下します。
または、左側のメニューからも選択できます。

Google APIの利用規約に同意して進みます。

[APIキーを生成]ボタンを押下するとキーが生成されます。


Gemini APIをWebアプリケーションに組み込む
ここからは取得したAPIキーを使用して、WebアプリケーションにGemini APIを組み込んでいきます。
InputManJSを使用したWebアプリケーションの作成
まずはベースとなるWebアプリケーションを作成していきます。今回はGemini APIが生成した結果の出力先としてInputManJSのリッチテキストエディタコントロールを、Gemini APIへ渡すプロンプトの入力フォームとして複数行テキストコントロールをそれぞれ使用します。
TypeScriptのプロジェクトの作成
ターミナル、またはコマンドプロンプトから以下のコマンドを実行し、ViteでTypeScriptのプロジェクトを作成します。
npm create vite@latest inputmanjs-gemini-api -- --template vanilla-ts続けて以下のコマンドを実行します。
cd inputmanjs-gemini-api
npm install
必要なライブラリのインストールが完了したら、以下のコマンドでアプリケーションを起動します。
npm run dev「http://localhost:5173/」にブラウザでアクセスすると、以下のようなアプリケーションが立ち上がります。

InputManJSのインストールと組み込み
次に以下のコマンドを実行し、プロジェクトにInputManJSのライブラリをインストールします。
npm install @mescius/inputman @mescius/inputman.richtexteditorまた、Gemini APIからのレスポンスの取得には時間がかかる場合があるので、BootstrapをインストールしてローディングのスピナーのUIも実装します。
npm install bootstrap@5.3.0次に「index.html」を以下のように置き換え、InputManJSの複数行テキスト、リッチテキストエディタ、及びローディング時のスピナーのUIを定義します。
<!doctype html>
<html lang="ja">

<head>
  <meta charset="UTF-8" />
  <meta name="viewport" content="width=device-width, initial-scale=1.0" />
  <title>InputManJS × Gemini</title>
</head>

<body>
  <!-- 画面中央のスピナー -->
  <div id="loadingSpinner">
    <div class="spinner-border text-primary" role="status">
      <span class="visually-hidden">Loading...</span>
    </div>
  </div>
  <div id="inputContainer">
    <textarea id="gcMultiLineTextBox"></textarea>
    <button id="send" type="button" class="btn btn-primary">送信</button><br /><br />
  </div>
  <div>
    <textarea id="gcRichTextEditor1"></textarea>
  </div>
  <script type="module" src="/src/main.ts"></script>
</body>

</html>
「src/main.ts」を以下のように置き換え、InputManJSのコントロールの初期化処理等を行います。
※ ライセンスキーを設定しない場合トライアル版を示すメッセージが表示されます。ライセンスキーの入手や設定方法についてはこちらをご覧ください。
import "@mescius/inputman.richtexteditor/CSS/gc.inputman.richtexteditor.css";
import "./style.css";
import '@mescius/inputman/CSS/gc.inputman-js.css';
import { InputMan } from '@mescius/inputman';
import * as GcRichtexteditor from '@mescius/inputman.richtexteditor';
import "bootstrap/dist/css/bootstrap.min.css";

// ライセンスキーの設定
InputMan.LicenseKey = "ここにInputManJSのライセンスキーを設定します";
InputMan.appearanceStyle = InputMan.AppearanceStyle.Modern;

const spinner = document.getElementById("loadingSpinner") as HTMLElement;
const sendButton = <HTMLElement>document.getElementById("send");

const gcMultiLineTextBox = new InputMan.GcMultiLineTextBox(<HTMLTextAreaElement>document.getElementById("gcMultiLineTextBox"), {
  width: 500,
  height: 100,
  watermarkDisplayNullText: "プロンプトを入力してください。",
});

const gcRichTextEditor = new GcRichtexteditor.InputMan.GcRichTextEditor(
  <HTMLInputElement>document.getElementById("gcRichTextEditor1"),
  {
    baseUrl:
      "../node_modules/@mescius/inputman.richtexteditor/JS",
    plugins: [GcRichtexteditor.InputMan.GcRichTextEditorPluginItem.All],
    menubar: [
      GcRichtexteditor.InputMan.GcRichTextEditorMenuBarItem.File,
      GcRichtexteditor.InputMan.GcRichTextEditorMenuBarItem.Edit,
      GcRichtexteditor.InputMan.GcRichTextEditorMenuBarItem.Format,
    ],
    toolbar: [
      "newdocument",
      "restoredraft",
      "preview",
      "print",
      "undo",
      "redo",
      "cut",
      "copy",
      "paste",
      "pastetext",
      "selectall",
      "searchreplace",
      "htmlcode",
      "fullscreen",
      "image",
      "link",
      "media",
      "template",
      "charmap",
      "emoticons",
      "hr",
      "pagebreak",
      "blockquote",
      "bold",
      "italic",
      "underline",
      "strikethrough",
      "superscript",
      "subscript",
      "styles",
      "fontfamily",
      "fontsize",
      "align",
      "lineheight",
      "forecolor",
      "backcolor",
      "removeformat",
      "wordcount",
      "table",
      "ltr",
      "rtl",
      "outdent",
      "indent",
      "bullist",
      "numlist",
    ],
    height: 530,
  }
);
「src/style.css」を以下のように置き換え、余白やスピナーのスタイル等を設定します。
body{
  padding: 10px;
}

/* ウォーターマークのスタイル */
.gcim_watermark_null textarea{
  color: lightgrey;
}

#inputContainer {
  display: flex;
  align-items: flex-end; /* ボタンを下揃え */
  gap: 10px;
  margin-bottom: 10px;
}

#loadingSpinner {
  position: fixed;
  top: 50%;
  left: 50%;
  transform: translate(-50%, -50%);
  display: none; /* 初期状態は非表示 */
  align-items: center;
  justify-content: center;
  width: 100%;
  height: 100%;
  background-color: rgb(255 255 255 / .8); /* 半透明の背景 */
  z-index: 1000;
}
以上の設定が完了したら、再度アプリケーションを実行します。以下のようにInputManJSの複数行テキストとリッチテキストエディタが組み込まれた画面が表示されます。

Gemini APIとの連携機能の組み込み
次にGemini APIとの連携機能を組み込んでいきます。JavaScript用のGoogle AI SDKと、Gemini APIからのレスポンスをマークダウン形式からHTML形式に変換するために「marked」をインストールします。
npm install @google/generative-ai markedインストールが完了したら「src/main.ts」を以下のように追記し、Google AI Studioから取得したAPIキーや、使用するモデルを設定します。また、[送信]ボタンクリック時に、InputManJSの複数行テキストに入力されたプロンプトをGemini APIに送信し、返却されたレスポンスをInputManJSのリッチテキストエディタに表示する処理を定義します。さらに、レスポンスが表示されるまでスピナーを表示するように処理も追加しています。
import { GoogleGenerativeAI } from "@google/generative-ai";
import { marked } from "marked";
・・・(中略)・・・
const API_KEY = "Google AI Studioから取得したAPIキー";
const genAI = new GoogleGenerativeAI(API_KEY);
const model = genAI.getGenerativeModel({ model: "gemini-2.0-flash" });
・・・(中略)・・・
sendButton.onclick = async function (): Promise<void> {

  const prompt = gcMultiLineTextBox.text;

  if (prompt && prompt.length > 0) {
    spinner.style.display = "flex";
    try {
      const result = await model.generateContent(prompt);
      const response = result.response;
      const text = response.text();
      const html = marked.parse(text);
      gcRichTextEditor.setContent(html.toString(), GcRichtexteditor.InputMan.ContentFormat.Html);
    } catch (error) {
      console.error("Gemini API エラー:", error);
    } finally {
      // スピナーを非表示
      spinner.style.display = "none";
    }
  }else{
    alert('プロンプトを入力してください。');
  }
};
上記コードを追加して再度実行すると、複数行テキストに入力されたプロンプトから生成されたコンテンツをリッチテキストエディタに表示できます。以下はGemini APIに関するブログ記事を生成した例です。
Gemini APIを使用してリッチテキストエディタの機能を拡張する
次にGemini APIを使用してInputManJSのリッチテキストエディタの入力支援機能を拡張してみたいと思います。
リッチテキストエディタに翻訳機能を追加する
リッチテキストエディタのメニューバーに、エディタ上で選択した文章を翻訳する翻訳アシスタント機能を追加します。addCommandメソッドで翻訳結果を取得するカスタムコマンドを追加し、execCommandメソッドで実行します。ここでは翻訳の指示をするプロンプトをコード中に記述しています。メニューバーへのメニューの追加にはregisterMenuItemメソッドを使用します。
・・・(中略)・・・
const languages = ['english', 'spanish', 'french', 'german', 'italian', 'hindi', 'chinese', 'korean', 'japanese'];
let selectedLang = 'english';
・・・(中略)・・・
const gcRichTextEditor = new GcRichtexteditor.InputMan.GcRichTextEditor(
  <HTMLInputElement>document.getElementById("gcRichTextEditor1"),
  {
    baseUrl:
      "../node_modules/@mescius/inputman.richtexteditor/JS",
    plugins: [GcRichtexteditor.InputMan.GcRichTextEditorPluginItem.All],
    menubar: [
      GcRichtexteditor.InputMan.GcRichTextEditorMenuBarItem.File,
      GcRichtexteditor.InputMan.GcRichTextEditorMenuBarItem.Edit,
      GcRichtexteditor.InputMan.GcRichTextEditorMenuBarItem.Format,
      "translate",
    ],
    menu: {
      translate: {
        title: "翻訳アシスタント",
        items: languages,
      },
    },
    toolbar: [
・・・(中略)・・・
    height: 530,
    setup: (gcRichTextEditor) => {
      languages.forEach((lang) => {
        //メニューバーの項目を追加
        gcRichTextEditor.registerMenuItem(lang, {
          text: lang.charAt(0).toUpperCase() + lang.slice(1),
          enabled: true,
          onAction: () => {
            selectedLang = lang;
            //コマンドの追加
            gcRichTextEditor.execCommand("getTranslation", false);
          },
        });
      });
    },
・・・(中略)・・・
//コマンドで処理を追加(選択内容を翻訳する)
gcRichTextEditor.addCommand("getTranslation", async () => {
  let selectedText = gcRichTextEditor.getSelection();
  if (selectedText && selectedText.length > 0) {
    spinner.style.display = "flex";

    try {
      const translated = await getTranslate(selectedText, selectedLang);
      gcRichTextEditor.replaceSelection(translated, GcRichtexteditor.InputMan.ContentFormat.Text);
    } catch (error) {
      console.error("Gemini API エラー:", error);
    } finally {
      // スピナーを非表示
      spinner.style.display = "none";
    }
  }else{
    alert('翻訳したい文章を選択してください。');
  }
});

// 翻訳機能ヘルパー関数
async function getTranslate(selectedText: string, lang: string) {
  // 翻訳結果のみを生成するように指示を出す
  const prompt = `No need detail explanation, just translate the following text to ${lang}: ${selectedText}`;
  const result = await model.generateContent(prompt);

  const response = result.response;
  const text = response.text();
  return text;
}
上記コードを追加して再度実行します。文章を選択し、追加した「翻訳アシスタント」メニューから翻訳する言語を選択すると、文章をその言語に翻訳できます。
リッチテキストエディタに校正機能を追加する
次にリッチテキストエディタのツールバーのメニューとして、エディタ上で選択した文章の誤字脱字などをチェックする簡易的な校正機能を追加します。先ほどと同様にaddCommandメソッドで校正結果を取得するカスタムコマンドを追加し、execCommandメソッドで実行します。メニューの追加にはregisterToolbarItemメソッドを使用します。
・・・(中略)・・・
      "bullist",
      "numlist",
      "collection"
    ],
・・・(中略)・・・
gcRichTextEditor.registerToolbarItem('collection', {
  text: '校正',
  tooltip: '選択した文章を校正して置き換える',
  enabled: false,
  onAction: () => {
    gcRichTextEditor.execCommand('getCollection', false);
  },
});

//コマンドで処理を追加(選択内容を校正する)
gcRichTextEditor.addCommand("getCollection", async () => {
  let selectedText = gcRichTextEditor.getSelection();
  if (selectedText && selectedText.length > 0) {

    spinner.style.display = "flex";

    try {
      const result = await getCollection(selectedText);
      const isConfirmed = window.confirm(`次の文章に置き換えます。よろしいですか?\n\n${result}`);
      if (isConfirmed) {
        gcRichTextEditor.replaceSelection(result, GcRichtexteditor.InputMan.ContentFormat.Text);
      }
    } catch (error) {
      console.error("Gemini API エラー:", error);
    } finally {
      // スピナーを非表示
      spinner.style.display = "none";
    }
  }else{
    alert('校正したい文章を選択してください。');
  }
});

// 校正機能ヘルパー関数
async function getCollection(selectedText: string) {
  // プロンプト
  const prompt = `次の文章から、不自然な日本語を見つけて、修正すべき箇所を修正し、修正した後の文章案のみを返却してください。: ${selectedText}`;
  const result = await model.generateContent(prompt);
  const response = result.response;
  const text = response.text();
  return text;
}
上記コードを追加して再度実行します。誤字を含み、且つ読点の位置がおかしい文章を選択し、追加した「校正」メニュー選択すると、正しい日本語の文章を提案してくれます。そしてダイアログから[OK]を押下すると、その文章に置き換えができます。
作成したサンプルをStackBlitzで公開しているので、こちらもご覧ください。
※ サンプルはStackBlitzのWeb Container上で起動します。読み込みに時間がかかる場合があります。
※ AI機能の実行にはGoogle AI Studioから取得したAPIキーが必要です。
さいごに
今回はInputManJSのコントロールとGemini APIを連携し、AIを活用した入力支援機能を追加する方法をご紹介しました。InputManJSはGemini API以外のAIモデルとも連携可能なので、是非いろいろ試してみてください。
製品サイトでは、InputManJSの機能を手軽に体験できるデモアプリケーションやトライアル版も公開しておりますので、こちらもご確認ください。
また、ご導入前の製品に関するご相談、ご導入後の各種サービスに関するご質問など、お気軽にお問合せください。