今回は、「Vercel」が提供するクラウド開発プラットフォームとクラウドデータベースNeonを利用してクラウドCRUD Web APIを作成方法をご紹介します。
前回の記事は「Vercel」が提供するクラウド開発プラットフォームについて、その特長や基本的な使用方法についてご紹介しました。今回の記事では、このクラウド開発プラットフォームを利用して、CRUD Web APIの実装を行っていきたいと思います。
目次
プロジェクト・開発環境の準備
前回の記事ではVercelからプロジェクトを作成し、GitHubリポジトリへの追加とデプロイまでを行いました。ここからは、このプロジェクトを利用してCRUD Web APIの実装を行っていきたいと思います。
まずはじめに、以下の開発環境をご用意ください。
開発環境
- VSCode(Visual Studio Code)
- Node.js ※ LTS (長期サポート) バージョンのご利用をお勧めします
- Vercel CLI
- Git
VercelマーケットプレイスからNeonを追加
続いて、CRUD処理を行うためのデータの格納先として、Vercelマーケットプレイスからクラウドデータベース「Neon」を作成済みのプロジェクトに追加します。
今回使用する、Neonの特長や使い方など、詳しく解説内容は以下の記事でも紹介しています。こちらもご覧ください。
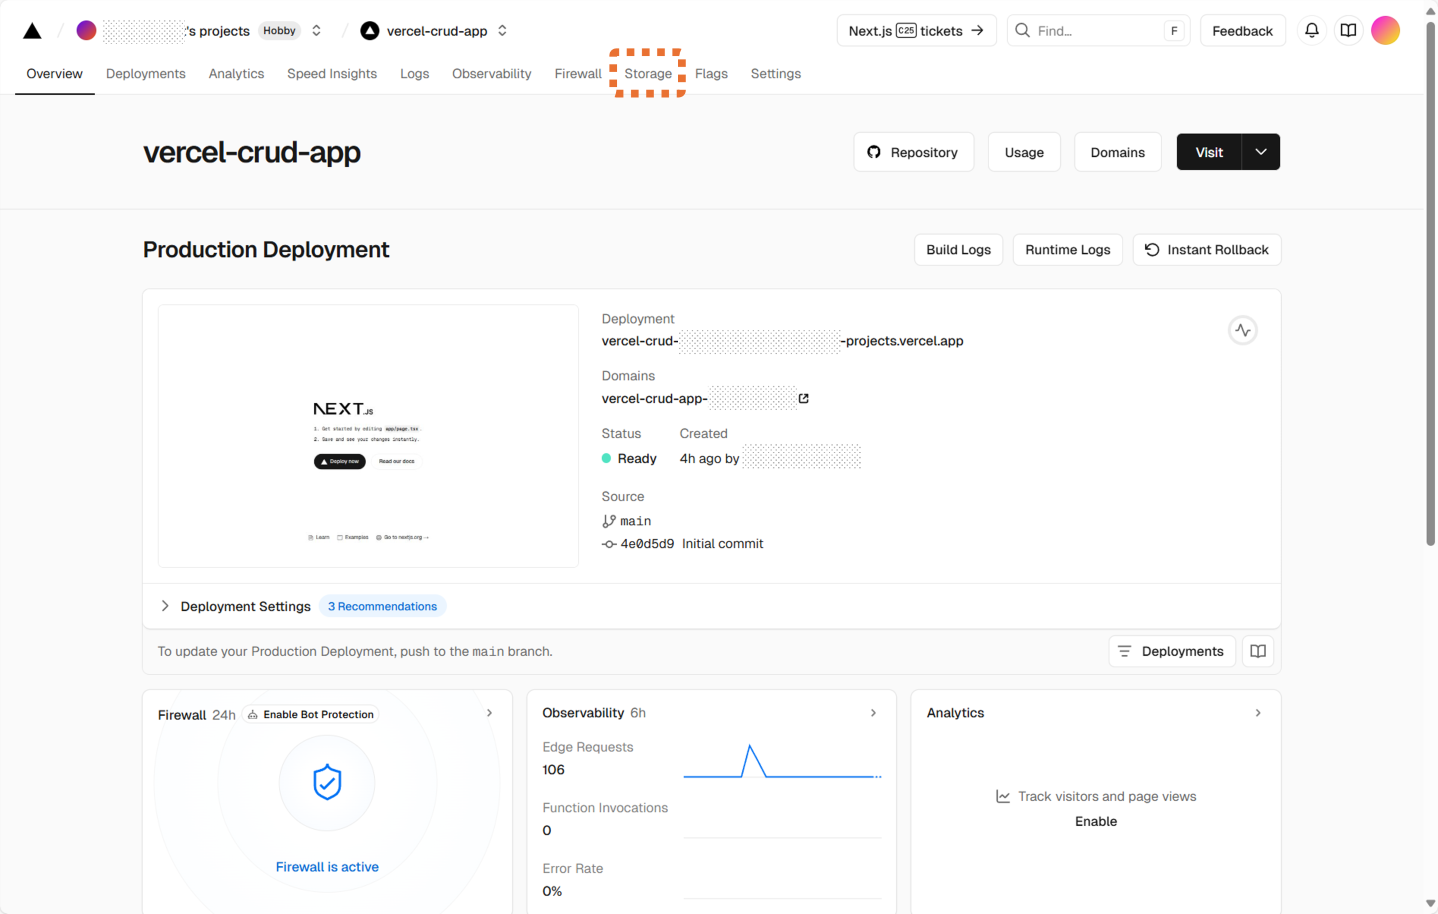
まずは、以下のダッシュボード画面から「Storage」を選択します。
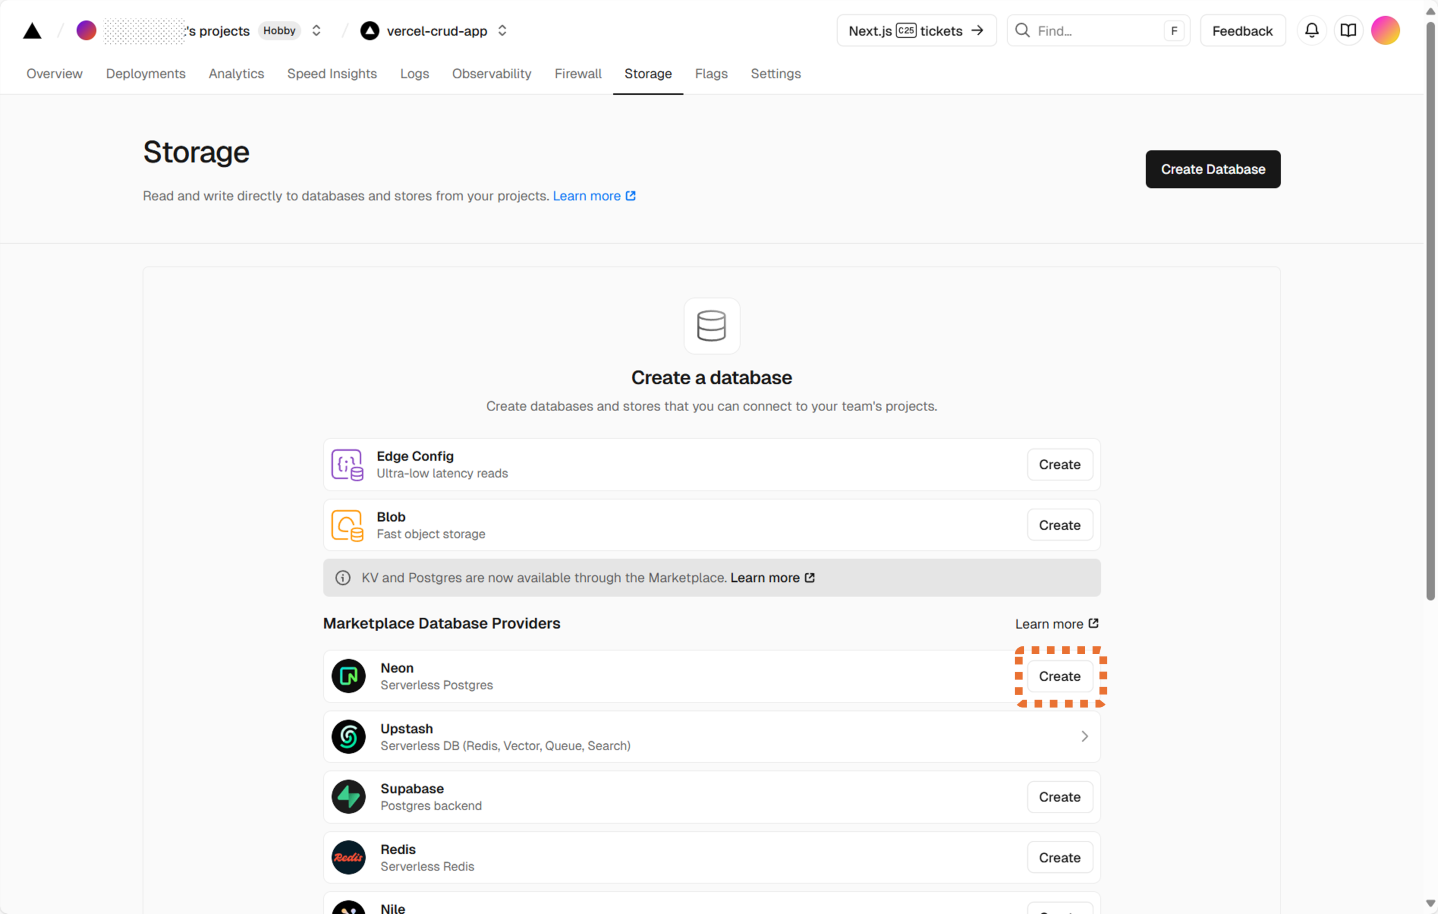
続いて、Storage追加画面から「Neon」の[Create]ボタンを押します。
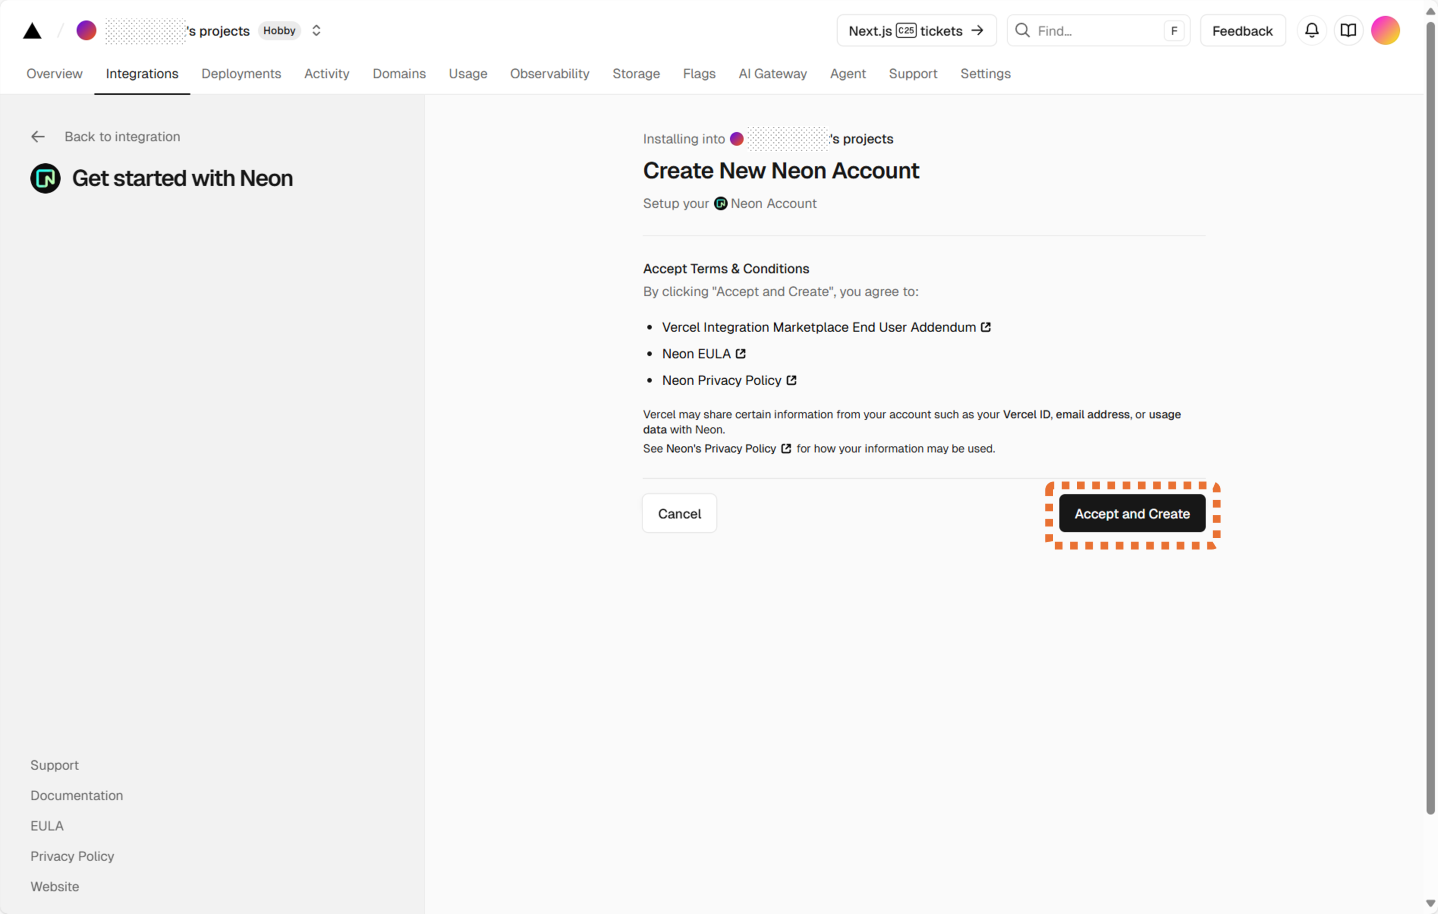
Neonのアカウント作成画面に遷移後、[Accept And Create]ボタンを押します。
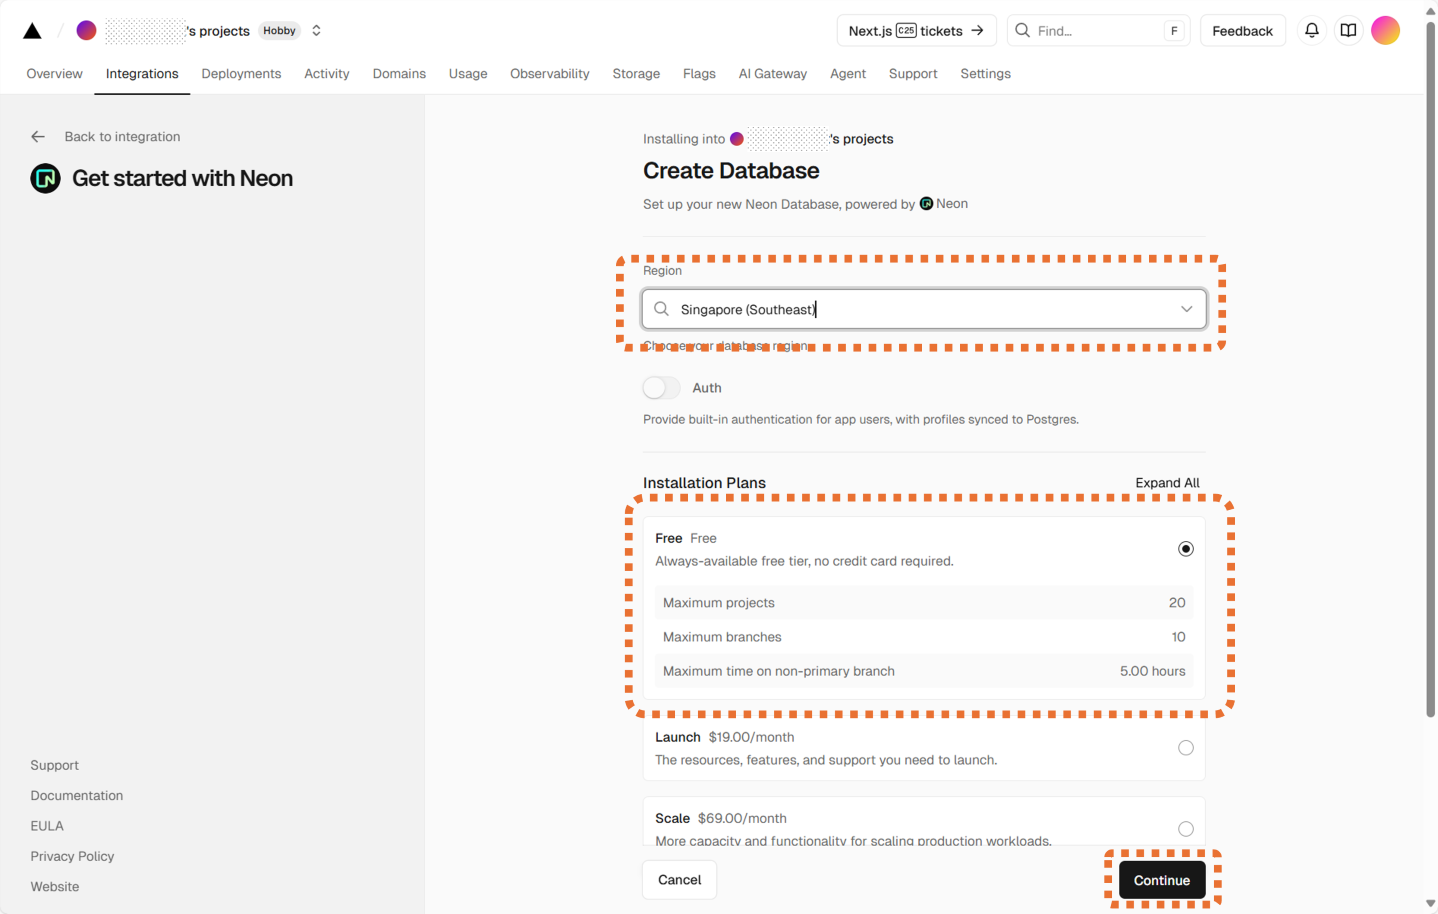
データベースの作成画面では、クラウドリージョンの指定とインストールプランの指定を行います。今回はリージョンに「シンガポール」、プランは「Free」を選択します。
さらに、データベースの作成画面が続き、ここでデータベース名の設定を行い、[Create]ボタンを押すと、データベースの作成が開始されます。
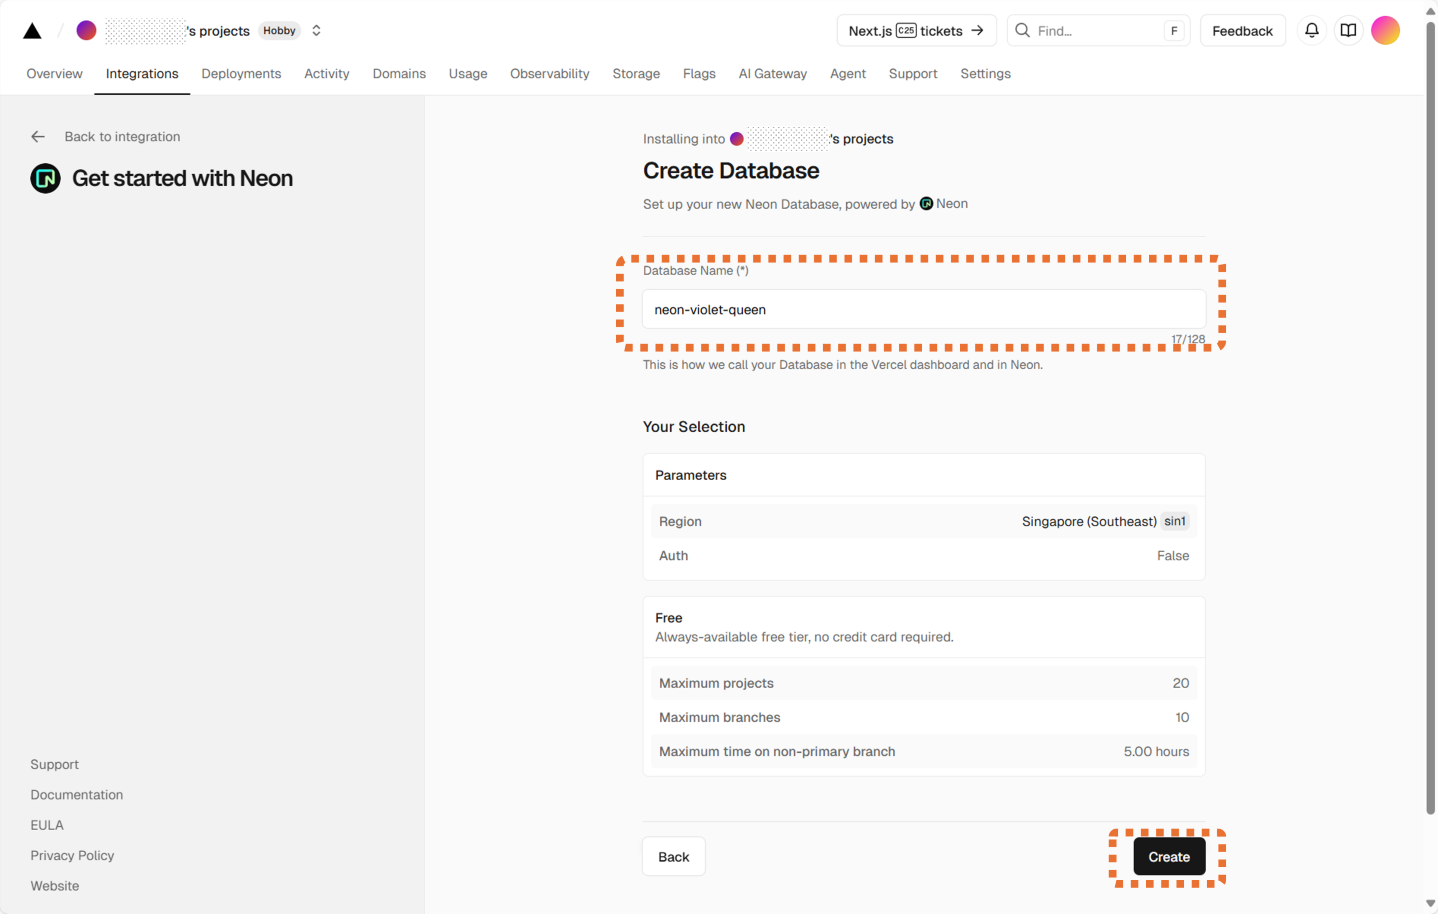
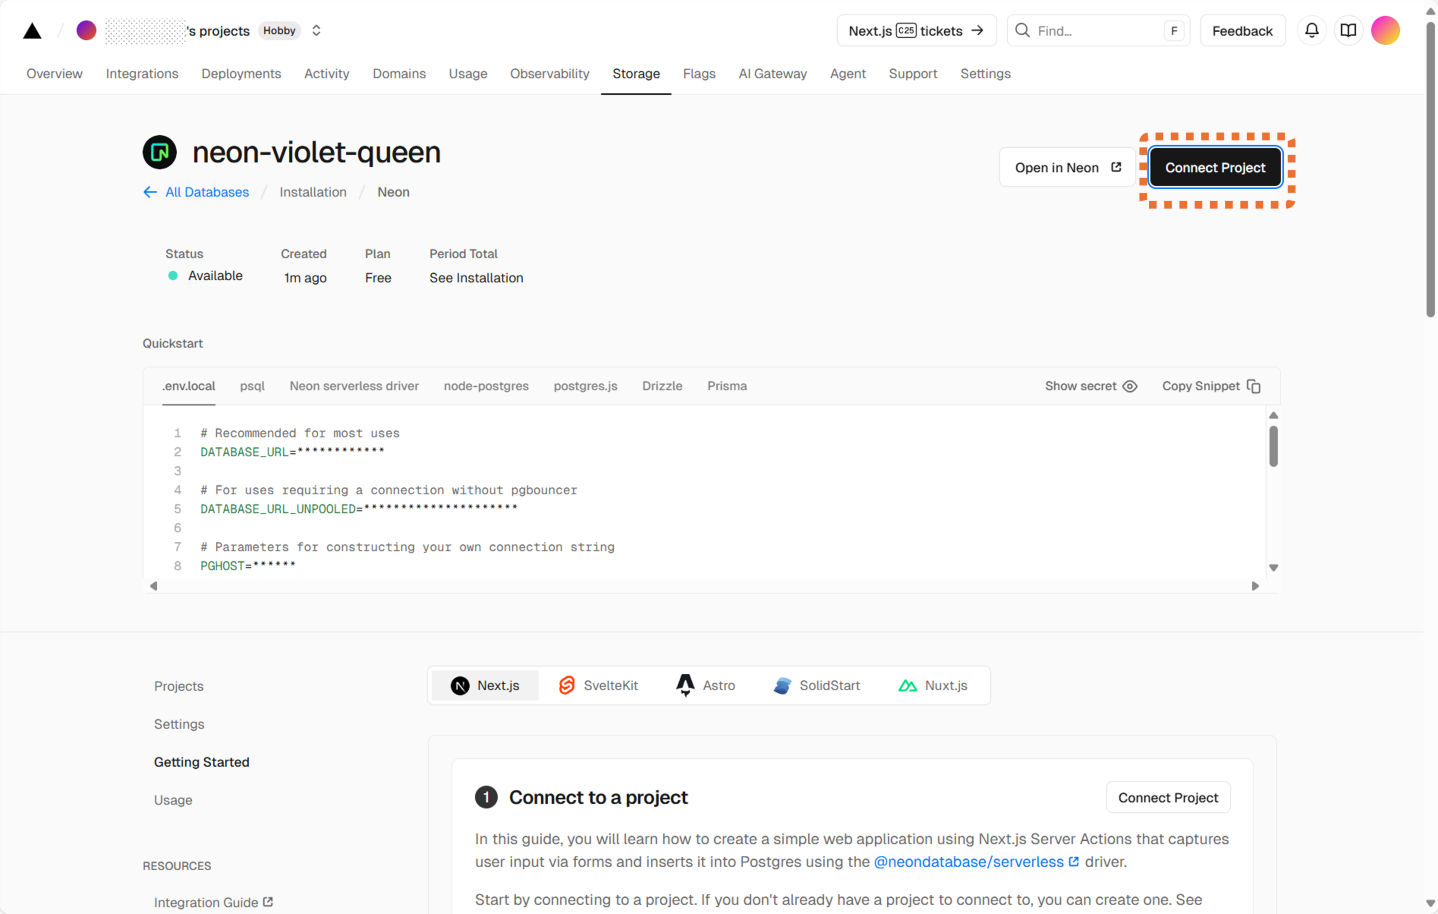
データベースの作成が完了すると、以下のように成功メッセージが表示されますので、[Done]ボタンを押し、画面を終了します。

続いて、データベースをプロジェクトに接続するための画面が表示されます。ここでは次のように[Connect Project]ボタンを押します。
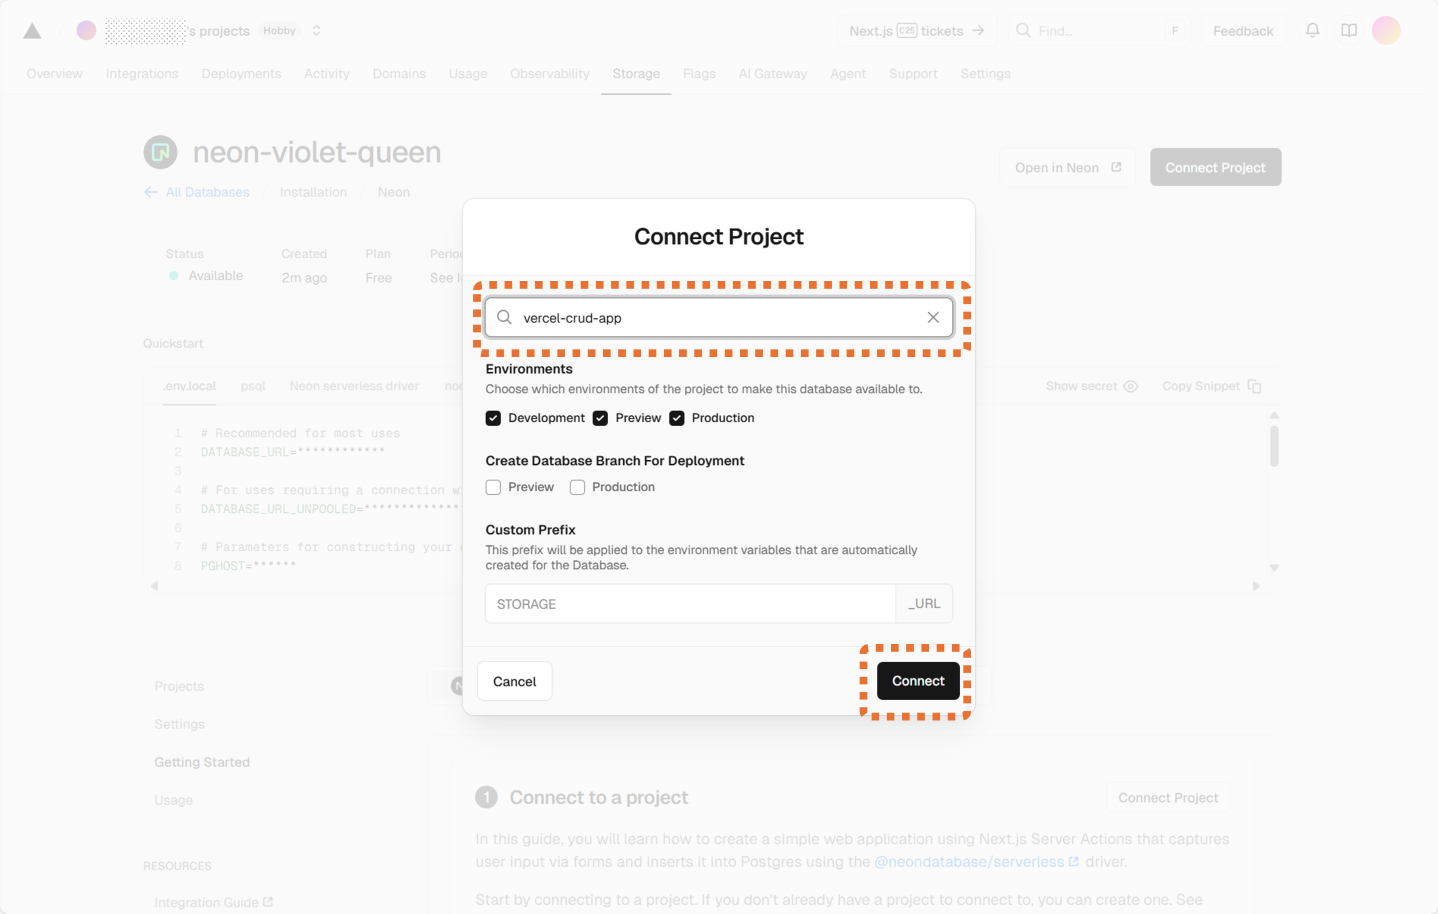
ボタンを押すと、ダイアログが表示されます。ここで今回対象とするリポジトリを指定して、[Connect]ボタンを押し、接続します。
以上で、クラウドデータベース「Neon」の追加は終了です。
GitHubリポジトリをクローン
ここからは、コードの実装を行っていきます。今回は既にGitHubにリポジトリを作成済みですので、こちらをクローンして開発を進めていきます。任意のフォルダでターミナルを起動し、以下のコマンドを実行して、作成済みのリポジトリをクローンしてください
git clone https://[YourAccount]@github.com/[YourAccount]/vercel-crud-app.git今回作成したリポジトリはプライベートリポジトリのため、上記のコマンドでクローンしています。コマンドを実行すると、アカウントの認証方法を選択するダイアログが表示されます。ここではブラウザでの認証を選び、ブラウザ上でリポジトリへのアクセスを許可した後にクローンが開始されます。
利用パッケージのインストール
クローンが完了しましたら、VSCodeでプロジェクトを開きます。また、あわせてターミナルも起動しておきます。

続いて、ローカルで実行するため、以下のパッケージをインストールしていきます。
プロジェクトに設定済みのパッケージ
作成済みのプロジェクトにあらかじめ追加済みのパッケージをインストールします。
npm installNeonデータベース用パッケージ
Neonデータベースを利用するためのパッケージをインストールします。
npm install @neondatabase/serverlessSwaggerUI用パッケージ
今回作成するCRUD WebAPIは動作確認のため、SwaggerUIを利用します。SwaggerUIを利用するためにこちらのパッケージと型定義をインストールします。
npm install swagger-ui-react @types/swagger-ui-reactDrizzle ORM・Drizzle Kitパッケージ
今回のアプリケーションでは、データベースへのスキーマ定義、マイグレーション、データ取得・更新などの処理をORMツール「Drizzle」を使用して行います。Drizzleを利用するため以下のパッケージをインストールします。
npm install drizzle-orm
npm install drizzle-kit
環境変数利用のためのパッケージ
ORMツール「Drizzle」で、データベース情報を環境変数として扱うため、環境変数を利用するためのパッケージ「dotenv」をインストールします。
npm install dotenvVercel CLIを利用して環境変数を取得
続いて、Vercel CLIを利用して、Vercel環境にデプロイ済みのプロジェクトからNeonデータベース情報の環境変数を取得します。
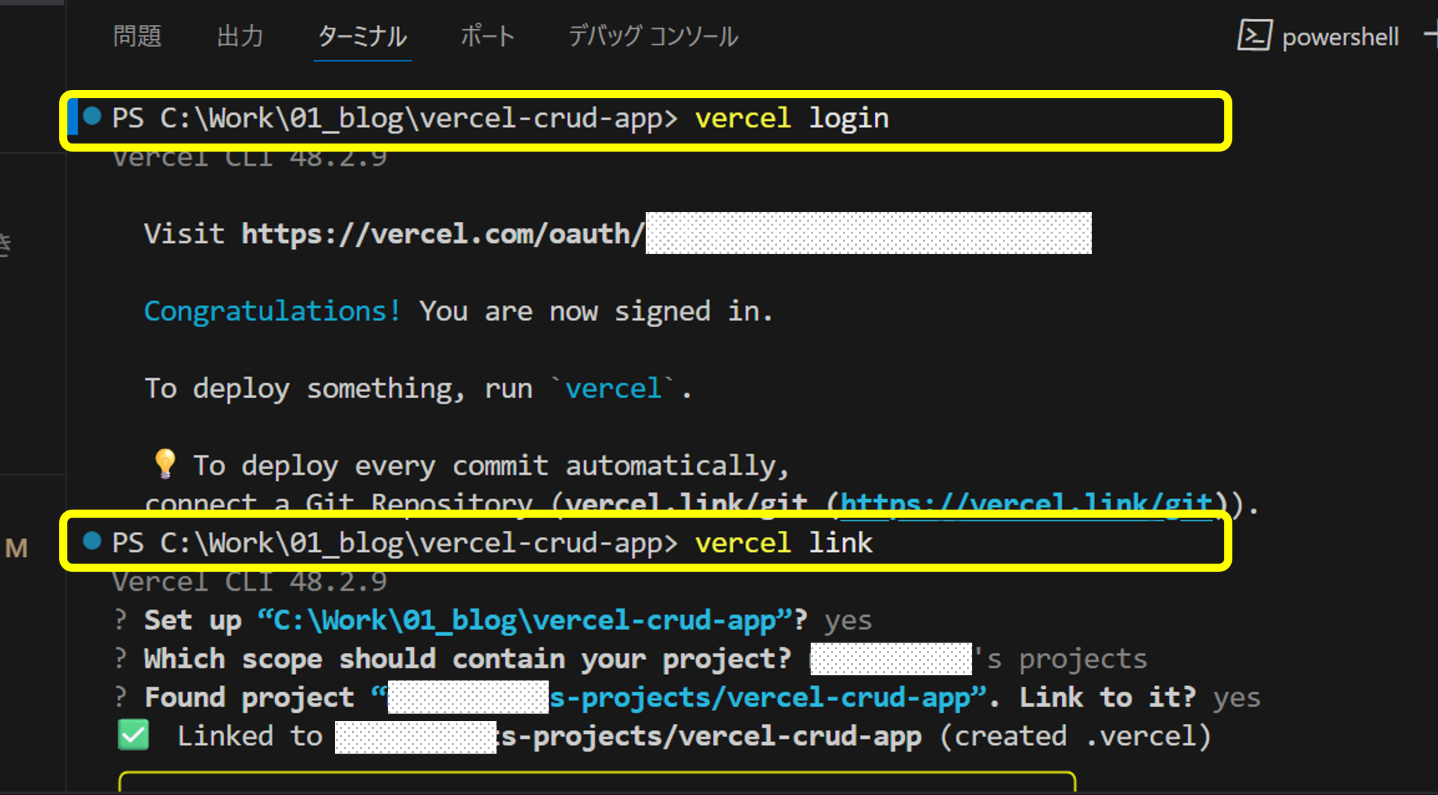
まず、以下のコマンドを実行し、Vercel環境へログインを行います。
vercel login続いて、以下のコマンドでローカルプロジェクトとVercel上のデプロイプロジェクトの接続を行います。
vercel linkコマンドを実行すると、以下のように接続対象のスコープとプロジェクトを選択するようにダイアログが表示されますので、指示に従って対象のスコープとプロジェクトを指定します。
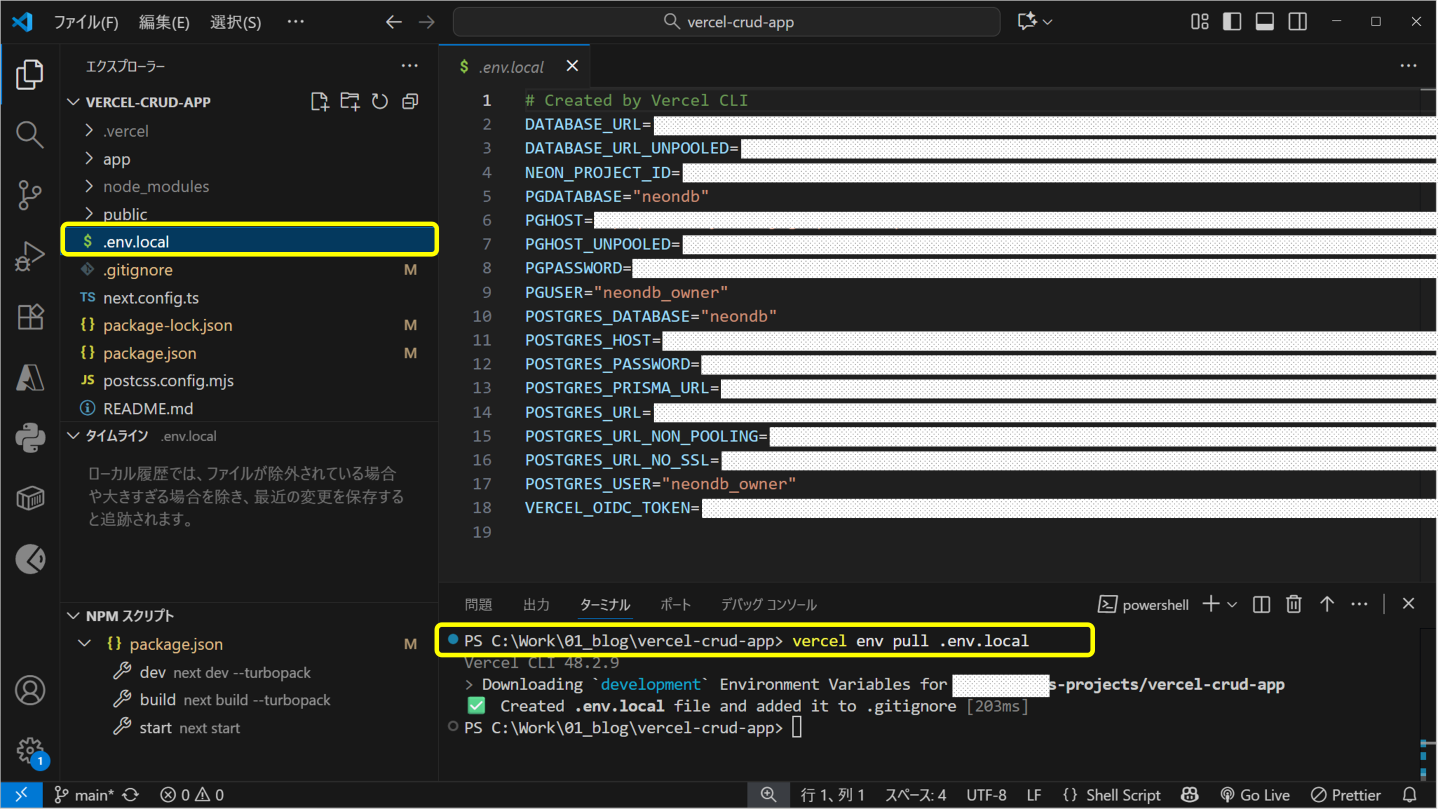
つづいて、以下のコマンドで環境変数を取得します。
vercel env pull .env.localコマンドを実行すると、以下のようにNeonデータベースの接続情報がデプロイ先の環境より取得され、環境変数「.env.local」として保存されます。
Drizzleを利用して、Neonデータベースにテーブルを作成
Neonデータベースの情報を環境変数として設定したので、この情報を利用して、CRUD処理の更新対象となるテーブルの作成を「Drizzle」で行います。
テーブルの定義情報となる、以下のファイルをプロジェクト配下に「lib\db」のフォルダを作成し保存します。
import { pgTable, serial,integer, text, numeric, timestamp, primaryKey, index } from 'drizzle-orm/pg-core';

export const invoices = pgTable(
    'Invoices',
    {
        Id: serial('Id').primaryKey(),
        BillNo: text('BillNo'),
        SlipNo: text('SlipNo'),
        CustomerId: text('CustomerId'),
        CustomerName: text('CustomerName'),
        Products: text('Products'),
        Quantity: integer('Quantity').notNull(),
        UnitPrice: numeric('UnitPrice').notNull(),
        DeliveryDate: timestamp('DeliveryDate'),
        createdAt: timestamp('created_at').defaultNow().notNull(),
    }
);
続いて、プロジェクトフォルダ直下に、以下のDrizzleの設定ファイルを作成します。
import type { Config } from 'drizzle-kit';
import * as dotenv from 'dotenv';
// 環境変数を明示的に読み込み
dotenv.config({ path: '.env.local' });
export default {
schema: './lib/db/schema.ts',
out: './drizzle',
dialect: 'postgresql',
dbCredentials: {
url: process.env.POSTGRES_URL || process.env.DATABASE_URL!,
},
verbose: true,
strict: true,
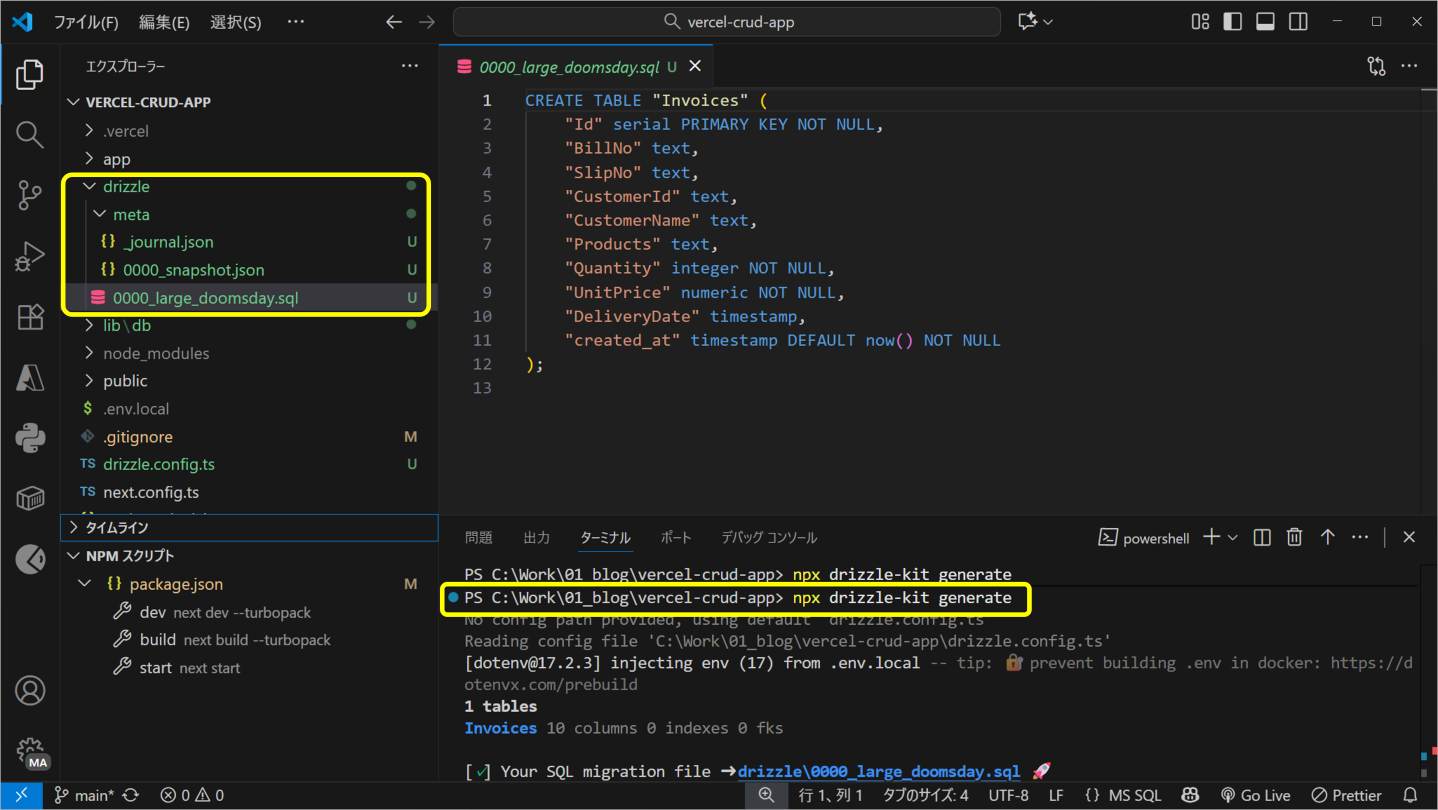
} satisfies Config;ファイルの作成後、ターミナルで以下のコマンドを実行します。
npx drizzle-kit generateコマンドを実行すると、プロジェクトフォルダ直下に、drizzleフォルダが生成され、Neonデータベースにテーブルを作成するためのSQLなどのテーブル作成ツール一式が出力されます。
drizzleフォルダ内に生成された、テーブル作成ツールを利用するため、以下のコマンドを実行します。
npx drizzle-kit push正しくテーブルが作成されたか確認するために、VercelのダッシュボードからNeonの管理画面へ遷移し、テーブル情報を確認します。
Neon上のデータベースを確認してみると、「schema.ts」で定義した、「Invoices」テーブルが作成されているのが分かります。
コード実装
ここまでで、データベースの準備が整いました。つづいてコード実装を行っていきます。
今回は、データベースの更新や取得をORMツールDrizzleを使用して行うため、まずは、Neonデータベースとの接続情報の設定となる「index.ts」を「lib\db」内に追加します。
import { drizzle } from 'drizzle-orm/neon-http';
import { neon } from '@neondatabase/serverless';

export const db = drizzle(neon(process.env.POSTGRES_URL!));
Web APIの実装
続いて、Web APIの本体を実装していきます。今回使用している「Next.js Boilerplate」はNext.jsのApp Router構成です。この構成を用いるため、まず「app」フォルダ配下に「api」フォルダを作成します。次に、CRUD処理の対象となる「invoices」テーブルと同名のフォルダをその中に作成し、そのフォルダ内に「route.ts」ファイルを配置してコードを実装します。
route.tsには、次のコードのように、CRUD処理の「Read(読み取り)処理」を、GET処理で実装。「Create(作成)処理」をPOST処理にて実装します。
import { NextRequest, NextResponse } from 'next/server';
import { db } from '@/lib/db';
import { invoices } from '@/lib/db/schema';
import { eq } from 'drizzle-orm';

// GET /api/invoices - 全てのinvoiceを取得
export async function GET() {
  try {
    const result = await db.select().from(invoices);
    return NextResponse.json(result);
  } catch (error) {
    console.error('Database error:', error);
    return NextResponse.json({ error: 'Failed to fetch invoices' }, { status: 500 });
  }
}

// POST /api/invoices - 新しいinvoiceを作成
export async function POST(request: NextRequest) {
  try {
    const body = await request.json();

    // バリデーション
    if (!body.Quantity || !body.UnitPrice) {
      return NextResponse.json(
        { error: 'Quantity and UnitPrice are required' },
        { status: 400 }
      );
    }

    const newInvoice = await db.insert(invoices).values({
      BillNo: body.BillNo,
      SlipNo: body.SlipNo,
      CustomerId: body.CustomerId,
      CustomerName: body.CustomerName,
      Products: body.Products,
      Quantity: parseInt(body.Quantity),
      UnitPrice: body.UnitPrice,
      DeliveryDate: body.DeliveryDate ? new Date(body.DeliveryDate) : null,
    }).returning();

    return NextResponse.json(newInvoice[0], { status: 201 });
  } catch (error) {
    console.error('Database error:', error);
    return NextResponse.json({ error: 'Failed to create invoice' }, { status: 500 });
  }
}つづいて、「Update(更新)」、「Delete(削除)」、「Read(1件取得)」の処理を実装するため、「invoices」フォルダの中に「[id]※」という名前のフォルダを作成します。さらにその中に、先ほどと同様に「route.ts」ファイルを用意して各処理を実装していきます。
※ 「[id]」フォルダはApp Routerの動的ルーティング機能を利用するためのもので、URLパラメータとして特定のIDを受け取る際に使用します。
import { NextRequest, NextResponse } from 'next/server';
import { db } from '@/lib/db';
import { invoices } from '@/lib/db/schema';
import { eq } from 'drizzle-orm';

// GET /api/invoices/[id] - 特定のinvoiceを取得
export async function GET(
  request: NextRequest,
  { params }: { params: Promise<{ id: string }> }
) {
  try {
    const { id: idParam } = await params;
    const id = parseInt(idParam);

    if (isNaN(id)) {
      return NextResponse.json({ error: 'Invalid ID' }, { status: 400 });
    }

    const result = await db.select().from(invoices).where(eq(invoices.Id, id));

    if (result.length === 0) {
      return NextResponse.json({ error: 'Invoice not found' }, { status: 404 });
    }

    return NextResponse.json(result[0]);
  } catch (error) {
    console.error('Database error:', error);
    return NextResponse.json({ error: 'Failed to fetch invoice' }, { status: 500 });
  }
}

// PUT /api/invoices/[id] - 特定のinvoiceを更新
export async function PUT(
  request: NextRequest,
  { params }: { params: Promise<{ id: string }> }
) {
  try {
    const { id: idParam } = await params;
    const id = parseInt(idParam);

    if (isNaN(id)) {
      return NextResponse.json({ error: 'Invalid ID' }, { status: 400 });
    }

    const body = await request.json();

    // バリデーション
    if (!body.Quantity || !body.UnitPrice) {
      return NextResponse.json(
        { error: 'Quantity and UnitPrice are required' },
        { status: 400 }
      );
    }

    const updatedInvoice = await db.update(invoices)
      .set({
        BillNo: body.BillNo,
        SlipNo: body.SlipNo,
        CustomerId: body.CustomerId,
        CustomerName: body.CustomerName,
        Products: body.Products,
        Quantity: parseInt(body.Quantity),
        UnitPrice: body.UnitPrice,
        DeliveryDate: body.DeliveryDate ? new Date(body.DeliveryDate) : null,
      })
      .where(eq(invoices.Id, id))
      .returning();

    if (updatedInvoice.length === 0) {
      return NextResponse.json({ error: 'Invoice not found' }, { status: 404 });
    }

    return NextResponse.json(updatedInvoice[0]);
  } catch (error) {
    console.error('Database error:', error);
    return NextResponse.json({ error: 'Failed to update invoice' }, { status: 500 });
  }
}

// DELETE /api/invoices/[id] - 特定のinvoiceを削除
export async function DELETE(
  request: NextRequest,
  { params }: { params: Promise<{ id: string }> }
) {
  try {
    const { id: idParam } = await params;
    const id = parseInt(idParam);

    if (isNaN(id)) {
      return NextResponse.json({ error: 'Invalid ID' }, { status: 400 });
    }

    const deletedInvoice = await db.delete(invoices)
      .where(eq(invoices.Id, id))
      .returning();

    if (deletedInvoice.length === 0) {
      return NextResponse.json({ error: 'Invoice not found' }, { status: 404 });
    }

    return NextResponse.json({ message: 'Invoice deleted successfully' });
  } catch (error) {
    console.error('Database error:', error);
    return NextResponse.json({ error: 'Failed to delete invoice' }, { status: 500 });
  }
}
Swagger UIの導入
最後に、Web APIの動作確認のため、Swagger UIを利用できるように、「app\page.tsx」を以下のように書き換えます。
import SwaggerUI from "swagger-ui-react";
import "swagger-ui-react/swagger-ui.css";

export default function Home() {
  return (
    <div className="p-8">
      <h1 className="text-3xl font-bold mb-4">API Documentation</h1>
      <SwaggerUI url="/swagger.json" />
    </div>
  );
}
最後に、APIの仕様を定義した「swagger.json」ファイルを、Next.jsプロジェクトの「public」フォルダに配置します。これにより、アプリケーション内でSwagger UIを使ってAPIドキュメントを表示できるようになります。
「swagger.json」ファイルはこちらからダウンロード、もしくは以下のJSONデータをコピーしてください。
swagger.json
{
"openapi": "3.0.0",
"info": {
"title": "Invoices CRUD API",
"description": "App RouterでのInvoices管理API",
"version": "1.0.0"
},
"servers": [
{
"url": "/"
}
],
"paths": {
"/api/invoices": {
"get": {
"summary": "全てのinvoiceを取得",
"description": "データベースから全てのinvoiceレコードを取得します",
"responses": {
"200": {
"description": "成功",
"content": {
"application/json": {
"schema": {
"type": "array",
"items": {
"$ref": "#/components/schemas/Invoice"
}
}
}
}
},
"500": {
"description": "サーバーエラー",
"content": {
"application/json": {
"schema": {
"$ref": "#/components/schemas/Error"
}
}
}
}
}
},
"post": {
"summary": "新しいinvoiceを作成",
"description": "新しいinvoiceレコードを作成します",
"requestBody": {
"required": true,
"content": {
"application/json": {
"schema": {
"$ref": "#/components/schemas/InvoiceCreate"
}
}
}
},
"responses": {
"201": {
"description": "作成成功",
"content": {
"application/json": {
"schema": {
"$ref": "#/components/schemas/Invoice"
}
}
}
},
"400": {
"description": "リクエストエラー",
"content": {
"application/json": {
"schema": {
"$ref": "#/components/schemas/Error"
}
}
}
},
"500": {
"description": "サーバーエラー",
"content": {
"application/json": {
"schema": {
"$ref": "#/components/schemas/Error"
}
}
}
}
}
}
},
"/api/invoices/{id}": {
"get": {
"summary": "特定のinvoiceを取得",
"description": "IDを指定してinvoiceを取得します",
"parameters": [
{
"name": "id",
"in": "path",
"required": true,
"schema": {
"type": "integer"
},
"description": "Invoice ID"
}
],
"responses": {
"200": {
"description": "成功",
"content": {
"application/json": {
"schema": {
"$ref": "#/components/schemas/Invoice"
}
}
}
},
"400": {
"description": "無効なID",
"content": {
"application/json": {
"schema": {
"$ref": "#/components/schemas/Error"
}
}
}
},
"404": {
"description": "Invoice が見つかりません",
"content": {
"application/json": {
"schema": {
"$ref": "#/components/schemas/Error"
}
}
}
},
"500": {
"description": "サーバーエラー",
"content": {
"application/json": {
"schema": {
"$ref": "#/components/schemas/Error"
}
}
}
}
}
},
"put": {
"summary": "特定のinvoiceを更新",
"description": "IDを指定してinvoiceを更新します",
"parameters": [
{
"name": "id",
"in": "path",
"required": true,
"schema": {
"type": "integer"
},
"description": "Invoice ID"
}
],
"requestBody": {
"required": true,
"content": {
"application/json": {
"schema": {
"$ref": "#/components/schemas/InvoiceUpdate"
}
}
}
},
"responses": {
"200": {
"description": "更新成功",
"content": {
"application/json": {
"schema": {
"$ref": "#/components/schemas/Invoice"
}
}
}
},
"400": {
"description": "リクエストエラー",
"content": {
"application/json": {
"schema": {
"$ref": "#/components/schemas/Error"
}
}
}
},
"404": {
"description": "Invoice が見つかりません",
"content": {
"application/json": {
"schema": {
"$ref": "#/components/schemas/Error"
}
}
}
},
"500": {
"description": "サーバーエラー",
"content": {
"application/json": {
"schema": {
"$ref": "#/components/schemas/Error"
}
}
}
}
}
},
"delete": {
"summary": "特定のinvoiceを削除",
"description": "IDを指定してinvoiceを削除します",
"parameters": [
{
"name": "id",
"in": "path",
"required": true,
"schema": {
"type": "integer"
},
"description": "Invoice ID"
}
],
"responses": {
"200": {
"description": "削除成功",
"content": {
"application/json": {
"schema": {
"type": "object",
"properties": {
"message": {
"type": "string",
"example": "Invoice deleted successfully"
}
}
}
}
}
},
"400": {
"description": "無効なID",
"content": {
"application/json": {
"schema": {
"$ref": "#/components/schemas/Error"
}
}
}
},
"404": {
"description": "Invoice が見つかりません",
"content": {
"application/json": {
"schema": {
"$ref": "#/components/schemas/Error"
}
}
}
},
"500": {
"description": "サーバーエラー",
"content": {
"application/json": {
"schema": {
"$ref": "#/components/schemas/Error"
}
}
}
}
}
}
}
},
"components": {
"schemas": {
"Invoice": {
"type": "object",
"properties": {
"Id": {
"type": "integer",
"description": "Invoice ID(自動生成)"
},
"BillNo": {
"type": "string",
"description": "請求書番号",
"example": "INV-001"
},
"SlipNo": {
"type": "string",
"description": "伝票番号",
"example": "SLP-001"
},
"CustomerId": {
"type": "string",
"description": "顧客ID",
"example": "CUST-001"
},
"CustomerName": {
"type": "string",
"description": "顧客名",
"example": "田中太郎"
},
"Products": {
"type": "string",
"description": "商品名",
"example": "商品A"
},
"Quantity": {
"type": "integer",
"description": "数量",
"example": 10
},
"UnitPrice": {
"type": "string",
"description": "単価",
"example": "1500.00"
},
"DeliveryDate": {
"type": "string",
"format": "date-time",
"description": "納期",
"example": "2025-01-15T00:00:00.000Z"
},
"createdAt": {
"type": "string",
"format": "date-time",
"description": "作成日時",
"example": "2025-01-01T12:00:00.000Z"
}
}
},
"InvoiceCreate": {
"type": "object",
"required": ["Quantity", "UnitPrice"],
"properties": {
"BillNo": {
"type": "string",
"description": "請求書番号",
"example": "INV-001"
},
"SlipNo": {
"type": "string",
"description": "伝票番号",
"example": "SLP-001"
},
"CustomerId": {
"type": "string",
"description": "顧客ID",
"example": "CUST-001"
},
"CustomerName": {
"type": "string",
"description": "顧客名",
"example": "田中太郎"
},
"Products": {
"type": "string",
"description": "商品名",
"example": "商品A"
},
"Quantity": {
"type": "integer",
"description": "数量(必須)",
"example": 10
},
"UnitPrice": {
"type": "string",
"description": "単価(必須)",
"example": "1500.00"
},
"DeliveryDate": {
"type": "string",
"format": "date",
"description": "納期",
"example": "2025-01-15"
}
}
},
"InvoiceUpdate": {
"type": "object",
"required": ["Quantity", "UnitPrice"],
"properties": {
"BillNo": {
"type": "string",
"description": "請求書番号",
"example": "INV-001-UPDATED"
},
"SlipNo": {
"type": "string",
"description": "伝票番号",
"example": "SLP-001"
},
"CustomerId": {
"type": "string",
"description": "顧客ID",
"example": "CUST-001"
},
"CustomerName": {
"type": "string",
"description": "顧客名",
"example": "田中太郎"
},
"Products": {
"type": "string",
"description": "商品名",
"example": "商品A(更新)"
},
"Quantity": {
"type": "integer",
"description": "数量(必須)",
"example": 15
},
"UnitPrice": {
"type": "string",
"description": "単価(必須)",
"example": "1800.00"
},
"DeliveryDate": {
"type": "string",
"format": "date",
"description": "納期",
"example": "2025-01-20"
}
}
},
"Error": {
"type": "object",
"properties": {
"error": {
"type": "string",
"description": "エラーメッセージ"
}
}
}
}
}
}動作確認
すべての実装が完了しましたので、まずは、ビルドを行います。次のコマンドを実行してください。
npm run build正常にビルドが完了後、動作を確認していきます。まず、ローカル環境で実行するため、次のコマンドを実行します。
npm run dev実行すると、ローカル環境でWebアプリケーションが動きます。ブラウザで開いて動作を確認してみましょう。
Swagger UIの画面からPOST処理でレコードを追加し、GET処理でその内容を確認できました。続いて、GitHubリポジトリにプッシュし、Vercel上にデプロイしてクラウド環境での動作を確認しましょう。
クラウド環境でも、ローカル環境と同じようにPOSTやGET処理が正常に動作し、さらにPUTでの更新やDELETEによるレコード削除も問題なく実行できました。
さいごに
今回は、Next.jsの開発元として知られる「Vercel」が提供するクラウド開発プラットフォームを使って、CRUD処理を行うWeb APIを実装してみました。VercelはGitHubリポジトリと連携するだけで自動デプロイが可能で、公式CLIツールを活用すれば、ローカル環境から本番環境までシームレスな開発体験を実現できます。また、Vercelマーケットプレイスから「Neon」などのPostgreSQLデータベースも簡単に統合できるため、業務アプリケーションの構築にも適した選択肢となるでしょう。
クラウドサービス上で業務アプリケーションを作ってみたい方は、ぜひ本記事を参考に、一度試してみてください。
メシウスでは業務アプリケーション開発の工数削減に役立つ高機能なJavaScriptライブラリを提供しています。

無償のトライアル版や、ブラウザ上で手軽に試せるデモアプリケーションも公開しているので、こちらも是非ご覧ください。